GitLab
GitLab is a web-based “dev ops” software system that provides Git server based hosting, bug tracking, CICD and more for software projects. It is a strong competitor to GitHub, especially for commercial uses.
Container Registries
Each repo can have it’s own container registry. You can use this to store Docker images relating to the project.
CI_REGISTRY_IMAGE is provided and is the base path for the container registry.
You can log into the repo’s container registry inside a pipeline with the command:
echo $CI_REGISTRY_PASSWORD | docker login -u $CI_REGISTRY_USER $CI_REGISTRY --password-stdinThen you be able to push a built image:
docker push "$CI_REGISTRY_IMAGE"You can download images from the GitLab container registry to your local machine by first logging in:
docker login registry.gitlab.comYou will be prompted to enter your username and password. If you have 2FA enabled, you will have to substitute your password with a personal access token.
You can then download and run an image with:
docker run -it registry.gitlab.com/<org_name>/<project_path> bashGitLab CI Files
Includes
You can include files in your .gitlab-ci.yml file with the include keyword. This is useful for sharing common configuration between multiple projects.
include: - project: 'my-group/my-project' file: '/path/to/file.yml'You can also use the ref to specify a branch, tag or commit SHA when including a file. This is good for “version control” of your include dependencies.
include: - project: 'my-group/my-project' ref: 'main' # Branch name file: '/path/to/file.yml' - project: 'my-group/my-project' ref: 'v1.0.0' # Tag name file: '/path/to/file.yml' - project: 'my-group/my-project' ref: 'b6901dcb0918db67a81b190d24fa67f0b5f99fdb' # Commit SHA file: '/path/to/file.yml'Conditionally Running Jobs
Sometimes you will only want to run a job under certain conditions. You can do this by using the rules keyword.
Regex can be used with the rules keyword by using =~.
my_job: rules: - if: $CI_COMMIT_TAG =~ /^docker-image-v.*$/ script: - echo "This job will only run for commits that are tagged with docker-image-v1, docker-image-v2 etc."Running Jobs In Docker Containers
You can tell GitLab to run the job inside a Docker container by using the image keyword.
my_job: image: name: my-docker-image services: - docker:dind script: - echo "This job will run in a Docker container with the image my-docker-image"The default Docker user will be used by default. If you want to override this, you can change the structure of the image key a bit and add a docker/user key as shown below.
my_job: image: name: my-docker-image docker: user: root script: - echo "This job will run in a Docker container with the image my-docker-image and as user root"Running Pipelines Locally
GitLab does not have official support for running pipelines locally, but there is a popular third-party tool called gitlab-ci-local (a.k.a. GCL) which allows you to do this.
Installation
To install gitlab-ci-local on Debian-based UNIX distributions (e.g. Ubuntu), you can run the following command2:
sudo wget -O /etc/apt/sources.list.d/gitlab-ci-local.sources https://gitlab-ci-local-ppa.firecow.dk/gitlab-ci-local.sourcessudo apt-get updatesudo apt-get install gitlab-ci-localRunning a Job
Clone the repository that contains the pipeline (i.e. has a .gitlab-ci.yml file) and run the following command:
gitlab-ci-local <job_name>This will run the job locally and output the results to the console. You may need authentication for the job to run successfully, see the section below for details.
However, this will not run the job’s dependencies, which might be what you were expecting. To run the job and all of it’s dependencies, add the --needs flag:
gitlab-ci-local <job_name> --needsgitlab-ci-local will cache the “dot env” of dependencies, so you don’t need to keep using --needs during testing if the dependencies haven’t changed. By default, gitlab-ci-local stores the cache of the artifacts at .gitlab-ci-local/artifacts/<job_name>. This is quite a convenient place to check if you need to debug a job.
Manual Jobs
You can trigger a manual job to run during the execution of another job with --manual <job_name>. For example:
gitlab-ci-local build_firmware --manual my_manual_jobGitLab Variables
When a pipeline is running on GitLab’s servers, a number of pre-defined environment variables get provided that the pipeline scripts can use. When running them locally, gitlab-ci-local will do it’s best to provide sensible defaults for these variables. However those dealing with authentication and other URLs will not work, as gitlab-ci-local cannot work out what these should be. In these cases, you can create a file called .gitlab-ci-local-variables.yml in the root directory of the repository and manually provide the variables.
---MY_VAR_1: <value_1>MY_VAR_2: <value_2>CI_REGISTRY defaults to https://registry-1.docker.io/v2/.
CI_PROJECT_DIR will be set to /gcl-builds, which should be where the root directory of the repository resides.
If .gitlab-ci-local-variables.yml ends up containing sensitive information like personal access tokens, do not commit this file to the repository! Make sure to add it to your .gitignore file.
Variables In Variables
It doesn’t look like gitlab-ci-local supports defining variables using other variables. For example, this is works when running on GitLab:
variables: MY_PATH: $MY_PATH /another/pathBut when this same job is run locally with gitlab-ci-local, the variable does not get updated, as just seems to set to what ever value it was as if this expression was never run.
Authentication
Normal pipelines that are run on GitLab’s servers get provided with a CI_JOB_TOKEN which can be used to authenticate when pulling submodules that are other private GitLab repositories, or when pulling/pushing to the GitLab container registry. If you want access when running locally, first create a personal access token through the GitLab web interface (with the necessary permissions). Then add it to your .gitlab-ci-local-variables.yml file as shown:
---CI_JOB_TOKEN: <your_personal_access_token>Image Registry
If you access the repos image registry (or another GitLab repo’s image registry) you will need to set both CI_JOB_TOKEN and CI_REGISTRY_IMAGE in .gitlab-ci-local-variables.yml.
---CI_JOB_TOKEN: <your_personal_access_token>CI_REGISTRY_IMAGE: <your_registry_image>CI_REGISTRY_IMAGE should be in the format registry.gitlab.com/<namespace>/<project>, e.g. registry.gitlab.com/my-group/my-project. You can copy the registry URL from the GitLab web interface by going to the image registry and copying any one image URL to the clipboard, and then removing the :tag from the end of the URL.
Watch Out For Untracked Files
GCL will not sync local files that are not tracked by Git. So if you are playing around and add a completely new file, you might run into a “file not found” error when running your pipeline. To fix this, all you need to do is run git add ... to stage the file in git (it doesn’t need to be committed)2.
The file does not need to be continuously re-added to the git staging area when changes are made, as long as the file has been staged (or committed) at least once.
Caching
gitlab-ci-local does not support the GitLab caching feature. gitlab-ci.yml statements like:
cache: paths: - path/to/cachewill not be cached when running the job locally with gitlab-ci-local, and so expect things to run slower in this situation.
GitLab Runners
GitLab runners are the machines/applications that run your CI pipelines. GitLab runners can be configured and run on GitLab’s servers (GitLab-hosted runners) or self-hosted on your own servers.
You use tags (GitLab tags, not Git tags) to specify what runner should run a job. GitLab-hosted runners will by default (an untagged job) use the small Linux x86-64 runner3.
GitLab-hosted runners support Linux, Windows and MacOS. As of November 2024, the Windows and MacOS runners are in beta3.
To use a Windows runner, you would use the saas-windows-medium-amd64 tag as follows:
my_windows_job: tags: - saas-windows-medium-amd64Cleaning Up The Repo
You might find that you have committed too many large files to a repository and want to get rid of them. Just deleting them from the repository and committing will not work, as Git will still keep a copy of the file in the repository history.
To permanently remove files from a repositories history, GitLab provides a feature called Repository maintenance which can be used alongside the git-filter-repo tool.4
You may get the error shown below if you don’t run the git-filter-repo commands from a fresh clone of the repository.
$ python .\git-filter-repo --path .\releases\ --invert-pathsAborting: Refusing to destructively overwrite repo history sincethis does not look like a fresh clone. (expected freshly packed repo)Please operate on a fresh clone instead. If you want to proceedanyway, use --force.You should be able to fix this by performing a fresh clone of the repo. If this will take a long time from the internet and you have a local copy already, you can use:
git clone ./existing-path-to-repo/ ./new-clone-path/ --no-localThe --no-local flag is needed so that the .git directory is in the same state as if cloned from the internet.
Now you need to run git-filter-repo to remove the large files as needed. For example, let’s pretend someone was lazy and rather than releasing build artifacts correctly (e.g. releases section of cloud Git hosting or file storage), decided to commit them to the repository. This folder got rather large and now you want to remove it (and all the Git history associated with it). To do this, you can run:
python .\git-filter-repo --path releases --invert-pathsgit-filter-repo creates a commit map at .git/filter-repo/commit-map whenever it is run. This file will look something like this:
old new00df40253a7d17435864fe5a005f6f0469ef13b2 77966bbe6fc535c8a2b30d0d880a72c583ba0d5500e98efe0aa8a60c4b69b06918b882718f747bb9 73890befb43ab56b81a27f6e8c874f326c4cc67b044801170462ad46b077871557a9101964466edc 044801170462ad46b077871557a9101964466edc0527cd140f2e071093581b61bff8faa768c17ae2 ee4ed5aead68b4c149e73481f8a05b38ab777ee6Make sure to back this up somewhere as we will be uploading it to GitLab once we have pushed the repo changes.
Next, we need to push the changes that git-filter-repo made locally to the remote repository. You might need to re-add origin as git-filter-repo can remove it for safety reasons. If so, run:
git remote add origin https://gitlab.com/my-group/my-project.gitThen push the changes to the remote repository:
git push origin --force 'refs/heads/*'git push origin --force 'refs/tags/*'git push origin --force 'refs/replace/*'Then, you can run the GitLab cleanup process. The GitLab cleanup process does the following:4
- Removes any internal Git references to old commits.
- Runs
git gc --prune=30.minutes.agoagainst the repository to remove unreferenced objects. - Unlinks any unused LFS objects attached to your project, freeing up storage space.
- Recalculates the size of your repository on disk.
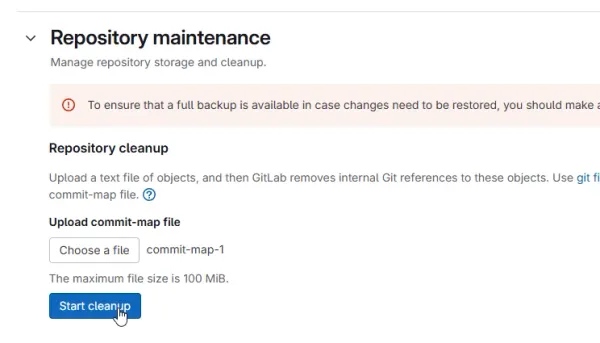
Go to Settings > Repository > Repository maintenance in the GitLab web interface. Upload the commit-map file and then click “Start cleanup” as shown in This is a placeholder for the reference: gitlab-ui-repo-maintenance-start-cleanup.

Footnotes
-
GitLab (2015, Jul 3). Our new logo [blog post]. Retrieved 2024-10-14, from https://about.gitlab.com/blog/2015/07/03/our-new-logo/. ↩
-
GitHub. firecow/gitlab-ci-local [repo README]. Retrieved 2024-10-02, from https://github.com/firecow/gitlab-ci-local. ↩ ↩2
-
GitLab. GitLab-hosted runners [docs]. Retrieved 2024-11-11, from https://docs.gitlab.com/ee/ci/runners/index.html. ↩ ↩2
-
GitLab. Repository size [documentation]. Retrieved 2025-01-15, from https://docs.gitlab.com/ee/user/project/repository/repository_size.html. ↩ ↩2


