Running Rust on Microcontrollers

Rust is a fairly new programming language (born in 20101), but is showing great potential for developing embedded firmware. It is first and foremost designed to be a systems programming language, which makes it particularly suitable for microcontrollers. Its aim to improve on some of C/C++‘s biggest shortcomings by implementing a robust ownership model (which removes entire classes of errors from occurring) is also very much applicable to firmware.
As of 2022, the C and C++ programming languages still remain the de-facto standard for embedded firmware. However, Rust’s role in firmware is looking bright. Rather than firmware being an afterthought, it feels as if Rust has first-tier embedded support. There is an official Rust Embedded Devices Working Group and The Embedded Rust Book.

This page aims to be an exploration into running Rust on microcontrollers (what you would consider to be low-level embedded firmware, and not running on a hosted environment such as Linux), covering things such as:
- Language Features
- Architecture Support
- MCU Family Support
- IDEs, Programming and the Debugging Experience
- RTOSes
- Rust Disadvantages
Lets jump straight in!
Rust Language Features
Let’s explore some of Rust’s language features and how they are applicable to embedded firmware.
Ownership
One of the core differences between Rust and C/C++ is that Rust implements a robust ownership model into the programming language. This prevents many memory-related bugs that can occur in C/C++ (think memory leaks, dangling pointers, etc.). These benefits that Rust provides are just as applicable to embedded firmware as they are to software.
For anything but basic primitive data types that live on the stack (primitive data types include u32, bool, f64, etc.), Rust will move data when the assignment operator is used, rather than perform a copy. The following example shows how the compiler enforces that only one variable may own a piece of data at once.
let s1 = String::from("hello"); // Create complex data type which involves the use of the heaplet s2 = s1; // This "moves" the data from s1 to s2 (s2 owns the data), s1 is no longer valid
println!("{}", s1); // The compiler will throw an error here, s1 is no longer valid!
If you did actually want to perform a copy, s2 = s1.clone() is the correct way to do it. These ownership rules also apply to passing variables into functions. A comprehensive walk-through can be found in The Rust Programming Language - Ch. 04 - Understanding Ownership.
Rather than transfer ownership, Rust also lets you “borrow” data via references. You are only allowed to:
- Borrow as many immutable references and no mutable references, OR
- Borrow one mutable reference and no immutable references.
Peripheral Access
A big part of writing firmware is interacting with peripherals (GPIO, UART, USB, DMA, etc.). Most peripherals are memory mapped — i.e. you read/write to “magic” memory addresses to control the peripheral. The standard way of accessing peripherals in Rust is to use a Peripheral Access Crate or PAC. More likely than not, there will already be a PAC for the particular microcontroller you are using.
For example, the cortex_m crate provides access to the peripherals that are shared across all Cortex-M devices (e.g. the NVIC interrupts, SysTick). You can “claim” the peripherals by calling take().unwrap():
use cortex_m::interrupt;use cortex_m::peripheral::Peripherals;use stm32f30x::Interrupt;
let cp = cortex_m::Peripherals::take().unwrap(); // This will work only once!
// Let's enable an interruptlet mut nvic = cp.NVIC;nvic.enable(Interrupt::TIM2);
Note that a singleton pattern is employed — you can only call take() once and have it return Some<T>. The next time it will return None and then calling unwrap() will cause a panic. You would typically take() at the start of your high-level main() or App class.
The other peripherals that aren’t part of the Cortex-M architecture (such as UARTs, timers, PWMs, etc.) are normally found in a different crate for your particular microcontroller. For example, if I was using a STM32F30x microcontroller, I would add the appropriate PAC crate and then be able to write:
let mut peripherals = stm32f30x::Peripherals::take().unwrap(); // Again, will work only once!peripherals.GPIOA.odr.write(|w| w.bits(1));Another thing Rust can do is provide compile-time checks that hardware has been configured properly based on how the code uses it. The Embedded Rust Book has this to say:
When applied to embedded programs these static checks can be used, for example, to enforce that configuration of I/O interfaces is done properly. For instance, one can design an API where it is only possible to initialize a serial interface by first configuring the pins that will be used by the interface.
One can also statically check that operations, like setting a pin low, can only be performed on correctly configured peripherals. For example, trying to change the output state of a pin configured in floating input mode would raise a compile error. — The Embedded Rust Book - Static Guarantees3
Lets explain this with an example. We’ll follow the Embedded Rust Book guide as use a GPIO pin (a very basic form of MCU peripheral) as an example, with into_...() named functions to convert between the different types.
let pin = get_gpio();
// We can't do much with a disabled GPIO pin, let's convert it// into an input pinlet input_pin = pin.into_enabled_input_pin();
// We can now read the state of the pinlet pin_state = input_pin.is_set();
input_pin.set(); // We can't set an input, this produces a compile time error!
// We've changed our minds, we now want it to be an output! This// is easy to do, again it "consumes" the input_pin objectlet output_pin = input_pin.into_enabled_output_pin();
// Set output pin highoutput_pin.set(true);
svd2rust is a command-line tool that ingests SVD files (a.k.a. CMSIS-SVD — they are files that define register names, addresses and uses, you can think of them as a computer-readable version of the microcontrollers datasheet) and creates Rust PAC crates that expose the peripherals in a type-safe Rust API4. It currently supports the Cortex-M, MSP430, RISCV and Xtensa LX6 microcontrollers4.
Traits
Rust supports ad-hoc polymorphism via its concept of traits. As a really basic example, both float and integer types implement the Add trait because they can be added. The embedded-hal project leverages traits by defining traits for things such as GPIO pins (input and output), UART, I2C, SPI, ADC, etc. These generic interfaces can be used by the application code, and underneath the vendor specific drivers implement the correct functionality for each particular microcontroller. This is very similar to how virtual interface classes in C++ are used to create a portable HAL. More on this in the cargo and Package Structure section.
For example, the serial::Read and Write traits are defined as5:
pub trait Read<Word> {    type Error;    fn read(&mut self) -> Result<Word, Self::Error>;}
pub trait Write<Word> {    type Error;    fn write(&mut self, word: Word) -> Result<(), Self::Error>;    fn flush(&mut self) -> Result<(), Self::Error>;}
Safer Array Use
In Rust, if you index into an array, it is automatically bounds checked. This can prevent a ton of subtle “undefined behaviour bugs” that you get when you try the same thing in C/C++ (and security concerns!). Of course, bounds checking does incur a small amount of runtime overhead (which is likely to be negligible in 99% of use cases).
fn main() { let arr: [i8; 3] = [1, 2, 3]; // Rust will throw a compiler error on the next line, since it can work out a compile time that this // index is out of bounds let _ = arr[3];}If an array reference is passed into a function, then Rust can’t work out at compile time if the indexing is out-of-bounds. In this case it will do bounds checking at runtime and panic:
fn main() {    let arr: [i8; 3] = [1, 2, 3];    out_of_bounds(&arr);}
fn out_of_bounds(arr: &[i8]) {    println!("{:?}", arr);    let _ = arr[3]; // Rust will do a runtime bounds check and panic here}
If the runtime overhead of bounds checking is a concern for your application, you can get rid of this overhead however by using an array iterator instead of indexing (or using get_unchecked()). This is in fact the recommended way of accessing an array unless you really have to use an index (some situations do still need to randomly access the array).
You might have also noticed that arrays don’t decay to pointers (i.e. loses the dimension information — sizeof now gives you the size of the pointer) as easily as they do in C/C++ (especially when passing into functions). In Rust you can pass in references to any-sized arrays into a function while still being able to find it’s length by calling .len(), something you cannot do in C/C++ (you can pass arrays in C/C++ without the variable decaying to a pointer, but you have to hardcode the function to a specific array size, this is because the size information is not saved in the array memory layout).
fn no_decaying_to_pointer(arr: &[i8]) { // Yay! Arrays don't decay to pointers, I still // have length information! println!("{:?}", arr.len());}Concurrency
Concurrency is something you have to concern yourself about in embedded firmware when it comes to interrupts and multiple threads/cores (e.g. running a RTOS). One of the first times you’ll encounter concurrency concerns is when updating variables from within an interrupt. In C/C++, the use of volatile and critical sections is generally the way the problem is solved. When using multiple threads, RTOS primitives such as mutexes/queues/etc. are used to prevent data corruption.
In Rust, you can also use critical sections to prevent data races in interrupts.
The nb crate (it’s docs are here) takes an interesting approach to solving the problem of deciding whether or not an API call should block or not (or how to block!). It allows people writing APIs to write the core functionality, and then let the caller decide on the blocking behaviour. The API has return a type of nb::Result<T, Error> where T is the standard return type for the function. If the caller does want to block waiting for the function to complete, they can wrap the call in the block! macro. This nb crate has some potential to be used with HAL peripherals such as UART read/write() functions (which typically block until data is sent/received).
Error Handling
In most languages, there are two common ways of handling errors. Either:
- Return an error code
- Throw an exception
In embedded firmware, sometimes exceptions are banned from use due to either the unpredictable time of execution (although contrary to popular belief, exceptions can actually improve runtime in the non-exceptional case) or the fact it’s another complexity that every developer has to be aware of. Returning error codes is the de-facto error handling method for many embedded projects, but you have to remember to check for errors and propagate them up the call stack appropriately. Rust can vastly improve the error handling experience due to it’s Result type.
For example, lets invent a pretend uart_write_bytes() function which writes an array of bytes over a UART. Our UART has some peculiar behaviour and can’t write more than 10 bytes at a time. If the user provides more than 10 bytes, we want to return an error condition. If they provide 10 bytes or less, we want to write them out the UART and then return the number of bytes written. So let’s write this function:
fn uart_write_bytes(bytes: &[u8]) -> Result<usize, &'static str> {    if bytes.len() > 10 {        return Err("Can only write 10 bytes or less!");    }    // Write bytes here    // ....
    // Writing completed successfully, return number of bytes written    Ok(bytes.len())}
Rust will produce warnings if we try and use this function and forget to check the returned result, e.g. if we write:
let data = [32, 38, 24, 34];uart_write_bytes(&data); // Oh oh, we've forgotten to check for an errorRust will spit out:
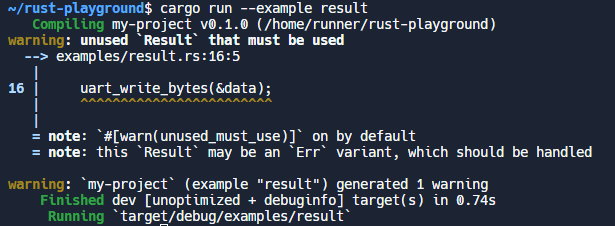
How to deal with this returned Result object properly? One way is to call unwrap(). unwrap() returns the value if it didn’t error, and panics if there was an error. You would use unwrap() in cases in where the error is non-recoverable, and in embedded situations you get to define what panic does (think of it to the same as a C/C++ assert).
// Using unwrap() we can unpack the returned `Result` type, we either get the number of bytes if write was successful or panic if `Err` was returnedlet num_bytes = uart_write_bytes(&data).unwrap();There is also expect() which like .unwrap() except it also allows you to provide a custom error message:
let num_bytes = uart_write_bytes(&data).expect("Writing bytes to UART failed.");If the error is recoverable and/or expected, you can use a match statement on the Result object to handle the error condition appropriately.
fn main() {    // We used the ? operator in perform_comms(), which propagates the error    // back to here.    perform_comms().unwrap();}
fn perform_comms() -> Result<(), &'static str> {    let data = [32, 38, 24, 34];    let num_bytes = match uart_write_bytes(&data) {        Ok(num_bytes) => num_bytes,        Err(e) => // Handle error condition here -- maybe retry?    };
    return Ok(());}
fn uart_write_bytes(bytes: &[u8]) -> Result<usize, &'static str> {    if bytes.len() > 10 {        return Err("Can only write 10 bytes or less!");    }    // Write bytes here    // ....
    // Writing completed successfully, return number of bytes written    Ok(bytes.len())}
Another option is to use the question mark operator ? — this is shorthand doing a match statement and returning early if there is an Err, essentially propagating the error condition up the stack. This design style is common practise (it’s very similar to how an exception works) and so it makes sense that Rust has introduced a shorthand for it. The following example shows this, with an extra function added to show the error propagation.
let num_bytes = uart_write_bytes(&data)?;which is equivalent to:
let num_bytes = match uart_write_bytes(&data) { Ok(num_bytes) => num_bytes, Err(e) => return Err(e),};no_std
One of the reasons Rust feels like it has first-tier embedded support is the standardized #![no_std] crate-level attribute. This attribute indicates the crate will link to the core-crate instead of the std-crate. The core-crate is a subset of the std-crate which does not contain any APIs which assume/require the use of an operating system. This no_std is a perfect fit for bare-metal or custom RTOS environments. It provides the basic features such as primitives (floats, strings, slices, etc.) and generic processor features such as atomic operations and SIMD instructions. However, it does not provide any API to create things such as threads, file-system access, or the ability to make system calls.
Another thing you don’t get with no_std is the initialization which sets up stack overflow protection and spawns a thread to call main(). So in embedded no_std development you define which function you want as your “main”.
no_std also means that by default, you don’t get any way to dynamically allocate memory on the heap. This might seem strange at first, because in embedded C development you typically have malloc()/free() and friends, and in C++ you have new/delete. No dynamic memory allocations means that you can’t use any objects that rely on it (dynamic arrays or strings), and it Rust these are called collections (Vec, Box, BTreeMap, etc.). In some cases having no dynamic memory allocation in firmware is fine (and in-fact preferable or required…e.g. MISRA). However there are some good use cases for dynamic memory allocation (my general rule for non life-threatening applications is to allow it, but only during initialization). Luckily you can enable it as long as their is a suitable allocator for your microcontroller architecture. For example, the alloc-cortex-m crate provides a custom allocator for the Cortex-M architecture. You can then also use the standard Rust collections (but be careful with them!).
no_std also means you have to define what panic does. In embedded development, you are not allowed to return from the panic function, as it is forced to have the signature fn(&PanicInfo) -> !. There are a few 3rd party crates you can include which useful for panicking in embedded firmware:
- panic-halt: Causes the current thread to halt by entering an infinite loop.
- panic-itm: The panicking message is logged to the host over ITM, a Cortex-M specific debugging peripheral (faster than semihosting).
- panic-semihosting: The panicking message is logged to the host over semihosting.
Once you have added one of these crates as a dependency, all you need to do is tell the Rust compiler you want to link against it, as you won’t be calling anything from it directly. To do this, use:
use panic_halt as _;The _ is important as it tells the compiler you want to link to it but not call anything from it. If you didn’t have this the compiler would issue you an unused import warning.
cargo and Package Structure
One sorely lacking feature with C/C++ is a standardized package manager for managing your dependencies and build process. Luckily (like most common languages) Rust comes with the cargo package manager. cargo translates well to embedded development, you can use it to easily include 3rd party libraries (what they call crates) — or create your own libraries to make your code more modular and re-usable.
One thing I really liked about cargo is that it allows extensions to be installed, which can add features to the cargo command. There is a cargo-flash crate which adds microcontroller flashing support to cargo. You can install cargo-flash with:
$ cargo install cargo-flashThis adds the sub-command cargo flash to cargo. Then you can type the following to program a microcontroller with your Rust executable:
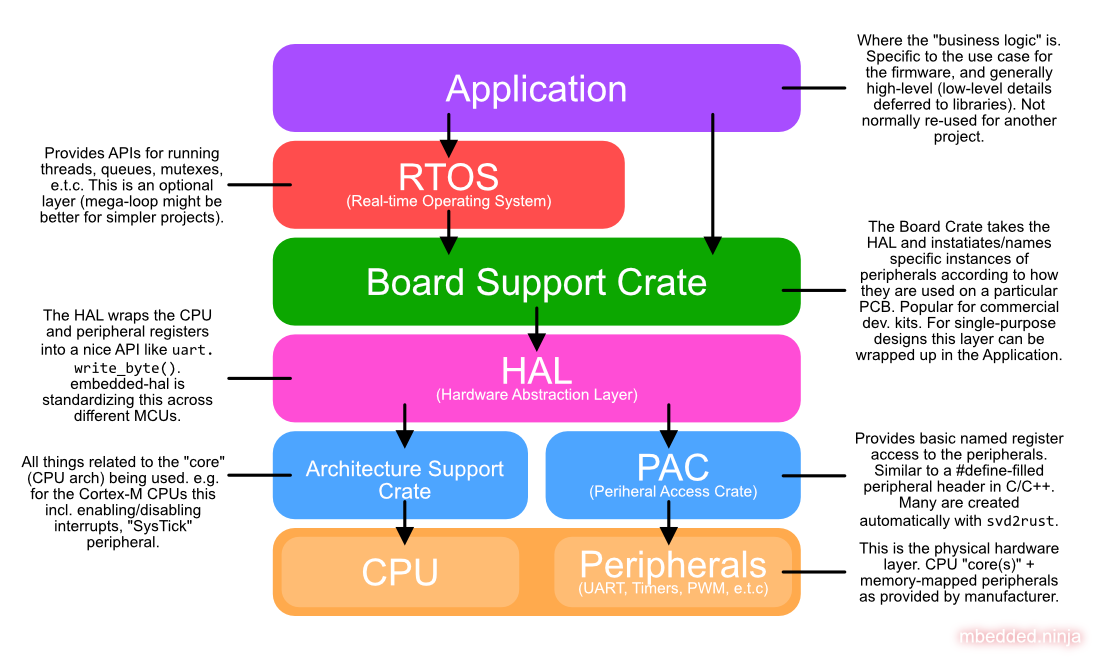
$ cargo flash --chip STM32F042C4TxAnother nice thing about cargo and embedded is that the community seems to have settled onto a structured way of organizing various firmware-related libraries. This includes:
- Peripheral Access Crates (PACs): Contains the minimal naming of memory-mapped registers that control microcontroller peripherals.
- Architecture Support Crate: Contains APIs to control the CPU and peripherals that are shared across a CPU architecture (e.g. API for controlling interrupts, system ticks).
- Hardware Abstraction Layers (HALs): Wraps up the PAC registers into easy-to-use peripheral APIs such as
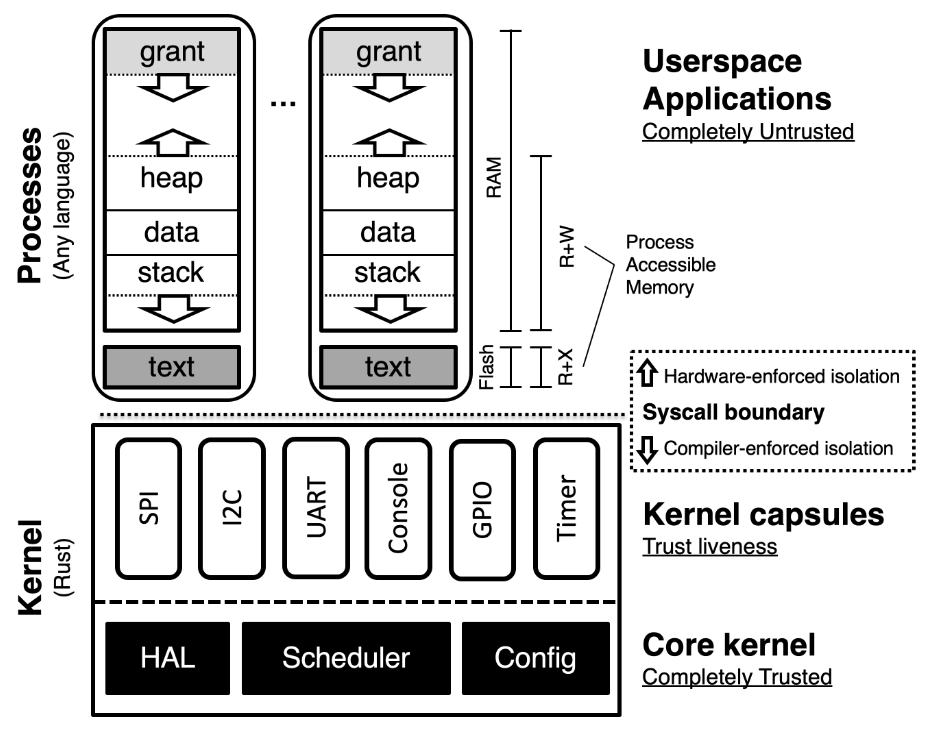
uart.init(),uart.write_byte(),adc.read_value(), etc. Although not unique to Rust, we might expect better standardization of the HALs in Rust because ofembedded-hal’s effort to keep it consistent across MCU families. In C/C++, the API of the HAL is usually unique to either the MCU family (STM32, SAMD, etc.) or the framework (Arduino, mbed, etc.). - Board Support Crate: This crate is built for a specific PCB project that contains the microcontroller. The Board Support Crate uses the HAL and creates appropriately named instances of HAL objects according to how the MCU is connected to the physical world. It’s an optional extra crate that is a good idea if you are designing a board to be used by many people for many different proposes. For a single-use project, the extra overhead of creating a board support crate might not be worth it, and instead you can bundle this code inside the Application.
- Real-time Operating System (RTOS): Just like in C/C++ firmware development, you can also get RTOSes for Rust. Some of these are ports/wrappers of C/C++ RTOSes like FreeRTOS, and others a developed-from-scratch RTOSes for Rust. Using a RTOS is completely optional, and usually makes sense for larger, complex firmware applications.
- Application: The final layer of any firmware project, this contains the high-level business logic. The application layer generally reaches down and makes calls to the RTOS (if present) and HAL layer.
This structure is shown in the image below:
cargo Features
It is common in embedded firmware to want to be able to include/exclude blocks of code based on conditionals (e.g. DEBUG vs. PRODUCTION, or ENABLE_LARGE_LUT_ARRAY) for reasons such as freeing up memory usage by removing debug strings in production builds or including architecture specific code depending on the compile target (so you can target more than one microcontroller with the same code base). In C/C++ land, this is commonly implemented using preprocessor directives (#ifdef, etc.). However, there in no preprocessor in Rust. The idiomatic way to solve this problem in Rust is to use Cargo features.
All Cargo features have to defined under [features] in the Cargo.toml. For example:
[features]DEBUGThen, inside a .rs source code file you can conditionally include code blocks:
#[cfg(feature = "DEBUG")]<debug code goes here>By default all features are disabled, unless a default feature is specified in the Cargo.toml.
Rust Macros
Another use of the C/C++ preprocessor is for performance reasons. It may be desirable to avoid function calls by creating preprocessor macros which perform direct text substitution. This is less of an issue in modern C/C++ as the compilers have gotten very good at knowing when to automatically inline functions anyway. But nevertheless, you can still perform similar tricks in Rust using Rust’s macro system. It many respects it is much more powerful and smarter than the C/C++ preprocessor (which does basic text substitution). There are however tricks you can do with the C/C++ preprocessor that you can’t do in Rust, such as partial variable name replacement. This is very unlikely to be a deal breaker though!
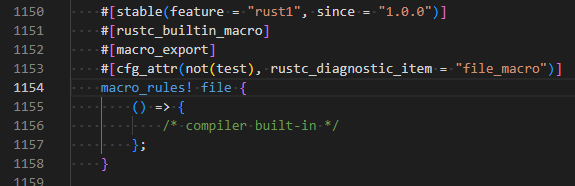
One common pattern in embedded C/C++ firmware is to use the preprocessor to make a assert() macro that not only checks the provided expression is true, but also grabs the current file, line number and provided expressions as strings. e.g.:
#define assert( exp ) \ ( (exp) ? (void)0 : assert_fn( __LINE__, __FILE__, #exp))#endifThis is made possible by the special __LINE__, __FILE__ and #exp (where the # stringifies the exp), and the fact that the macro contents gets plonked in the source code everywhere assert() is called. Luckily, you can do the same thing in Rust by utilizing the line!(), file!() and stringify!() macros (which are compiler built-ins)6.
Volatile Access
Most embedded developers will be familiar with the volatile keyword in C/C++. It tells the compiler that the value of this variable may change at anytime, which is true for pointers to memory-mapped peripheral registers that are updated in hardware. This is important so that the compiler does not perform incorrect optimizations (for more info on the C/C++ volatile keyword, see the Embedded Systems And The Volatile Keyword page).
Rust provides two methods, core::ptr::write_volatile() and core::ptr::read_volatile(), to tell the compiler the same thing. write_volatile() takes a variable of type *mut T and read_volatile() takes a variable of type *const T.
Rust Architecture Support
When considering Rust for an embedded project, you’ll be wondering “Is the microcontroller I used supported in Rust?”. As there are so many manufacturers and MCU families out there (and a few different architectures), it all depends on exactly what you are using. We’ll cover the level of Rust support of some of the popular architectures and MCU families below.
Support for a particular architecture is usually added by running rustup (by default rustup only installs the standard library for your host platform7):
$ rustup target add <architecture>This sets up the build environment for cross-compiling to your chosen architecture. For a complete list of supported platforms see The rustc Book: Platform Support.
Let’s go into more detail about the Rust support of major architectures used in the embedded space today.
Cortex-M (ARM)
The ARM Cortex-M CPU architecture is well supported by Rust, so many of the MCU families that use the Cortex-M naturally have good support too. The rust-embedded/cortex-m repo provides the minimal start-up code and runtime (including semihosting) for the Cortex-M family.
| ISA | rustup Target |
|---|---|
| ARMv6-M (Cortex-M0, M0+, M1) | thumbv6m-none-eabi |
| Armv7-M (Cortex-M3) | thumbv7m-none-eabi |
| Armv7E-M (Cortex-M4, M7 — no floating-point-support) | thumbv7em-none-eabi |
| Armv7E-M (Cortex-M4F, M7F — floating-point-support) | thumbv7em-none-eabihf |
You can quickly start a new project for a Cortex-M CPU with the command:
cargo generate --git https://github.com/rust-embedded/cortex-m-quickstart
The crate alloc-cortex-m provides a heap allocator for Cortex-M based microcontrollers. The below code example shows how this allocator can be setup as the global allocator (so that standard collections such as Vec work) and used within a firmware application11:
#![no_std]#![no_main]#![feature(alloc_error_handler)]
extern crate alloc;
use alloc::vec::Vec;use alloc_cortex_m::CortexMHeap;use core::alloc::Layout;use core::panic::PanicInfo;use cortex_m_rt::entry;
#[global_allocator]static ALLOCATOR: CortexMHeap = CortexMHeap::empty();
#[entry]fn main() -> ! {    // Initialize the allocator BEFORE you use it    {        use core::mem::MaybeUninit;        const HEAP_SIZE: usize = 1024;        static mut HEAP: [MaybeUninit<u8>; HEAP_SIZE] = [MaybeUninit::uninit(); HEAP_SIZE];        unsafe { ALLOCATOR.init(HEAP.as_ptr() as usize, HEAP_SIZE) }    }
    let mut xs = Vec::new();    xs.push(1);
    loop { /* .. */ }}
#[alloc_error_handler]fn oom(_: Layout) -> ! {    loop {}}
#[panic_handler]fn panic(_: &PanicInfo) -> ! {    loop {}}
RISC-V
RISC-V architecture support in Rust is quite good. Below are the support architectures:
| ISA | rustup Target |
|---|---|
| RV32I ISA | riscv32i-unknown-none-elf |
| RV32IMAC ISA | riscv32imac-unknown-none-elf |
| RV32IMC ISA | riscv32imc-unknown-none-elf |
| RV64IMAFDC ISA | riscv64gc-unknown-none-elf |
| RV64IMAC ISA | riscv64imac-unknown-none-elf |
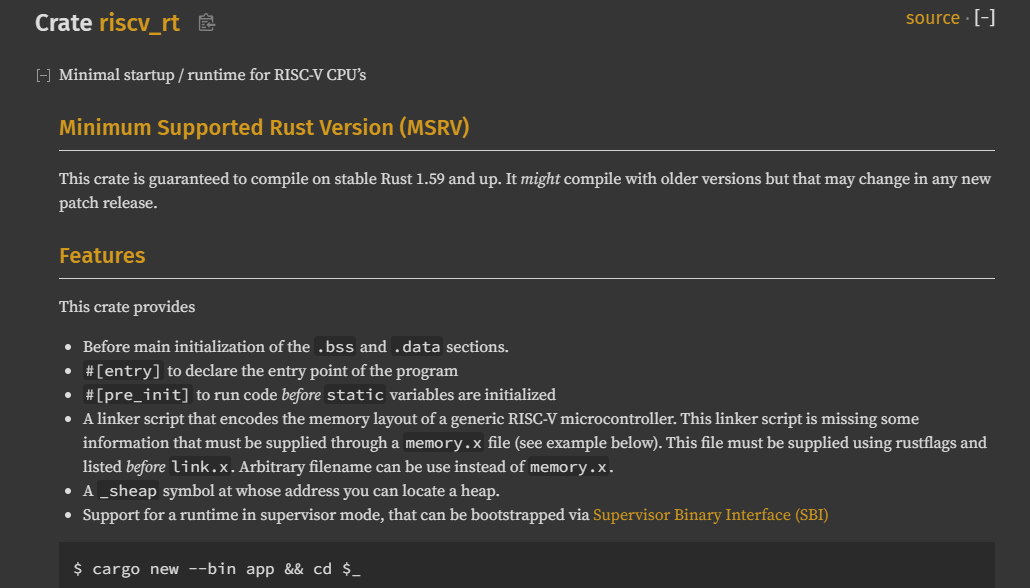
The riscv_rt crate provides the basic start-up/runtime for RISC-V CPUs.
Xtensa
The Xtensa architecture is only predominant in the ESP32 range of MCUs, so we’ll cover that below in the ESP32 (Espressif Systems) section.
Rust MCU Family Support
So we’ve covered the CPU architecture (which defines the instruction set), but what about support for all the peripherals that surround it and make up a MCU? Let’s cover the amount of Rust support of some popular manufacturers and their MCU families.
STM32 (ST Microelectronics)
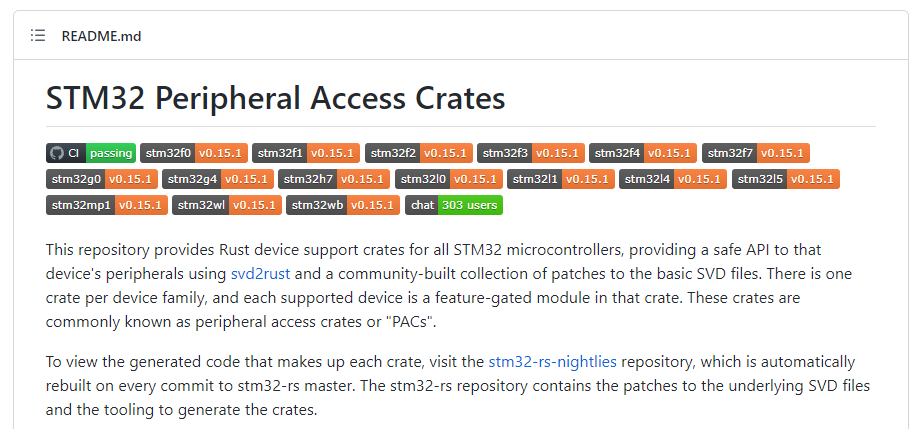
The STM32 family of microcontrollers has some of the richest Rust support out of any microcontroller. The stm32-rs/stm32-rs repo contains Rust PAC crates for a large variety of STM32 microcontrollers. As of Nov 2022 it is actively maintained and has 824 stars.
Atmel AVR
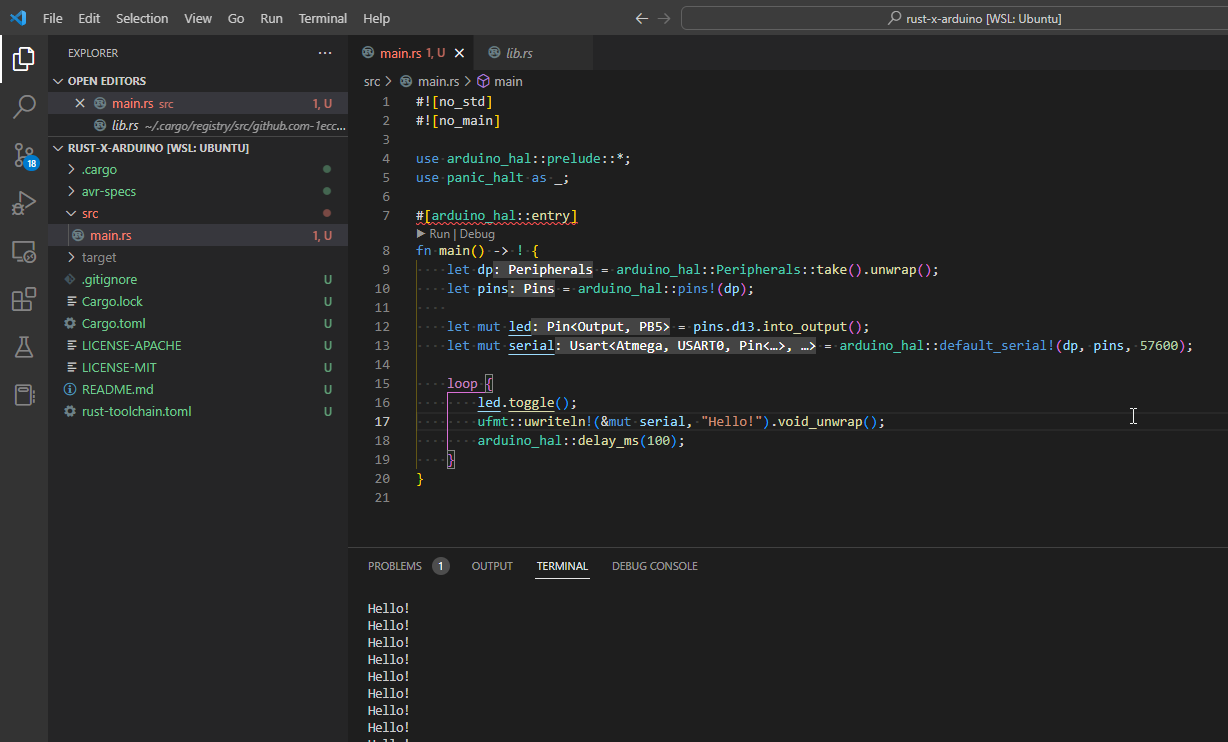
Rahix/avr-hal is a popular 3rd party Rust HAL layer for the ATmega AVRs (incl. Arduino, ATmega, ATtiny).
ravedude is a useful cargo application which adds support to cargo run to program the Arduino boards, and then connect up a serial to display any print messages.
cargo +stable install ravedude
There is a great tutorial on getting Rust working on the Arduino Uno (which uses the ATmega328P microcontroller) at https://blog.logrocket.com/complete-guide-running-rust-arduino/. Getting a blinky Rust project built and programming takes about 5 minutes using that tutorial when developing in the WSL (passing through the Arduino USB device with usbip).
Atmel SAM
The atsamd-rs/atsamd GitHub repo provides various crates for working with Atmel samd11, samd21, samd51 and same5x based devices using Rust12. This repo provides PACs (Peripheral Access Crates) and higher level HALs (Hardware Abstraction Layers). The HALs implement traits specified by the embedded-hal project.
Also included in this repo are BSPs (Board Support Packages) for a number of development boards. They distinguish between Tier 1 and Tier 2 BSPs, the Tier 1 BSPs are those that are kept up-to-date with the latest version of atsamd-hal, whilst the Tier 2 BSPs don’t (they might be locked to some past version).

The repo looks to be active, with 705 commits and 421 stars as of November 2022.
MSP430 (Texas Instruments)
There is a not well maintained version of RTFM (Real-Time For the Masses, the old name for RTIC) available for the MSP430 MCUs at the GitHub repo japaric/msp430-rtfm.
ESP32 (Espressif Systems)
There is a fork of the Rust compiler called (esp-rs/rust) which adds in support for the Xtensa instruction set (e.g. the ESP32S3). If Xtensa upstreams support for their architecture into LLVM this fork may not be needed in the future. The same esp-rs organization also provides a no_std HAL on GitHub at esp-rs/esp-hal, and one with std support at esp-rs/esp-idf-hal.
[esp-rs/esp-idf-svc] provides Rust wrappers for various ESP-IDF services such as WiFi, networking, and logging. This defines implementations of the traits defined in esp-rs/embedded-svc (think of this as an extension to the basic embedded-hal traits).
The esp-rs organization also provides their own installer, espup which is “rustup for esp-rs”. It’s a tool (alternative to rustup) for installing and maintaining the toolchain(s) required for developing with Rust on Espressif devices.
Nordic nRF
The nrf-rs/nrf-hal repo provides a Rust HAL for the nRF51, nRF52 and nRF91 families of microcontrollers13.
The default Embedded Rust tutorial now uses the micro:bit v2 (it used to use the STM32F303 Discovery Kit), which happens to have an nRF52 MCU onboard.
SiFive
The rustup target riscv32imac-unknown-none-elf is available to cross-compile for the Freedom E310 (e.g. the HiFive1). I couldn’t find any support for the HiFive1 Rev B bootloader, so a dedicated programmer was required to program the board.
RP2040
The RP2040 is just a single chip rather than a “family”, but there are a number of boards you can buy based of this IC. There is a good quality RP2040 provided by the rp-rs/rp-hal repo. This repo is organized as a Cargo Workspace which also includes a number of Board Support Crates for development boards that use this chip, including the Raspberry Pi Pico, Adafruit Feather RP2040, Adafruit ItsyBitsy RP2040, Pimoroni Pico Explorer, SolderParty RP2040 Stamp, Sparkfun Pro Micro RP2040, Sparkfun Thing Plus RP2040, and Seeeduino XIAO RP204014.
Others
- PSoC: The psoc-rs GutHub organization has a PAC and HAL repo for the PSoC 6 but they don’t look well maintained or used.
- PIC: The GitHub repo kiffie/pic32-rs contains a HAL for the PIC32. It looks somewhat maintained.
Rust IDEs, Programming and the Debugging Experience
One must have for embedded development is a smooth write code -> build -> program -> debug workflow. Ideally this is without vendor lock-in (i.e. being forced to use the vendors specific IDE) and with step-by-step debugging in your code editor rather than just on the command-line. Luckily Rust can provide all this! I focused on using VS Code since it is the most popular non-vendor-specific IDE these days. VS Code has very good support for Rust and embedded development. Cortex-Debug and rust-analyzer are two VS Code extensions that you are definitely going to want to install.
I had access to a STM32F303 Discovery Kit (development board with a STM32F303 MCU on it), so I did a bit of searching and found the repo rubberduck203/stm32f3-discovery. This contained pre-made VS Code launch configurations so I should be able to debug the Rust code straight from within VS Code. With a few tweaks (including adding "cortex-debug.gdbPath": "gdb-multiarch" to settings.json) I was able to get thus workflow up and running!
All I needed to do is hit F5 — this built the code, flashed it to the STM32F303 dev. kit and then jumped into a debug session. Below is an image from when I was stepping through the “Blinky” example. I was using VS Code connected to Ubuntu via the WSL (using usbip to pass-through the STM32F303 USB device).

Knurling is a collection of projects by Ferrous Systems (two of their popular tools include probe-run and defmt).
semihosting is provided for Cortex-M MCUs via the cortex-m crate. semihosting allows you to log debug messages to the host via the attached debugger with no extra cables (e.g. USB-to-UART devices). The disadvantage is that it’s slow. A single message can take many many milliseconds depending on the attached debugger you re using. The panic-semihosting crate can be also used to provide useful panic messages on the host. ITM is a faster option than semihosting but is only available on Cortex-M3’s and higher. RTT could be a even better option (being available on most targets/programmers like semihosting, but being fast like ITM)15. It is mostly platform agnostic and just depends on the debug probe supporting background target memory access. Once enabled you can use the rprintln!() macro. I have not used this yet though so can’t comment much!
probe-rs
probe-rs is a CLI tool for programming and debugging embedded devices. I used it with the Embassy RTOS example shown on this page and it worked well. It was easily able to find the connected nRF52DK (which shows up as a JLink device), program the MCU and show logs using defmt.
defmt
defmt (standing for deferred formatting) is a logging framework for resource constrained devices such as microcontrollers. It defers processing of variables to strings to the host machine (i.e. it sends over integers and floats as is, and the host converts them into their string representation), and for constant strings it just sends an index into a pre-saved array of all the string literals.16
This does mean however the host needs to know about all the string literals, so it does not make it suitable for sharing with a large user base that will expect a standard serial terminal to work. It is great for debugging though.
Rust RTOSes
No language can claim to be suitable for embedded programming without a selection of RTOSes to choose from. Luckily, Rust has some, from Rust wrappers of existing C/C++ RTOSes (such as FreeRTOS, Zephyr and RIOT) to RTOSes built from scratch to run on Rust (such as RTIC, Embassy and Tock). Lets review some of the popular options available to Rust developers.
RTIC
RTIC (Real-Time Interrupt-driven Concurrency) is an interesting approach to an RTOS that seems to have a decent amount of actively development and community support. All tasks share a single call stack (this is possible due to the run-to-completion model), and deadlock-free execution is guaranteed at compile time.
| Property | Value |
|---|---|
| Scheduling | Interrupt-based preemptive with priority |
| Native Rust | Yes |
| Num. Repo Stars | 2k |
| Num. Repo Commits | 1.9k |
Metrics last updated July 2025.
There are examples for a number of different development boards in the https://github.com/rtic-rs/rtic/tree/master/examples/ directory. This includes:
- ESP32C3
- ESP32C6
- HiFive1
- nRF52840
- STM32F1 Blue Pill
- STM32F3
- STM32F411
- STM32G030F6
- Teensy4
Embassy
Embassy primarily supports co-operative multitasking over preemptive scheduling. It is named after EMBedded ASYnc.17 However, it does let you create multiple executors with different priorities, so you can get preemption if you need it. It leverages the use of Rust’s async/await. The scheduler runs all tasks in a executor on a single stack, saving stack space compared to a traditional RTOS.
| Property | Value |
|---|---|
| Scheduling | Co-operative |
| Native Rust | Yes |
| Num. Repo Stars | 7.1k |
| Num. Repo Commits | 10.4k |
Metrics last updated July 2025.17
Here is an example plucked straight from the Embassy homepage:17
use defmt::info;use embassy_executor::Spawner;use embassy_time::{Duration, Timer};use embassy_nrf::gpio::{AnyPin, Input, Level, Output, OutputDrive, Pin, Pull};use embassy_nrf::{Peri, Peripherals};
// Declare async tasks#[embassy_executor::task]async fn blink(pin: Peri<'static, AnyPin>) {    let mut led = Output::new(pin, Level::Low, OutputDrive::Standard);
    loop {        // Timekeeping is globally available, no need to mess with hardware timers.        led.set_high();        Timer::after_millis(150).await;        led.set_low();        Timer::after_millis(150).await;    }}
// Main is itself an async task as well.#[embassy_executor::main]async fn main(spawner: Spawner) {    let p = embassy_nrf::init(Default::default());
    // Spawned tasks run in the background, concurrently.    spawner.spawn(blink(p.P0_13.into())).unwrap();
    let mut button = Input::new(p.P0_11, Pull::Up);    loop {        // Asynchronously wait for GPIO events, allowing other tasks        // to run, or the core to sleep.        button.wait_for_low().await;        info!("Button pressed!");        button.wait_for_high().await;        info!("Button released!");    }}
It also provides a suite of libraries such as embassy-net for IP networking, embassy-lora for LoRa networking, embassy-usb for USB devices and embassy-boot for a bootloader. Embassy works with probe-rs for programming and debugging.
One potential downside is that async/await forces your code to be sequential. I am a big proponent of event driven state machines, which allow for you to handle multiple possible code paths in parallel. I have found that the sequential nature of async/await can be hard to work with writing complex real world embedded firmware that needs to deal with things like timeouts, emergency shutdowns, and other things rather than the default “happy path”.
Saying that, Embassy does provide a select function that allows you to wait for multiple events (futures) at the same time. Here is an example of how to use it:
#![no_std]#![no_main]
use defmt;use embassy_executor::Spawner;use embassy_nrf::gpio::{AnyPin, Level, Pin, Output, OutputDrive};use embassy_time::{Duration, Ticker, Timer};use {defmt_rtt as _, panic_probe as _};use embassy_futures::select::{select, Either};
#[embassy_executor::main]async fn main(spawner: Spawner) {    let p = embassy_nrf::init(Default::default());
    spawner.spawn(blink(p.P0_17.degrade())).unwrap();
    defmt::info!("Application has started.");
    let mut ticker1 = Ticker::every(Duration::from_millis(1000));    let mut ticker2 = Ticker::every(Duration::from_millis(1200));
    loop {        match select(ticker1.next(), ticker2.next()).await {            Either::First(_) => defmt::info!("1000ms timer"),            Either::Second(_) => defmt::info!("1200ms timer"),        }    }}
Embassy provides it’s own HAL for most microcontrollers, which is different from the approach of many other RTOSes which just use the “default” HAL crate for the microcontroller family.
Check out the nRF52 DK Embassy Tutorial for a step-by-step guide to getting started with Embassy on the nRF52 DK.
Tock
Tock is an embedded operating system designed for running multiple concurrent, mutually distrustful applications on Cortex-M and RISC-V based embedded platforms — GitHub README.
| Property | Value |
|---|---|
| Scheduling | Preemptive |
| Native Rust | No |
| Num. Repo Stars | 4k |
| Num. Repo Commits | 11k |
Some of Tock is not completely baked into Rust, for example you have to break out of the Rust ecosystem and call make to program the kernel onto your board. Once the kernel is programmed onto your board, you can then use their own tockloader program to flash the application code.
Drone
Drone is a interrupt-based pre-emptive RTOS built in Rust for embedded devices.
| Property | Value |
|---|---|
| Scheduling | Interrupt-based pre-emptive with priority |
| Native Rust | Yes |
| Num. Repo Stars | 361 (drone-core) |
| Num. Repo Commits | 251 (drone-core) |
Zephyr
There is an official attempt at porting Zephyr to Rust, located in the zephyr-lang-rust repo under the zephyrproject-rtos GitHub organization.
CONFIG_RUST=y is added to the projects prj.conf file to enable Rust support.
FreeRTOS Wrappers
- hashmismatch/freertos.rs: Unfortunately this one repo does not look like it has had any active development for a number of years.
- lobaro/FreeRTOS-rust: Actively seeks to improve on
hashmismatch/freertos.rsand simplify the usage of FreeRTOS from Rust.
Rust Speed and Memory Usage
How does the speed and memory usage of Rust-built applications compare to C/C++? First off it’s worth saying that most of Rust’s unique ownership/borrow checking is purely a compile-time construct, and incurs zero runtime overhead, both in terms of speed and memory usage.
As mentioned in the Rust Language Features section, Rust automatically does bounds checking when accessing arrays. It will do it’s best to do this at compile time, but there are some cases in where this cannot be done (e.g. passing in a reference to array to a function), and it has to resort to doing this at runtime. The overhead is minimal and likely to be well-worth the effort in 99% of use cases. If you do want to avoid bounds checking you can either:
- Use iterators (if applicable)
- Use
get_unchecked()
When compiled without the --release option, Rust will also perform overflow checking when doing mathematical operations such as add and multiply. We can see this if we use the Godbolt Compiler Explorer and compare the assembly output of a simple square() function in both C++ and Rust:
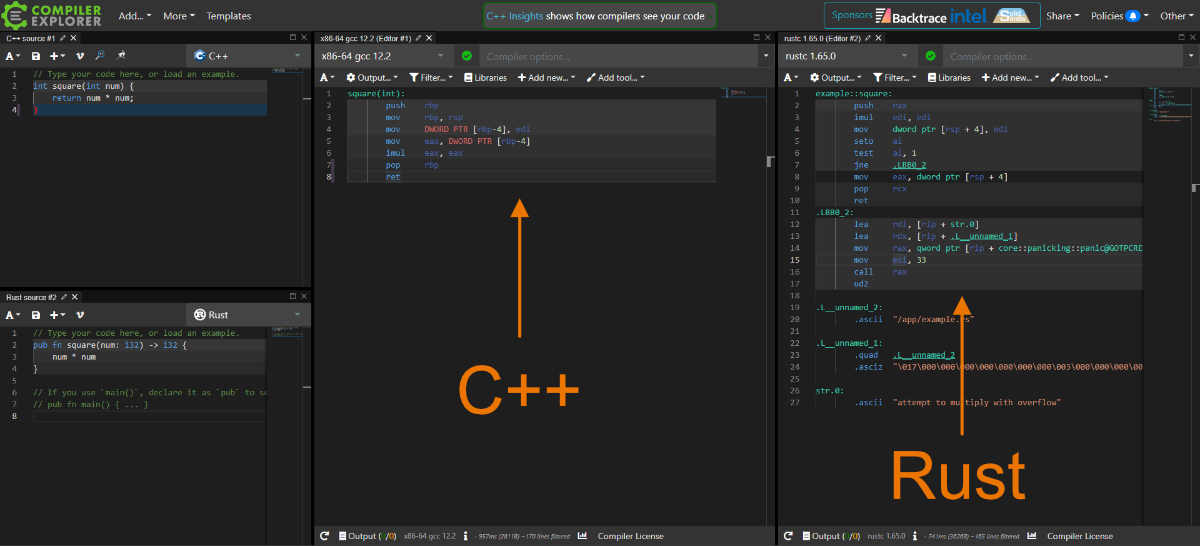
You can see in the Rust pane that it has a few extra instructions, including seto to read the overflow flag, and then a test and jump jne to a panic! in the case an overflow occurred. This will slow down mathematical operations, but in most cases this is a worthwhile trade-off to catch overflow bugs. And remember — the overhead disappears if you built with the --release option.
As bad as overflow can be, in many use cases (especially in embedded programming) you want (and even rely) on overflow wrapping. A classic example is getting the current system tick value and subtracting saved previous system tick values to calculate durations. Your system tick might be stored in a 32-bit unsigned integer and count the number of milliseconds since start-up. This would wrap back to 0 in a little over 1193 hours of continuous operation. However, due to the nature of how integer mathematics are implemented, durations relying on subtraction will still work fine when the current system tick wraps back to 0, as long as no one duration spans more than half the total system tick period (approx. 597 hours). In Rust, you can safely do overflowing equations with wrapping_xxx functions such as wrapping_add().
gccrs is a project to incorporate a Rust “front-end” into GCC. As of December 2022 this is still WIP (work-in-progress). This end goal is to make GCC able to compile Rust code. The main benefits of this are:
- We can then benefit from GCC’s really good optimization (which is distinct from LLVM)
- We have another Rust compiler to choose from (which is normally a good thing!)
As this is a front-end project, the compiler will gain full access to all of GCC’s internal middle-end optimization passes which are distinct from LLVM. — GCC Front-End For Rust19.
There are some interesting benchmarks of Rust against C++ at https://benchmarksgame-team.pages.debian.net/benchmarksgame/fastest/rust-gpp.html. Rust is clearly faster in 4 of the benchmarks, C++ is clearly faster in 3 of them, and for the remaining 3 they are basically identical.
The Disadvantages of Using Rust
No review would be fair without mentioning the negatives. What are the disadvantages of using Rust for embedded firmware?
-
Not as well supported as C/C++: C/C++ is definitely better supported by the many microcontroller vendors and IDEs, and there are far more embedded libraries for C/C++ than there are for Rust (library maturity). But as shown above, Rust support for many of the top tier microcontroller families is quite good, and hopefully will continue to get better as the language matures.
-
Rust has a steep learning curve: If you’re familiar with compiled languages such as C/C++ and some interpreted, high-level languages such as Javascript and Python, you’d probably find picking up new languages pretty easy. However, Rust has some significant core differences to the way it does things (it’s borrow checker/ownership concept is novel compared to most other popular languages), and therefore can still be quite difficult to learn. There is the well-known saying that when learning Rust you will “wrestle with the borrow checker”.
-
It’s going to be harder finding Rust developers: Again, because of Rust’s relatively immature nature compared to other languages it’s generally going to be harder to find competent developers if you are running big teams.
-
Not as well optimized as C/C++ code: Nevertheless, compiled Rust code is going to be fast and likely fast enough in 99% of use cases. C/C++ code will likely beat Rust in some specific use cases. Rust speed will likely getter better over time, and projects like the GCC Front-End For Rust will help this process.
Further Reading
Be sure to check out the Matrix ‘Rust Embedded’ chat room.
The GitHub repo rust-embedded/awesome-embedded-rust is a huge list of embedded Rust resources maintained by the Rust Resources team. It includes tools, RTOSes, peripheral access crates (PACs), hardware abstraction layers (HALs), board support crates (BSPs), blogs, books and other training materials.
You can have a play around with Rust using an online editor/compiler such as Replit. Or if you prefer running something locally, install cargo and then initialize a new project with cargo new hello_world --bin (this will be for running on your computer, not on a microcontroller).
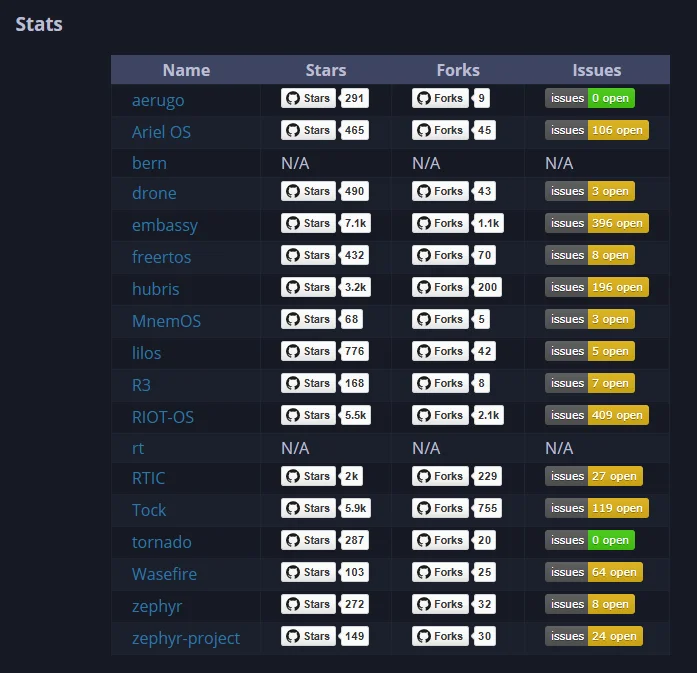
The website Are We RTOS Yet? tracks the progress of RTOSes in Rust.
Footnotes
-
Wikipedia (2022, Nov 11). Rust (programming language). Retrieved 2022-11-19, from https://en.wikipedia.org/wiki/Rust_(programming_language). ↩
-
Rust Embedded. Embedded Devices Working Group (repository). GitHub. Retrieved 2022-11-12, from https://github.com/rust-embedded/wg. ↩
-
Rust Embedded. The Embedded Rust Book. Retrieved 2022-11-14, from https://docs.rust-embedded.org/book/. ↩
-
svd2rust. Crate svd2rust (documentation). Retrieved 2022-11-14, from https://docs.rs/svd2rust/latest/svd2rust/. ↩ ↩2
-
Embedded HAL. Module embedded_hal::serial (documentation). Retrieved 2022-12-05, from https://docs.rs/embedded-hal/latest/embedded_hal/serial/. ↩
-
Rust Language Docs. Macro std::line. Retrieved 2022-11-29, from https://doc.rust-lang.org/std/macro.line.html. ↩
-
rust-lang. The rustup book: Cross-compilation. Retrieved 2022-11-14, from https://rust-lang.github.io/rustup/cross-compilation.html. ↩
-
rust-lang. The rustc book: Platform Support. Retrieved 2022-11-15, from https://doc.rust-lang.org/nightly/rustc/platform-support.html. ↩ ↩2
-
ARM Developer. Processors: Cortex-M3. Retrieved 2022-11-15, from https://developer.arm.com/Processors/Cortex-M3. ↩
-
ARM Developer. Processors: Cortex-M4. Retrieved 2022-11-15, from https://developer.arm.com/Processors/Cortex-M4. ↩
-
Rust Embedded. alloc-cortex-m - A heap allocator for Cortex-M processors (repository). Retrieved 2022-11-30, from https://github.com/rust-embedded/alloc-cortex-m. ↩
-
atsamd-rs. atsamd & atsame support for Rust (Git repository). Retrieved 2022-11-21, from https://github.com/atsamd-rs/atsamd. ↩
-
nrf-rs. nrf-hal (Git repository). Retrieved 2022-11-14, from https://github.com/nrf-rs/nrf-hal. ↩
-
rp-rs GitHub Organization. Rust support for the “Raspberry Silicon” family of microcontrollers. Retrieved 2022-11-28, from https://github.com/rp-rs/rp-hal. ↩
-
rust-embedded/book. Discourage use of semihosting and mention viable alternatives #257 (GitHub issue). Retrieved 2022-12-05, from https://github.com/rust-embedded/book/issues/257. ↩
-
Ferrous Systems. defmt [documentation]. Retrieved 2025-07-16, from https://defmt.ferrous-systems.com/. ↩
-
GitHub. embassy-rs > embassy [Git repository]. Retrieved 2025-07-13, from https://github.com/embassy-rs/embassy. ↩ ↩2 ↩3
-
Tock (2022, Jul 27). Tock Design (Markdown documentation). Retrieved 2022-11-23, from https://github.com/tock/tock/blob/master/doc/Design.md. ↩
-
rust-gcc. GCC Front-End For Rust - Homepage. Retrieved 2022-12-11, from https://rust-gcc.github.io/. ↩
-
Are We RTOS Yet? Are We RTOS Yet? [homepage]. Retrieved 2025-07-13, from https://arewertosyet.com/. ↩