Autoelectric Blanket

To design a smart phone controlled electric blanket.
Material Costs
| Item | Cost (NZ$) |
|---|---|
| RaspberryPi, Type B | $65 |
| Micro-SD Card, 8GB, Class 10 (with regular SD card adaptor) | $21 |
| USB Wi-Fi Module, N | $30 |
| Solid-state Relay D4825 | $16 |
| Electric Blanket | ? |
| RaspberryPi Prototyping PCB, Adafruit | $30 |
| 240VAC-12VDC Buck Converter | $18 |
| 12V-to-5V Regulator | $2.50 |
| TOTAL | $182.50 |
RaspberryPi Setup
I needed a later version of nodejs than sudo apt-get install nodejs would offer, so I downloaded the node v0.11.6 binary from http://nodejs.org/dist/v0.11.6/.
I ran out of room with the standard Raspian image on my harddrive. Used the option in raspi-config to expand the partition to the full SD card size.
I got some weird cb() never called! errors when trying to install express with npm install express. npm cache clear seemed to fix it.
I installed geany (sudo apt-get install geany), to get a better code editor than nano or leafpad.

List Of Installed Programs
- node
- express (node extension)
- ddclient - Manager for dynamic DNS service
Controlling GPIO
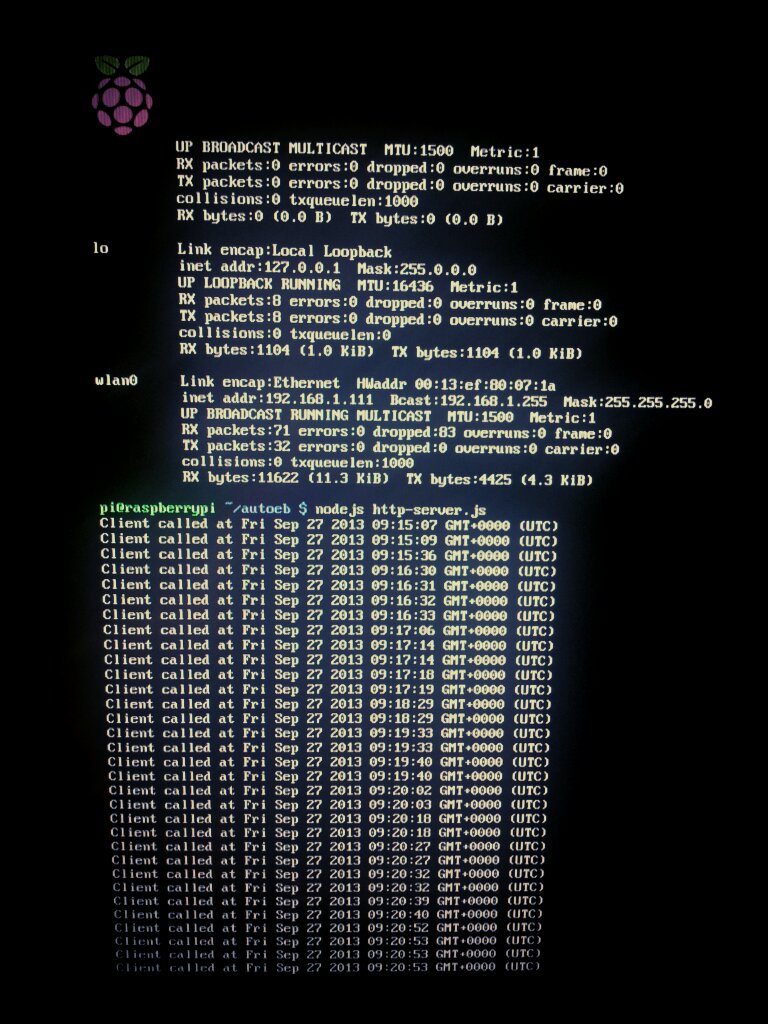
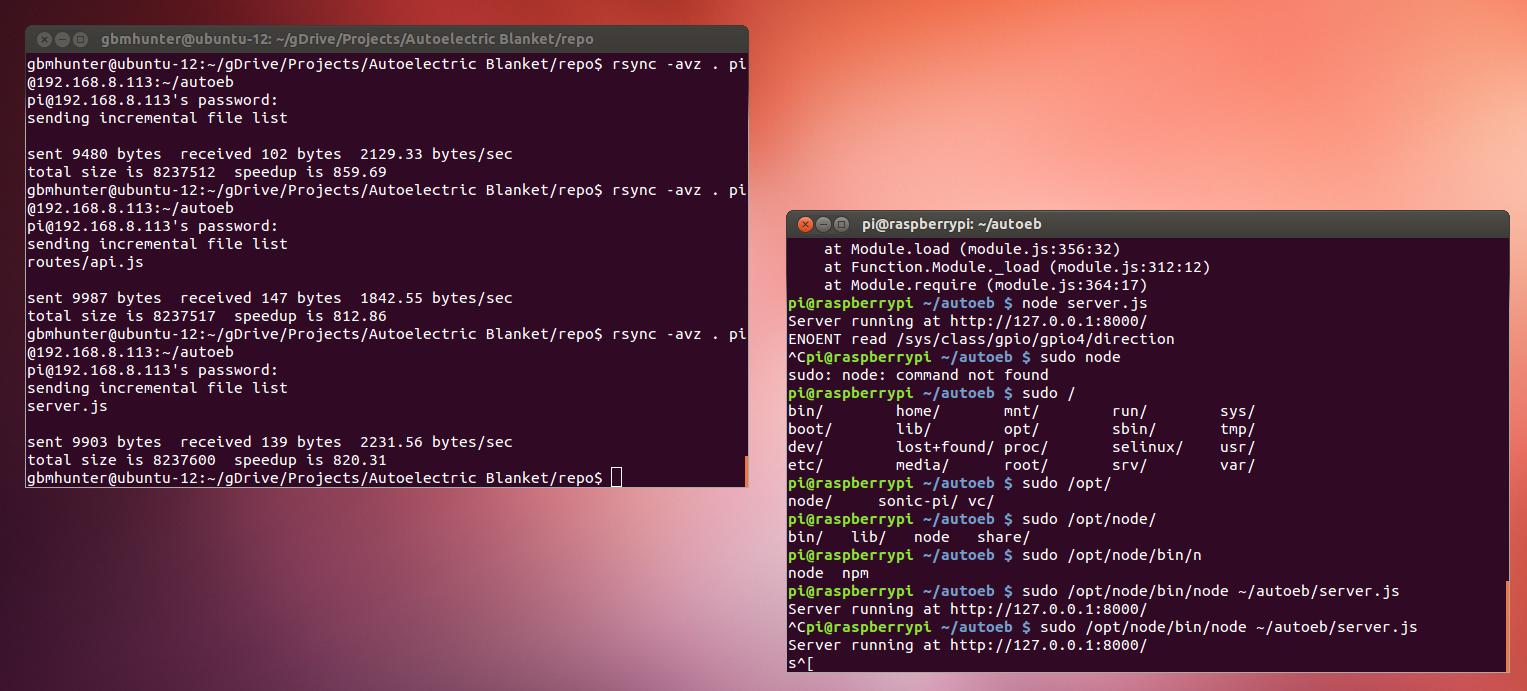
The ENOENT read /sys/class/gpio/gpio4/direction error caught me out for along time, until I realised I had to run the node module using sudo node server.js (with administrator privileges).
Nodejs Modules
Express allows you to easily set up a web server using node.js.
Managed to get the RaspberryPi to take action when the client visited a specific URL.
Wanted to send information back to the server without the client browsing to a different page.
The express extension serves up a web page.
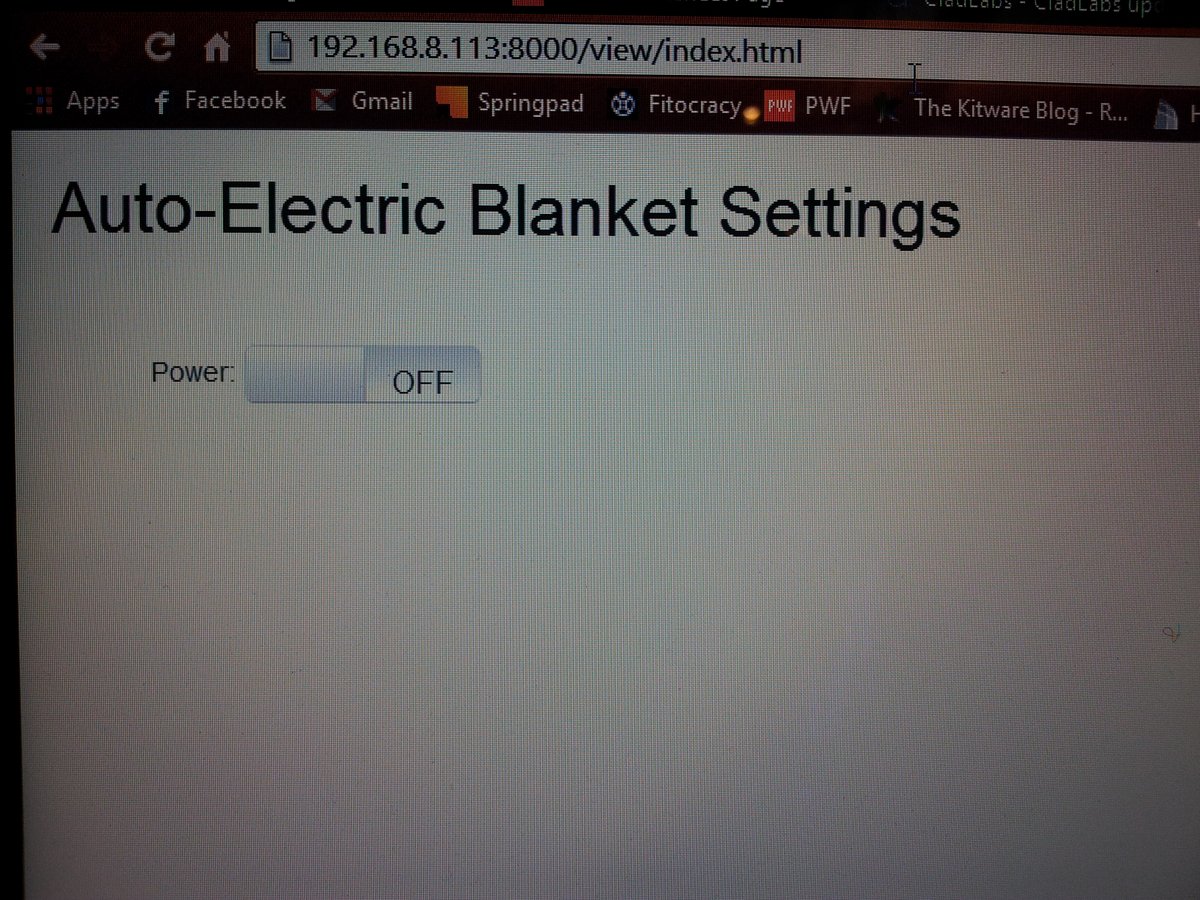
At first I was just using the window.redirect() to send data back to the server when the user toggled the on/off button. This had the problem of the web page wanting to change every time you clicked the button. To send back data without reloading the page, I use the AJAX (this was new to me) post request that comes with jQuery, $.post().
The server checks to see if it can resolve the address www.google.com every 5 seconds. If it can, it turns the online LED on, if it can’t, it turns it off. This gives the user a good indication of whether the device is connected to the internet or not.
Using Rsync To Write Code On PC, Then Transfer To RaspberryPi
I discovered rsync was one of the best ways of enabling me write code on my Windows computer, and then transfer it to the RaspberryPi quickly and easily for running.
I used the following command when currently in the repo directory on my PC (note the . after --delete ,this is important!):
Dynamic DNS
I used this awesome and simple guide, http://blog.mivia.dk/2013/03/free-dynamic-dns-for-raspberry-pi/
ddclient
You can reconfigure ddclient with the command dpkg-reconfigure ddclient. You can print out found internet addresses using the command ddclient —query.
The fixed name I gave the RaspberryPi was aeb.flashserv.net.
I gave the RaspberryPi a fixed internal address by configuring settings on the router for “DHCP Reservations”. I used the internal address 192.168.1.51.
Pagekite looks interesting, as it means you don’t have to setup port forwarding on the router, although I didn’t use the service for this project. They have a pay-what-you-want pricing plan, with the basic service being free.
Automatic Run On Start-up
We want the RaspberryPi server to automatically run on start-up. To do this, I edited some configuration files to make the RaspberryPi automatically login at turn on, and then set it up so a script ran automatically whenever that user logged in, hence it would run at start-up.
This guide is easy to follow…http://raspberrypi.stackexchange.com/questions/8734/execute-script-on-start-up and so is this. http://www.akeric.com/blog/?p=1976.
Forwarding Ports
I set up port forwarding on the router for port 8000. This worked fine for a Vodafone router, however, when I tried to set up the same port forwarding on an Orcon router, it complained that the port 8000 was already in use by something called a “USB Server”. I had to change all references of the port to 8001, which meant changing both the node server code and the Android app code.
Fixed IP
To do this I first had to setup the RaspberryPi so it has a fixed IP. Depending on the router, I could do this one of two ways:
- Set up a fixed IP purely on the router, using the RaspberryPi’s MAC address. This is the easy way!
- Set up a fixed IP on the RaspberryPi. This is harder!
To make the RaspberryPi request a fixed IP (option 2), you have to modify it’s network interface settings.
The file /etc/network/interfaces contains a list of the present network adaptors and their basic settings.
iface wlan0 inet manualThere were many tutorials online on how to modify this file. However, most of them didn’t seem to work in my case. The one that did (http://kerneldriver.wordpress.com/2012/10/21/configuring-wpa2-using-wpa_supplicant-on-the-raspberry-pi/) was when I changed it to:
# allow-hotplug wlan0iface wlan0 inet manualwpa-roam /etc/wpa_supplicant/wpa_supplicant.confiface default inet static address 10.1.2.20 netmask 255.255.255.0 network 10.1.2.0 gateway 10.1.2.1However, this would not work automatically on start-up. I had to also type the command sudo ifup wlan0 before the internet would start working.
This would give me the errors:
ioctl[SIOCSIWAP]: Operation not permittedioctl[SIOCSIWENCODEEXT]: Invalid argumentioctl[SIOCSIWENCODEEXT]: Invalid argumentBut it still seemed to work fine.
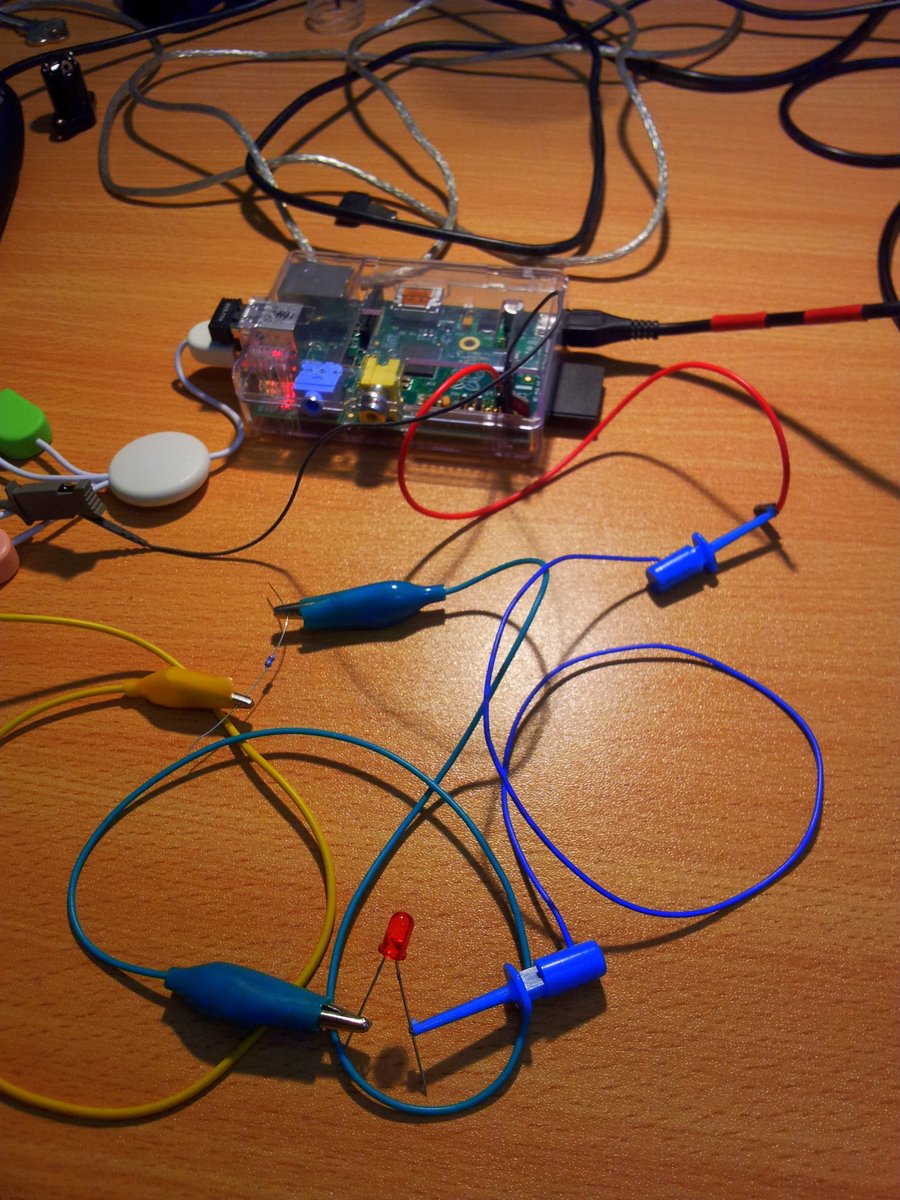
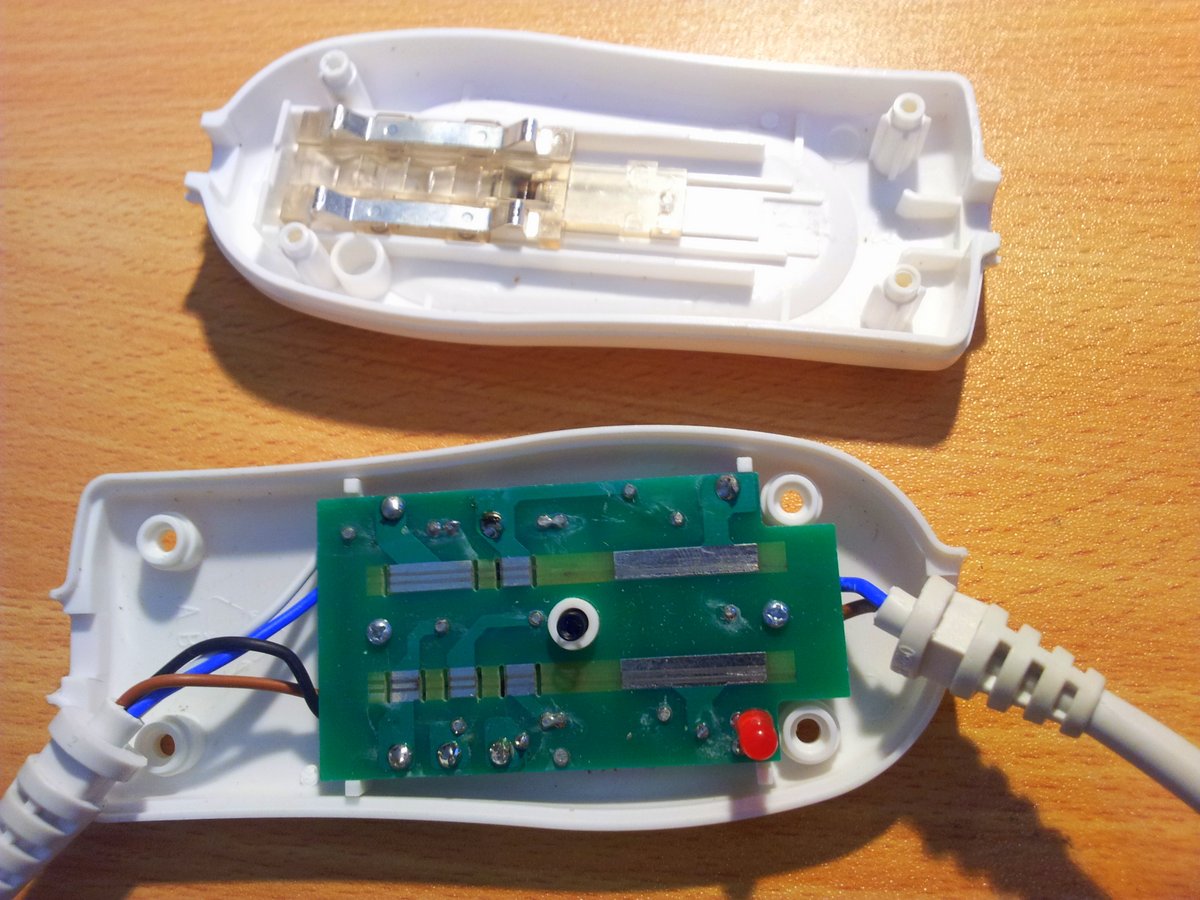
The Electric Blanket Wiring
I pulled apart the electric blanket. Simple control. Looks like switch selects different resistance circuits to power.
The Pololu (http://www.pololu.com/catalog/product/2120) wasn’t enough to power the RaspberryPi with the WiFi module installed (it got hot and then kept restarting).
Maybe a 12V to 5V cigarette lighter USB power port will work?
The solid-state relay didn’t have a decent datasheet, although what looks like an exact replica was found (http://nz.mouser.com/ProductDetail/Crydom/D4825/?qs=sGAEpiMZZMtq49AUx5G3778uEJUSSwFqduP38LjrRb0%3d). It shares the same code, D4825.
Although I should of been able to just drive the relay directly from a RaspberryPi GPIO, I choose to use a MOSFET to instead switch it to the +5V rail. I used a TO-92 package (cause it was easy to solder to the prototyping board) BS170”D27Z N-Channel MOSFET.
The switch has a 1kR resistor in series and a 50kR resistor pulling the GPIO pin to ground. The 1kR is to stop any damaging currents if the GPIO pin is accidentally turned into an output.
I had an issue with a energy-saving light flickering about once per second when the relay was not meant to be turned on.
Measured wire resistances:
| Brown-Blue | 870Ω |
| White-Black | 1.8kΩ |
How I think the circuit worked:
| Power Setting | Connection | Calculated Power |
|---|---|---|
| 0 | none | 0W |
| 1 | White-Black 1/2 Cycle | 16W |
| 2 | Brown-Blue 1/2 Cycle | 33W |
| 3 | Brown-Blue Full Cycle | 66W |
The Android App
I had never developed an Android app before, so the first task was downloading and installing the Android SDK.
The idea was to basically recreate how the web page looked and acted with an Android app. I considered just making an app which loaded the web page, since you have to be connected to the internet to control it anyway.
A thing that caught me out is that the WebView URL has to have http:// at the front to work, you can’t use shortened versions like www.google.com.