Running Umami on AWS Lightsail

Umami, aside from being a delicious savoury taste, is also an analytics platform. It is a popular alternative to Google Analytics and allows free use if you self-host the software on your own server. I decided to switch from Google Analytics to Umami because ad blockers were blocking the Google Analytics script used to keep track of the number of page visits and unique visitors to this blog, NinjaTerm and NinjaCalc. By using Umami and self-hosting it, I could point a subdomain (e.g. umami.mbedded.ninja) at the server running Umami. There is a very high probability that ad blockers won’t block the Umami client-side script since the data would now be sent to the same domain as this blog.
This page details how to get Umami setup and running on an AWS Lightsail server instance. AWS Lightsail is a simple and cheap way of hosting servers that don’t need to do much processing. Lightsail costs around US$3.50 to $5.00/month for the small size instances that Umami can run on (for small to medium sized sites) using IPv6 only.
Credit goes to Digital Ocean’s tutorial at https://www.digitalocean.com/community/tutorials/how-to-install-umami-web-analytics-software-on-ubuntu-20-04 for showing me how to do this for the first time. This tutorial expands on Digital Ocean’s by adding Lightsail specific information, DNS information, and updating some parts for relevance in 2024 (e.g. we now have docker compose rather than docker-compose).
Spinning Up Lightsail Server in AWS
This assumes you have an AWS account. If you don’t, go and sign up now! Then log into the AWS Console, and click on Services -> Amazon Lightsail. Click the “Create instance” button as shown below:

Firstly, choose an “Instance Location”. You can pick something close to where most of your users are, but in the end it doesn’t matter much!
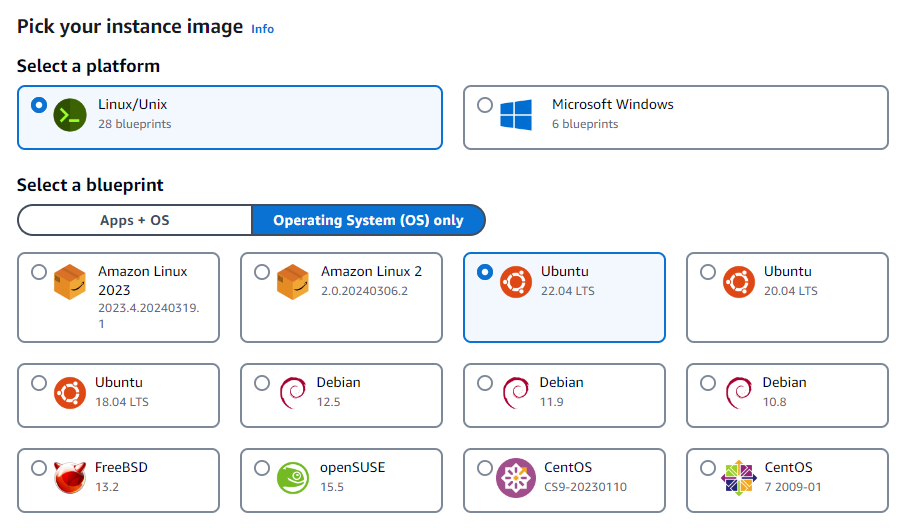
Then under “Select a blueprint”, click “Operating System (OS) only”. Select Ubuntu 22.04 as shown below. You could choose a different Linux OS, like AWS Linux, but the commands will be different (e.g. you’ll have to use yum instead of apt) and the nginx config files structure won’t be setup to use sites-available/sites-enabled (slightly different ways of doing things).
Then select or create a keypair to authenticate with this server. If creating a new keypair, the private key will be downloaded. Save this for later when we need to ssh into the instance to set it up.
Select the Networking Type. As of March 2024, Amazon is about to charge more for servers that have IPv4 addresses. IPv6 only should work fine — except that IPv6 doesn’t work for cloning projects off GitHub, nor some docker-based commands which fetch data from remotes. What we can do though is perform all of the setup with a public IPv4 address, and then once we are complete, create a Snapshot, and create a new instance from the Snapshot that is IPv6 only. So let’s continue with an instance which has both an IPv4 and IPv6 address — select Dual stack for the Networking Type as shown below.
Select a size. Umami does not take many resources to run. However I had issues with the memory capped at 512MB, so I picked the 1GB RAM/40GB SSD size (as of March 2024, US$5.00/month). Let me know if you get it running successfully on smaller resources!

Choose an instance name to easily identify this Lightsail instance in the future, e.g. Umami-Ubuntu-IPv4-1GB. It’s completely up to you and what you want to call it.
Click Create instance and your server will be spun up!
Add a Rule For Https
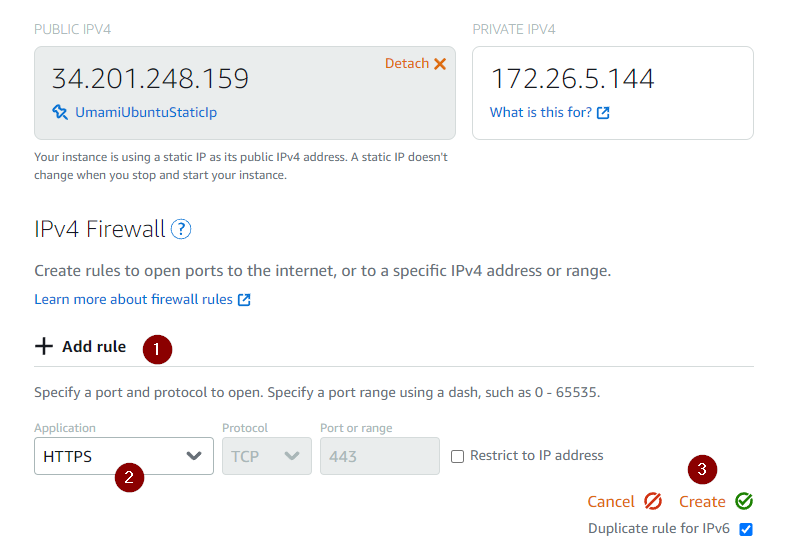
Once your Lightsail instance has spun up, click on the Networking tab under your Lightsail instance, and then add an IPv4 firewall rule allowing https traffic as shown below:
This will come in useful later when we force traffic to use https only.
Create a DNS A Record
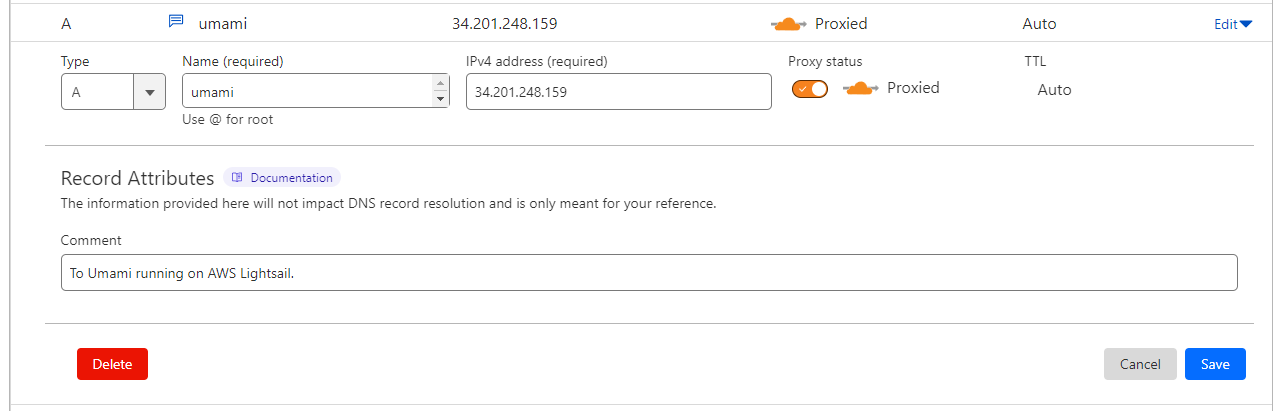
Now you need to create a DNS A Record that points your subdomain umami.my-domain.com to the IP address of the Lightsail instance you just created.
I use Cloudflare, so the image below shows a screenshot of myself setting up the A record through the Cloudflare control panel. It should be similar with most other DNS providers.
Installing Umami
Connect to your Lightsail instance via ssh. You can use the in-browser terminal if you want, but I much prefer a proper terminal-based session (e.g. from Windows Terminal, bash on Linux, etc.) for better responsiveness and copy/paste support.
I had problems using the subdomain to connect, so I just used the IP address directly. The IP address is shown on the main page for the Lightsail instance. You will need the private key that you setup/selected when you created the Lightsail instance above, which you can pass in to ssh using the -i option:
cd into the /opt directory, this is where we will put the Umami source code:
cd /optClone the Umami repo:
sudo git clone https://github.com/umami-software/umami.gitcd into the new directory:
cd umami/We’ll now edit the docker-compose.yml file, to make sure it only exposes the 3000 port on localhost, and not publicly (I’m not sure if it matters because the Lightsail firewall is a second line of defense here, but better to be on the cautious side):
sudo nano docker-compose.ymlFind the following section:
ports: - "3000:3000"and add 127.0.0.1 to the front so that it now looks like:
ports: - "127.0.0.1:3000:3000"Save these changes and exit nano. We can’t yet run Umami because we don’t have Docker. Let’s do that next!
Install Docker
We’ll need to install Docker so we can actually run Umami. I grabbed these instructions from https://docs.docker.com/engine/install/ubuntu/. Add Docker’s apt repository:
# Add Docker's official GPG key:sudo apt-get updatesudo apt-get install ca-certificates curlsudo install -m 0755 -d /etc/apt/keyringssudo curl -fsSL https://download.docker.com/linux/ubuntu/gpg -o /etc/apt/keyrings/docker.ascsudo chmod a+r /etc/apt/keyrings/docker.asc
# Add the repository to Apt sources:echo \  "deb [arch=$(dpkg --print-architecture) signed-by=/etc/apt/keyrings/docker.asc] https://download.docker.com/linux/ubuntu \  $(. /etc/os-release && echo "$VERSION_CODENAME") stable" | \  sudo tee /etc/apt/sources.list.d/docker.list > /dev/nullsudo apt-get update
And then install Docker:
sudo apt-get install -y docker-ce docker-ce-cli containerd.io docker-buildx-plugin docker-compose-pluginStart Umami on Localhost
Now that Docker is installed (along with the subcommand docker compose), we should be able to start the Umami application. Run the following command:
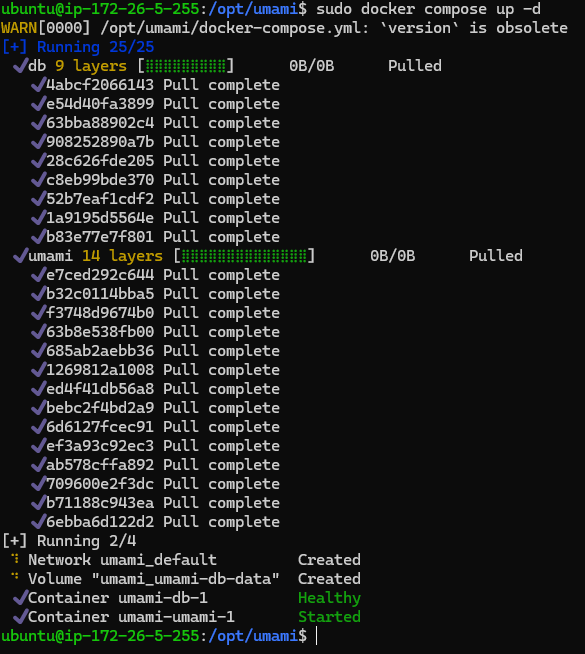
sudo docker compose up -dYou should see output similar to shown below:
We can check that Umami is up and running with the following command:
curl localhost:3000This will make a request to your localhost at port 3000. If it’s working, you should see something like:
<!DOCTYPE html><html id="__next_error__"><head><meta charSet="utf-8"/> ...Configure Umami to Start On Boot
You’ll likely want to configure the docker command above to run on boot. That way, if your server ever restarts for any reason, your server will start up and run without you having to ssh into the server and start it manually.
To do this, first create a new file in /etc/init.d/ called start-umami.sh with the following contents:
docker compose -f /opt/umami/docker-compose.yml up -dSave the file, and then make it executable:
sudo chmod +x /etc/init.d/start-umami.shNow you can add this script to the list of services that start on boot:
sudo update-rc.d start-umami.sh defaultsAll done! Test this out by restarting the server and checking that Umami is running after the restart.
Install nginx
Whilst we could just expose the Umami 3000 port to the public and get basic http working, we are going to install nginx and place it between the public and our Umami application. This will allow us to add support for https.
Let’s install nginx:
sudo apt updatesudo apt install nginxAdd a new config:
sudo nano /etc/nginx/sites-available/umami.confserver { listen 80; listen [::]:80; server_name umami.my-domain.com;
access_log /var/log/nginx/umami.access.log; error_log /var/log/nginx/umami.error.log;
location / { proxy_pass http://localhost:3000; proxy_set_header X-Real-IP $remote_addr; proxy_set_header Host $host; proxy_set_header X-Forwarded-For $proxy_add_x_forwarded_for; }}Now create a symbolic link in sites-enabled that points to the config file we just created in sites-available. This “enables” the configuration so that nginx will run it:
sudo ln -s /etc/nginx/sites-available/umami.conf /etc/nginx/sites-enabled/Now that we’ve modified the config file, reload nginx:
sudo systemctl reload nginxTest http Access
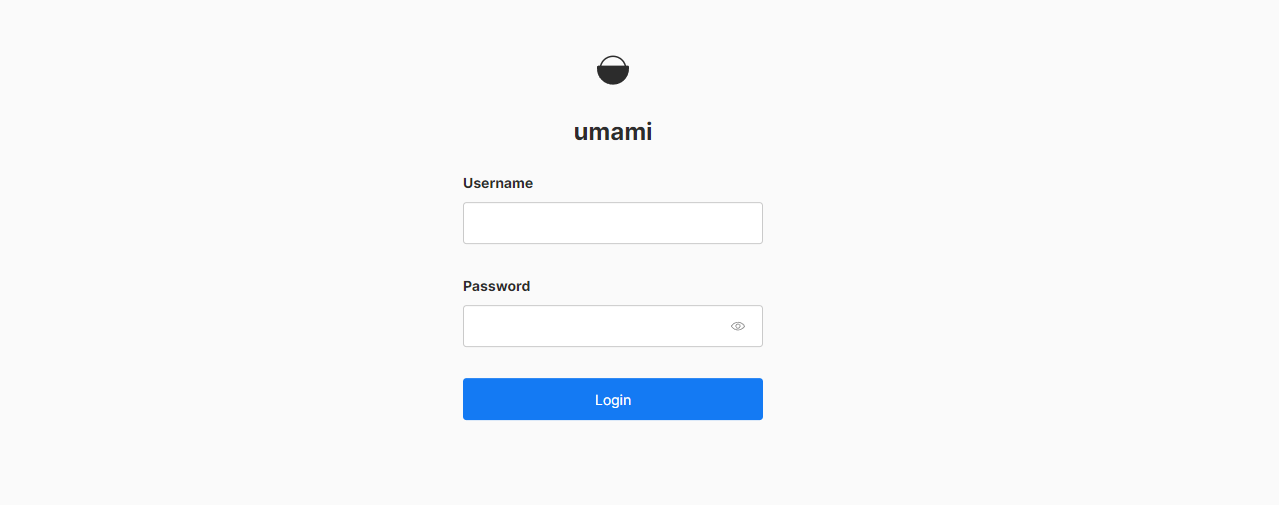
You should now be able to get to your Umami server using http from anywhere on the internet! Let’s test it out before we move onto switching to https. Type http://umami.my-domain.com into your browser. You should make it to the following screen.
Before continuing it’s a good idea to log in to Umami and change your password, as your Umami server is now available to the public! The default username is admin and the default password is umami.
Now let’s setup https.
Install Certbot
Setting up https is made very easy by the certbot program and Let’s Encrypt. Firstly, install certbot and the nginx plugin.
sudo apt install certbot python3-certbot-nginxNow run the following command to install certificates for your Umami instance. This will also modify the nginx configuration we created earlier to enable https, and to redirect all http traffic to https.
sudo certbot --nginx -d umami.my-domain.comYou’ll be prompted to enter in an email address. Once it’s complete, it should have modified your nginx umami.conf and restarted nginx so that you’re set to go!
For reference, Certbot should have modified your /etc/nginx/sites-available/umami.conf so that it looks similar to the following:
server {    server_name  umami.my-domain.com;
    access_log  /var/log/nginx/umami.access.log;    error_log   /var/log/nginx/umami.error.log;
    location / {      proxy_pass http://localhost:3000;      proxy_set_header X-Real-IP $remote_addr;      proxy_set_header Host $host;      proxy_set_header X-Forwarded-For $proxy_add_x_forwarded_for;  }
    listen [::]:443 ssl ipv6only=on; # managed by Certbot    listen 443 ssl; # managed by Certbot    ssl_certificate /etc/letsencrypt/live/umami.my-domain.com/fullchain.pem; # managed by Certbot    ssl_certificate_key /etc/letsencrypt/live/umami.my-domain.com/privkey.pem; # managed by Certbot    include /etc/letsencrypt/options-ssl-nginx.conf; # managed by Certbot    ssl_dhparam /etc/letsencrypt/ssl-dhparams.pem; # managed by Certbot
}server {    if ($host = umami.my-domain.com) {        return 301 https://$host$request_uri;    } # managed by Certbot
    listen       80;    listen       [::]:80;    server_name  umami.my-domain.com;    return 404; # managed by Certbot}
It also makes it so http traffic is redirected to https. That is the second server section in the above .conf file (with the listen 80 part).
Certbot will automatically renew the certificates before they expire.
Test It Works With Https
That’s it, you should now be able to use https! To test, type https://umami.my-domain.com into your browser, and you should be able to get to the same login screen that we got to previously.
Cloudflare Adjustments
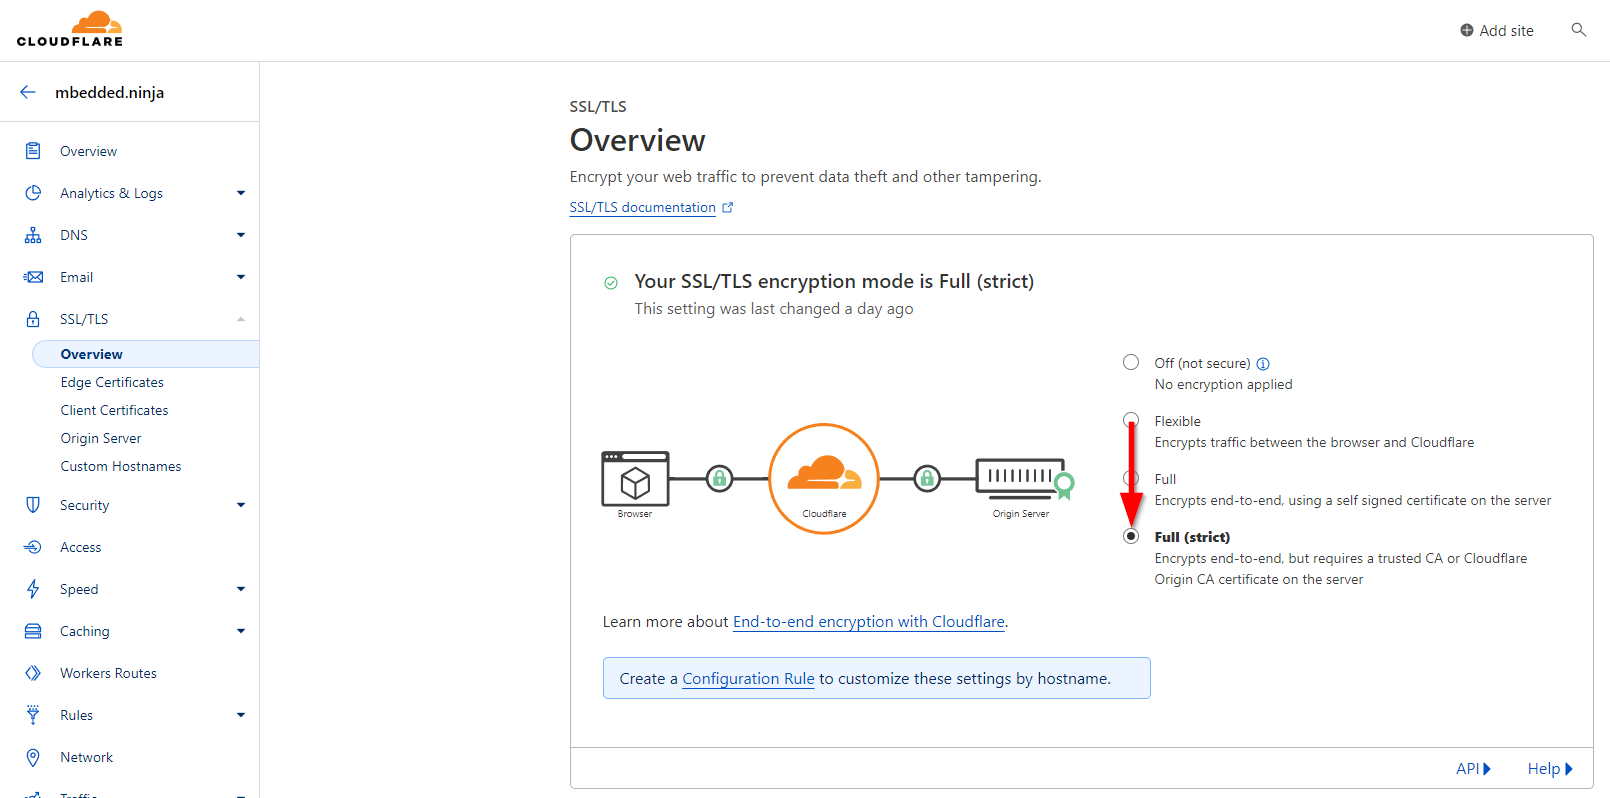
My Cloudflare account defaulted to the SSL/TLS encryption mode set to “Flexible”. As soon as I ran the Let’s Encrypt step above, I couldn’t get access to Umami through https due to a “Too many redirects” error. To fix this, I had to go to the Cloudflare dashboard, click on SSL/TLS -> Overview and change the Encryption mode from “Flexible” to “Full (strict)” as shown below:
This might be very Cloudflare specific — if you are using another DNS provider you might not have to change any setting similar to this.
Migrate to IPv6 Only
I ran into problems trying to setup the server using IPv6 only, mostly due to GitHub not supporting IPv6 when cloning and some docker commands failing. However, once the server is setup using IPv4, you can migrate it to IPv6 by doing the following.
First, create a snapshot of the existing server in AWS Lightsail as shown below:
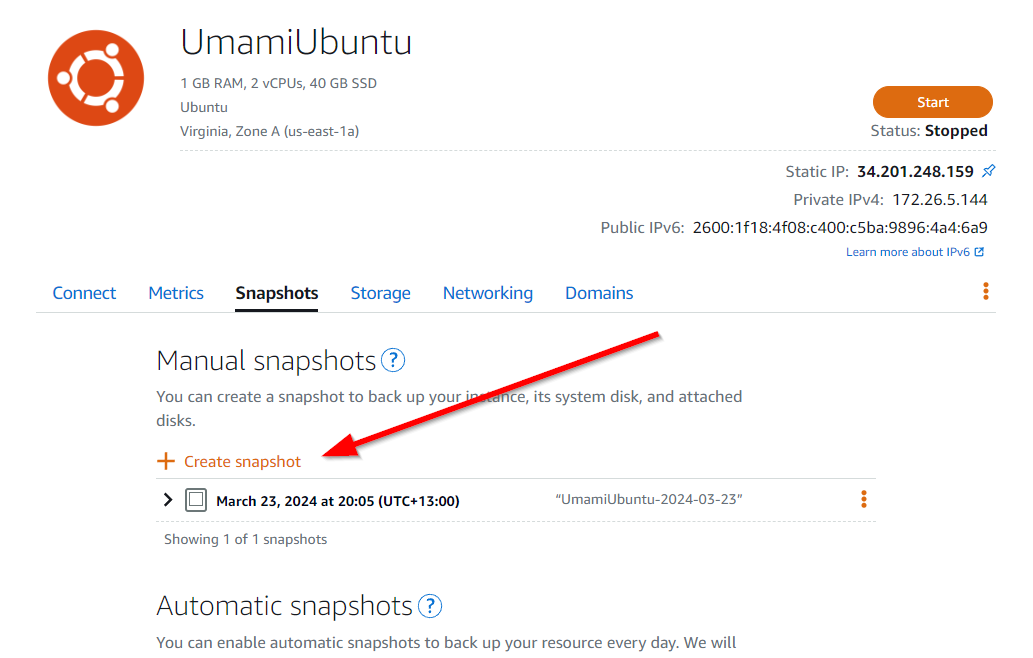
Once the snapshot has been created, you can click the vertical ellipsis (three dots) next to it and click “Create new instance”. From there, you will be able to select an IPv6 only setup. Note you can also change the instance size here, but you cannot choose a smaller size, presumably because you can’t easily make disks smaller (even if you are not using all of the available space).
Now when you ssh into the server, the command will look something like this:
ssh -i my-private-key.pem ubuntu@2600:1f18:4f08:c400:f26a:6a5:e85c:2420Create an AAAA record with your DNS provider that points your domain to the server’s IPv6 address. Remove the existing A record that pointed to the IPv4 instance.
All done! You should now be able to get to the Umami dashboard by going to umami.my-domain.com.
I presume certbot certificate renewal will work just fine with this IPv6 server. I’ve yet to hit this point in time (sudo certbot renew does nothing until the certificates are about to expire).
Sending Data to Umami
This page was all about how to setup the Umami server. But you might be wondering, what next? To send analytics data to Umami, you’ll have to embed the client side script into the web pages you want to track.
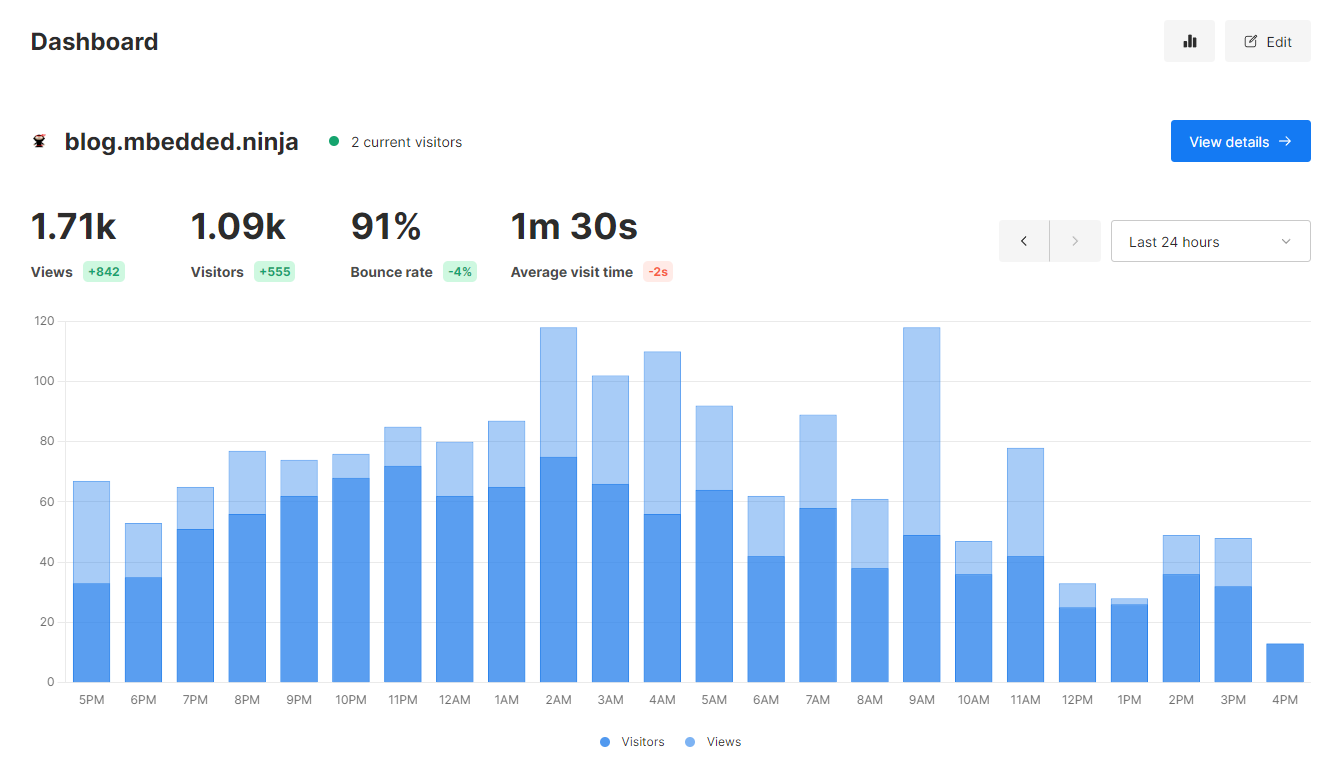
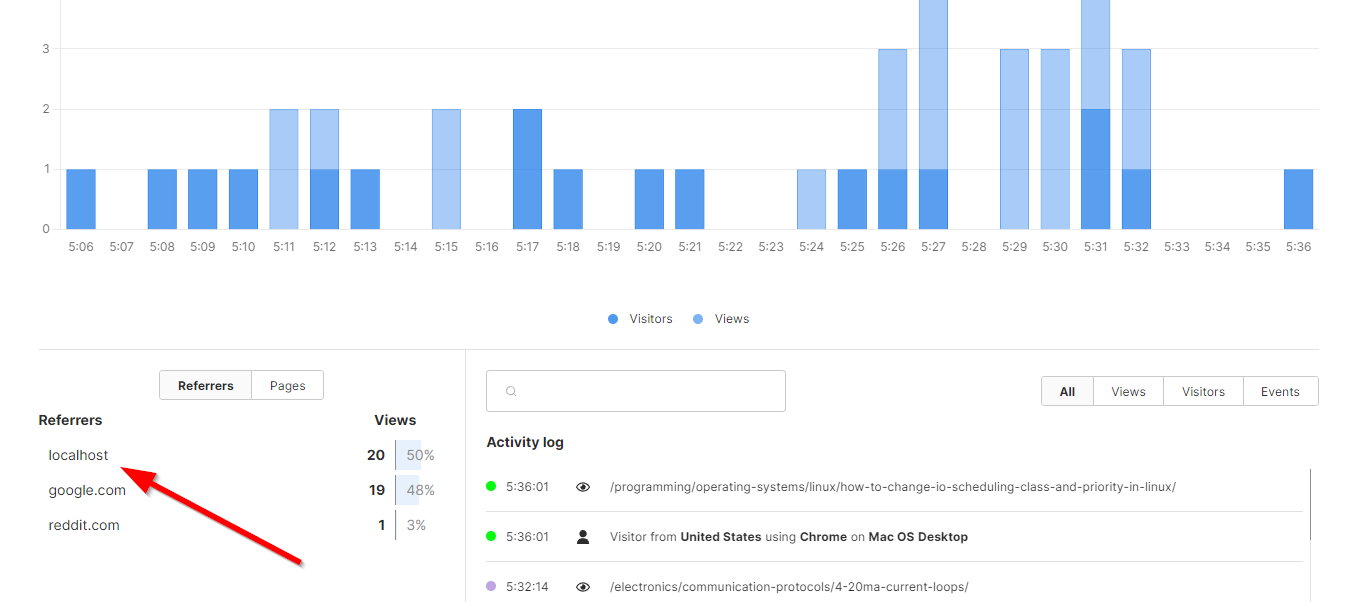
To do this, follow the “Add a website” tutorial on Umami. Once you have done that you should be able to login to the dashboard and see analytics like shown below:
Fine Tuning The Umami Script
Another thing that is worth mentioning is that you probably want to disable the script when developing your site/web application locally. If you don’t, you’ll likely end up with many false hits being recorded in Umami. This is especially true with hot-reloading systems which refresh the page every time you save the source code.
How exactly you do this depends on what framework your site runs on/in. I’ll give you a few examples which may be useful for your application. This blog used to run on Hugo (it has since migrated to Astro), in which I could use the following guard in my baseof.html file:
{{ if eq (getenv "HUGO_ENV") "production" | or (eq .Site.Params.env "production") }}<script defer src="https://umami.mbedded.ninja/script.js" data-website-id="e0f4b55d-8cc8-4afe-ab25-68d695b46826"></script>{{ end }}NinjaTerm runs on React, so I used the following in my index.tsx file:
if (import.meta.env.PROD) { var script = document.createElement('script'); script.type = 'text/javascript'; script.src = 'https://umami.mbedded.ninja/script.js'; script.setAttribute('data-website-id', 'b0ab1a49-5d70-4e53-b2e2-6f3b8127ef84'); document.getElementsByTagName('head')[0].appendChild(script);} else { console.log('Detected dev. environment, not adding Umami script.');}Note that the NinjaTerm example above uses JavaScript to inject the equivalent script tag into the head of the HTML document if the production environment variable evaluates to true.
UPDATE: The above way to only include the script if import.meta.env.PROD is true works great — except if you start making Umami API calls to track things like events. If you need to do this, you’d have to guard every call with a check to make sure window.umami is defined, which can get repetitive and feels like bad design. The better approach is to always include the script in the head, but set umami.disabled to 1 in local storage in dev. environments.1 Umami does not send analytics in this case, but the API is still available.
Here is an example:
// Enable Umami analytics script in production and disable// in dev. environment. Use the umami.disabled key in local storage for doing soif (import.meta.env.PROD) { // It's not good enough just to set the key to 0, it needs to be removed window.localStorage.removeItem('umami.disabled');} else { console.log('Detected dev. environment, setting umami.disabled in local storage to "1".'); window.localStorage.setItem('umami.disabled', '1');}Footnotes
-
Umami. Track events [documentation]. Retrieved 2024-03-31, from https://umami.is/docs/track-events. ↩