Building Linux For The Zynq ZC702 Eval Kit Using Yocto

Xilinx provides device and board information for the Zynq SoC for Yocto through the repository meta-xilinx. This includes board information for the ZC702 Evaluation Kit.
This tutorial has been tested on Ubuntu 16.04 64-bit, running inside a VMware virtual machine on a Windows host. Exact procedure and commands might have to be changed slightly for other configurations.
More information on building and booting Linux on the Zynq ZC702 using Yocto can be found at the Xilinx pages https://github.com/Xilinx/meta-xilinx/blob/master/meta-xilinx-bsp/README.building.md and https://github.com/Xilinx/meta-xilinx/blob/master/meta-xilinx-bsp/README.booting.md.
Download/Setup Yocto
If you want to get more familiar with Yocto, check out the Yocto Quick Start guide.
Firstly, install all the dependencies needed by Yocto:
~$ sudo apt-get install gawk wget git-core diffstat unzip texinfo gcc-multilib build-essential chrpath socat cpio python python3 python-pip libsdl1.2-dev xtermThen we need to get a Yocto release. We will use the poky release for this tutorial:
~$ git clone git://git.yoctoproject.org/pokyNow enter the poky directory:
~$ cd poky/Switch to the morty branch:
~/poky$ git checkout mortyConfiguring Yocto For The ZC702 Eval Kit
Now that Yocto has been setup, we need to configure it for the Xilinx ZC702 Evaluation Kit.
To start this step, we need to clone the meta-xilinx repository into the Yocto source directory (e.g. poky/).
~/poky$ git clone https://github.com/Xilinx/meta-xilinx.gitThis should clone the repo into ~/poky/meta-xilinx/.
We then need to make sure the branch of meta-xilinx is the same as the branch of poky.
~/poky$ cd meta-xilinx~/poky/meta-xilinx$ git checkout mortyThen go back to the poky directory, and initialise the build environment:
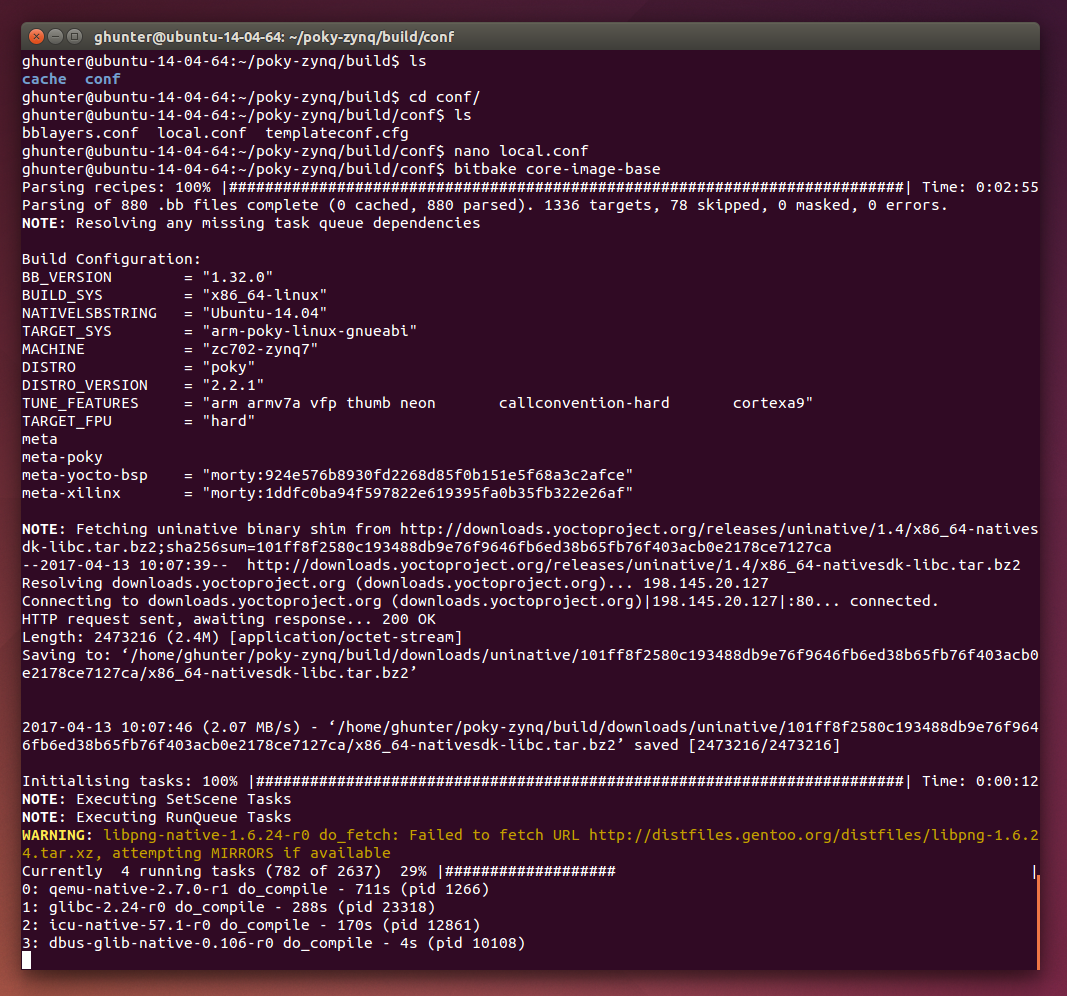
~/poky/meta-xilinx$ cd ..~/poky$ source oe-init-build-envYou should now automatically be in the ~/poky/build/ directory. Tell bitbake about the new meta-xilinx layer:
~/poky/build$ bitbake-layers add-layer "$HOME/poky/meta-xilinx"Add the following line to the conf/local.conf file:
MACHINE ?= "zc702-zynq7"We then start the build with:
~/poky/build$ bitbake core-image-minimalGo have lunch! This build is going to take a while…
Booting Via SD Card
The ZC702 can be configured to boot a Yocto Linux distribution from the SD card. The following instructions show how:
Setting Up A Bootable SD Card
Use dd to erase the first two sectors (replace X with the letter of the SD card):
~$ sudo dd if=/dev/zero of=/dev/sdX bs=1024 count=1Now let’s partition the SD card using the interactive fdisk command:
~$ sudo fdisk /dev/sdXFollow the following procedure, entering commands such as n, a and t where shown (the rest is fdisk output).
Command (m for help): nPartition type:    p primary (0 primary, 0 extended, 4 free)    e extendedSelect (default p): pPartition number (1-4, default 1): 1First sector (2048-15759359, default 2048):Using default value 2048Last sector, +sectors or +size{K,M,G} (2048-15759359, default 15759359): +200M
Command (m for help): nPartition type:    p primary (1 primary, 0 extended, 3 free)    e extendedSelect (default p): pPartition number (1-4, default 2): 2First sector (411648-15759359, default 411648):Using default value 411648Last sector, +sectors or +size{K,M,G} (411648-15759359, default 15759359):Using default value 15759359
Now set the bootable flag for the first partition, and set the partition IDs:
Command (m for help): aPartition number (1-4): 1
Command (m for help): tPartition number (1-4): 1Hex code (type L to list codes): cChanged system type of partition 1 to c (W95 FAT32 (LBA))
Command (m for help): tPartition number (1-4): 2Hex code (type L to list codes): 83
Check the new partition table is correct, and then write the changes:
Command (m for help): p
Disk /dev/sdb: 8068 MB, 8068792320 bytes249 heads, 62 sectors/track, 1020 cylinders, total 15759360 sectorsUnits = sectors of 1 * 512 = 512 bytesSector size (logical/physical): 512 bytes / 512 bytesI/O size (minimum/optimal): 512 bytes / 512 bytesDisk identifier: 0x920c958b
    Device Boot Start End Blocks Id System/dev/sdb1 * 2048 411647 204800 c W95 FAT32 (LBA)/dev/sdb2 411648 15759359 7673856 83 Linux
Command (m for help): wThe partition table has been altered!
Calling ioctl() to re-read partition table.
WARNING: If you have created or modified any DOS 6.xpartitions, please see the fdisk manual page for additionalinformation.Syncing disks.
Create file systems on the new partitions (this would cause VirtualBox to crash, but seemed to work fine using VMWare Workstation):
~$ sudo mkfs.vfat -F 32 -n boot /dev/sdX1~$ sudo mkfs.ext4 -L root /dev/sdX2Mount the partitions, sdX1 being the first partition (boot), and sdX2 being the second partition (where the root filesystem will be placed).
~$ sudo mkdir -p /mnt/sdX1~$ sudo mount /dev/sdX1 /mnt/sdX1~$ sudo mkdir -p /mnt/sdX2~$ sudo mount /dev/sdX2 /mnt/sdX2Copying Build Output Onto SD Card
You will want to copy over the following files from poky/build/tmp/deploy/images/zc702-zynq7/ onto the first partition (boot partition) of the SD card.
$ sudo cp boot.bin /mnt/sdX1/$ sudo cp u-boot.img /mnt/sdX1/$ sudo cp uImage /mnt/sdX1/$ sudo cp uImage-zynq-zc702.dtb /mnt/sdX1/$ sudo cp uEnv.txt /mnt/sdX1/We now will extract the root filesystem onto the second partition:
$ sudo tar x -C /mnt/sdX2/ -f core-image-minimal-zc702-zynq7.tar.gzuEnv.txt should contain information similar to the following:
kernel_image=uImagedevicetree_image=uImage-zynq-zc702.dtbbootargs=console=ttyPS0,115200 root=/dev/mmcblk0p2 rw rootwait earlyprintkuenvcmd=echo Copying Linux from SD to RAM... && fatload mmc 0 0x3000000 ${kernel_image} && fatload mmc 0 0x2A00000 ${devicetree_image} && bootm 0x3000000 - 0x2A00000Booting From SD Card
Insert the SD card onto the ZC702 dev board. Make sure the DIP switches (SW16) on the ZC702 board are set as follows:
- 1 -> LOW
- 2 -> LOW
- 3 -> HIGH
- 4 -> HIGH
- 5 -> LOW
Connect a cable from the mini-USB port on the dev. board (labelled J17 or USB UART) to your computer. Open a terminal on the COM port with the following settings:
- Baud rate = 115200
- Num. data bits = 8
- Parity = None
- Num. stop bits = 1
- Flow control = None
Now turn on the power switch to the dev. board. Hopefully, you should see it boot up!
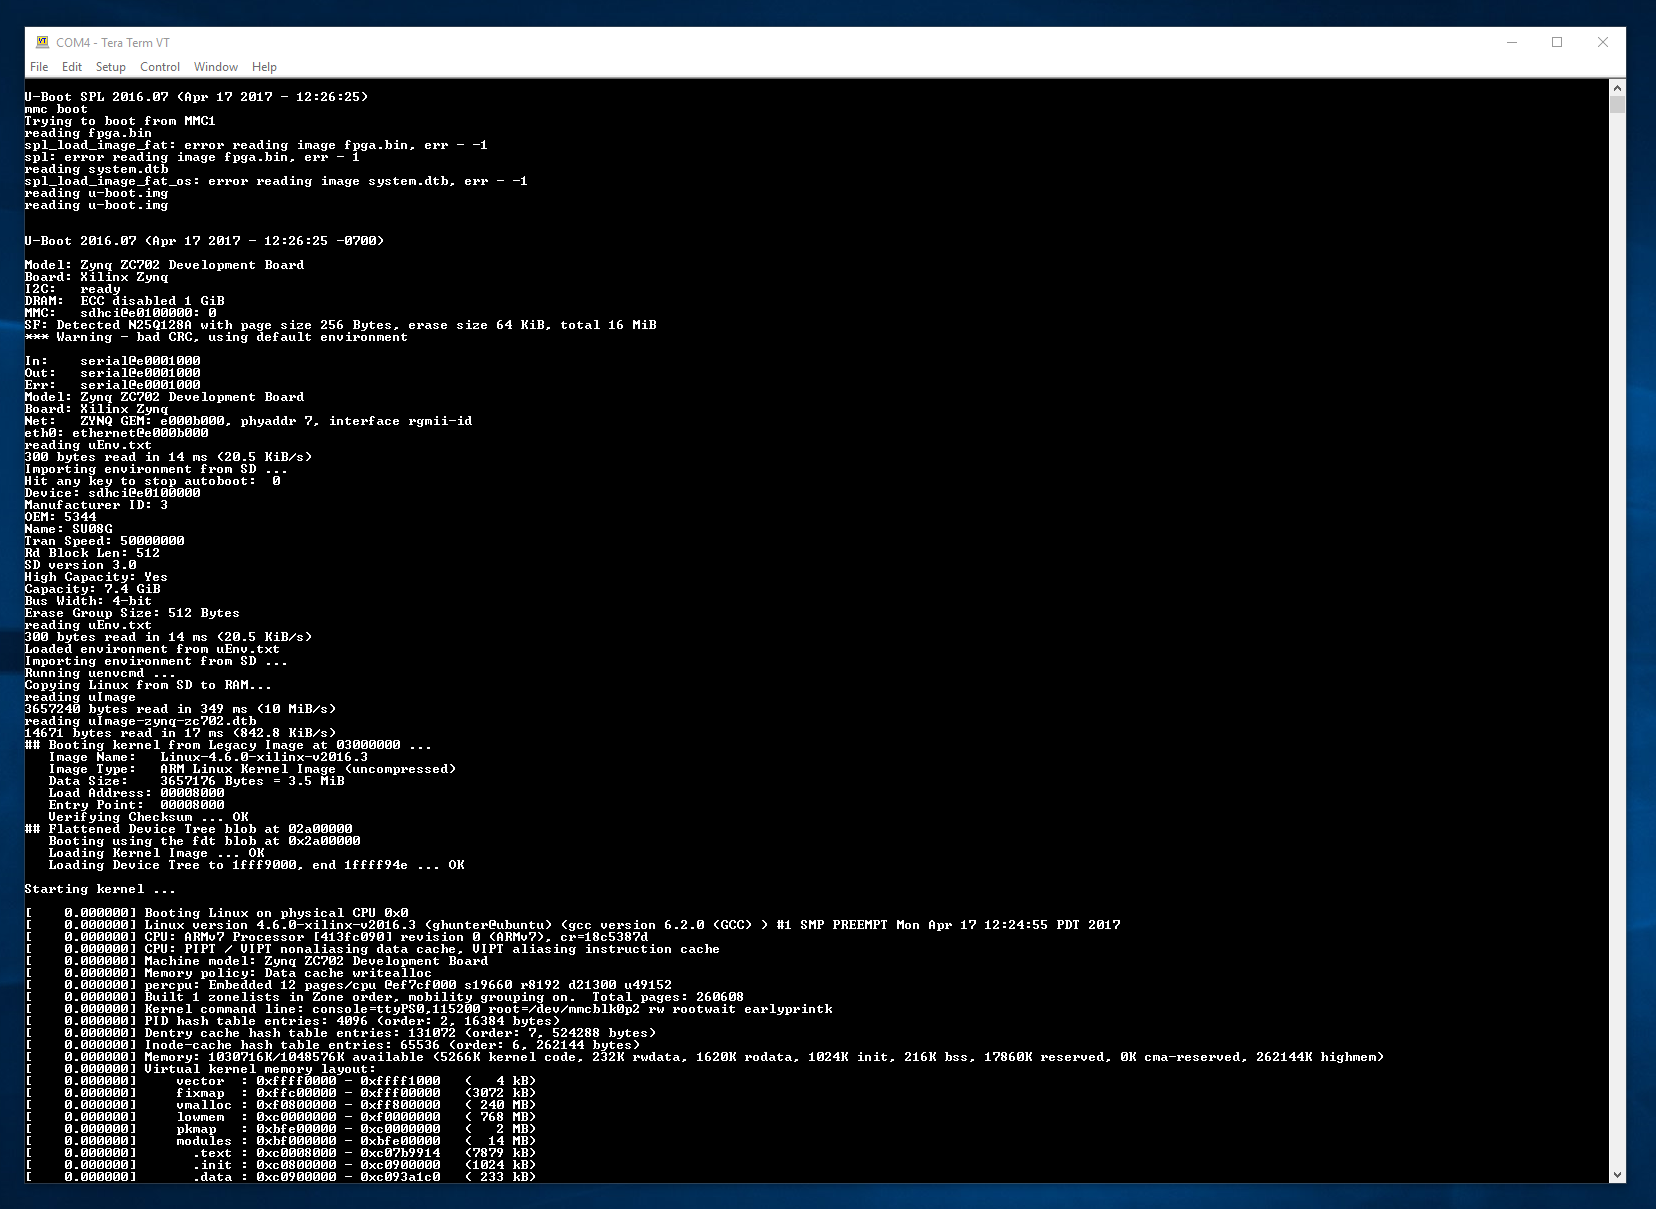
You should be able to log in as user root, with no password.
Booting Via TFTP
You can also use TFTP to transfer and boot compiled images from your desktop computer to the embedded device. The embedded device must have an internet/intranet connection to do so (e.g. Ethernet).
You must remember that U-Boot is required to be already present on the embedded device to support TFTP (you obviously need TFTP drivers to perform the communication, and this is what U-Boot provides). You can use TFTP to download the Linux kernel image, root filesystem and device tree.
setenv bootcmd 'tftpboot 0x2000000 uImage; tftpboot 0x3000000 core-image-minimal-zc702-zynq7.cpio.gz.u-boot; tftpboot 0x2A00000 uImage-zynq-zc702.dtb; bootm 0x2000000 0x3000000 0x2A00000'The above command assumes you have set up tftp on your server and then copied the Yocto build output into your tftpboot folder (e.g. /tftpboot/). Even better, you can make /tftpboot a symlink to your build directory:
$ sudo ln -s ~/poky/build/tmp/deploy/images/zc702-zynq7/ /tftpbootYou can then run this command by simply typing:
bootIn my experience, it usually takes about 30s from the time you type boot to the time to get to the Linux login screen, which includes downloading the files via TFTP and then booting the Linux image (for a 100MiB or so filesystem).
Booting Via Flash
Yocto produces a boot.bin file when building a Linux image for the ZC702 (using the meta-xilinx layer), but this doesn’t seem to be directly suitable for QSPI flash boot.
Create A FSBL Using Xilinx SDK
Load up the SDK. Select New->Application Project.
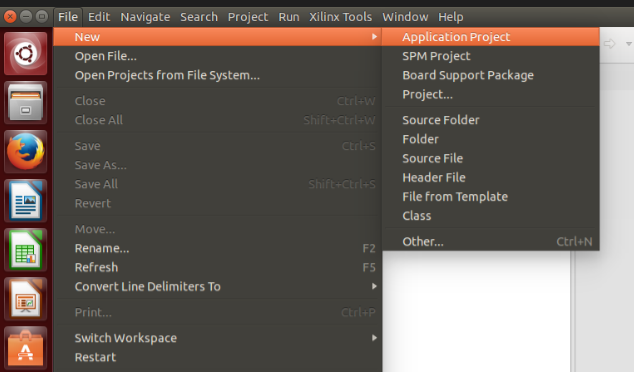
Enter a name:
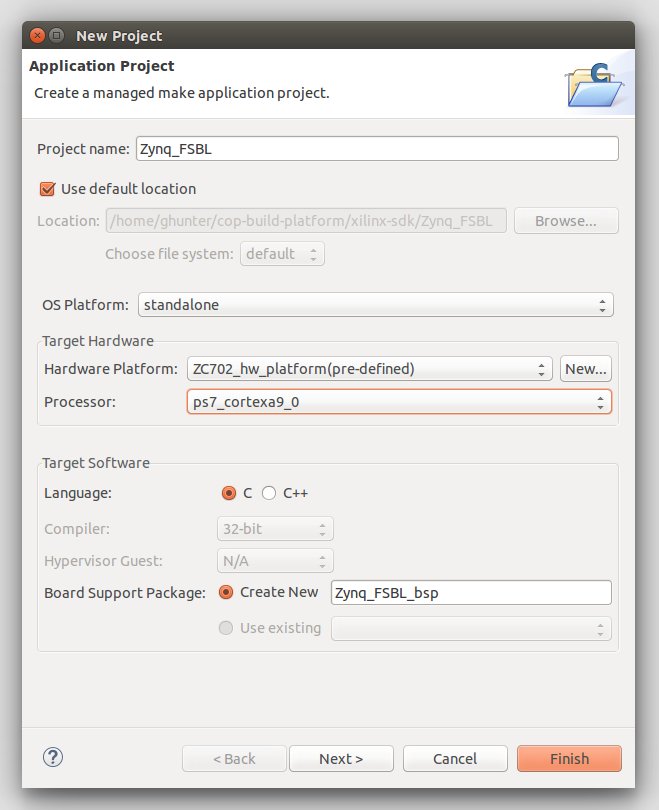
Click Next. Select FSBL.
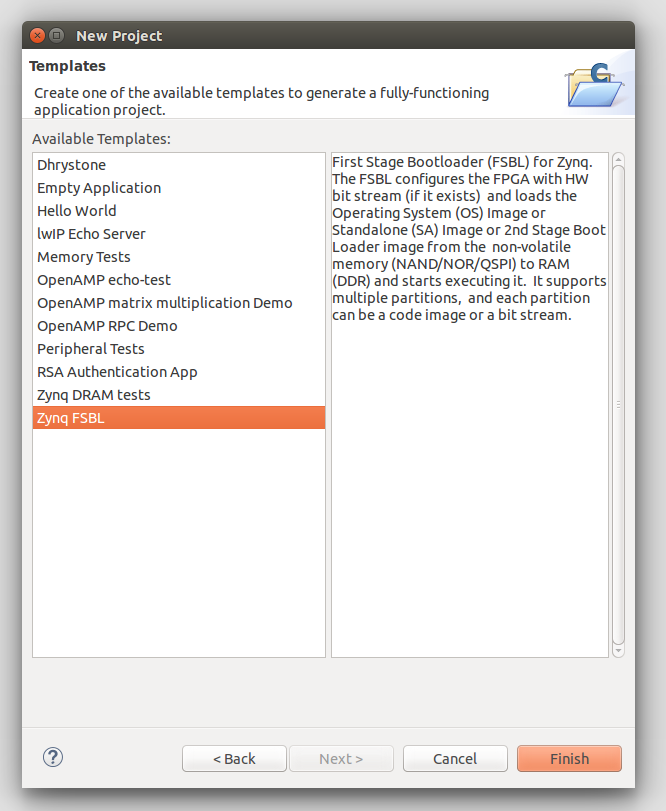
The Xilinx SDK should now create all the necessary files and run the build once.
This should create a FSBL as a .elf file in the Debug build directory.
Xilinx also has instructions for creating a Zynq FSBL at https://www.xilinx.com/support/documentation/sw_manuals/xilinx2013_4/SDK_Doc/tasks/sdk_t_project_creation_zynq_fsbl.htm
Create bootimage.bif
Manually create a bootimage.bif (bif is an acronym for Bootable Image Format) file using a text editor. It is pretty simple, and just needs to contain the following code:
the_ROM_image:{[bootloader]Zynq_FSBL.elf[load = 0x04000000, startup = 0x04000000]u-boot.elf}This file is used as a configuration file for bootgen (see below).
Create Flash Image Using bootgen
bootgen is a command-line application provided by the Xilinx SDK. It is used to stitch together the many files needed for an embedded OS to boot properly into one image file. For myself, it was located at /opt/Xilinx/SDK/2017.1/bin/.
Use the following command:
$ bootgen -image bootimage.bif -o BOOT.bin -wThis creates a BOOT.bin file from the bootimage.bif and the sources listed in the bootimage.bif file.
More information about bootgen can be found in Appendix A - Using Bootgen (page 55) of https://www.xilinx.com/support/documentation/user_guides/ug821-zynq-7000-swdev.pdf.
Program The Flash
You can program the flash connected to the Zynq on the ZC702 using Xilinx’s xsdb and program_flash utilities.
Firstly, make sure the micro-USB cable to the JTAG device on the ZC702 (U23) is connected to your Linux OS (see the Installing xsdb And JTAG Drivers page for more info).
Then, connect to the target using xsdb:
./xsdbconnecttargetThen use the program_flash utility to write the BOOT.bin file generated above to the flash:
~$ program_flash -f BOOT.bin -offset 0x0 -flash_type qspi_single -verify -cable type xilinx_tcf url tcp:localhost:3121More information on the Program Flash Utility can be found in the Embedded System Tools Reference Manual (UG1043).
Running In The Simulator (QEMU)
This assumes you have poky already downloaded onto your computer (see above). Create a new build directory for the QEMU build.
~/poky$ source oe-init-build-env build-qemuNote how an argument was provided to oe-init-build-env this time (build-qemu). This tells oe-init-build-env to initialise a build directory called build-qemu/ instead of the default, which is just build/ (we will keep build/ for the Linux build that runs on the real hardware).
As this is a fresh build directory, you need to add the meta-xilinx layer and set the machine again, this time to the QEMU variant. Tell bitbake about the layer:
~/poky/build-qemu$ bitbake-layers add-layer "$HOME/poky/meta-xilinx"Then add the following line to conf/local.conf:
MACHINE ?= "qemu-zynq7"Start the Linux build:
~/poky/build-qemu$ bitbake core-image-minimalNow run QEMU, passing in the location of the just-built QEMU configuration file.
~/poky/build-qemu$ runqemu tmp/deploy/images/qemu-zynq7/core-image-minimal-qemu-zynq7.qemuboot.conf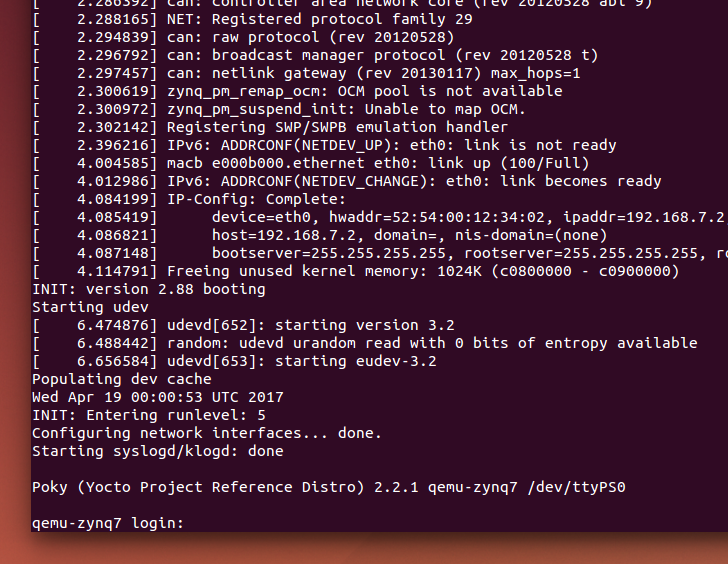
You should be able to log onto the Linux system with the username root, no password required.
Help! I Get A “No Recipes Available For…” Error
Is your error similar to:
ERROR: No recipes available for:/home/username/poky/meta-xilinx/recipes-microblaze/glibc/glibc-initial_2.25.bbappend/home/username/poky/meta-xilinx/recipes-microblaze/glibc/glibc_2.25.bbappendThis can happen if you forgot to checkout the correct branch of meta-xilinx. Remember, when you use the command git clone https://github.com/Xilinx/meta-xilinx, it will checkout the master branch. You then need to checkout the branch which matches the branch of poky you are using (this was morty when I did it), e.g.
~/poky/meta-xilinx$ git checkout mortyOther Resources
The Xilinx wiki page Prepare Boot Medium explains how to make a bootable SD card using Linux.