The Zephyr Shell

Zephyr features a “shell” (one of it’s modules) that it can provide over a serial transport such as a UART, USB or Segger RTT. The shell provides to the user things such as Linux command-line style commands, logging, auto-complete, command history and more. In It is great for implementing a debug interface to control your microcontroller from a terminal application such as NinjaTerm (shameless plug, I developed this app).
Zephyr provides an API that the firmware can use to define the commands available to the user over the shell.
Basic Shell Usage
CONFIG_SHELL=yThis might be all you need to get a basic shell working across the default serial transport (whatever printf() sends to). You should see the shell print a prompt to your terminal, e.g. uart:~$ .
Adding Commands
The API is provided by #include <zephyr/shell/shell.h>.
The macro SHELL_CMD_REGISTER() can be used to register a new root command. Let’s add a basic root command.
static int helloCallback(const struct shell* shell, size_t argc, char** argv){    printf("Hello, world!");    return 0;}
SHELL_CMD_REGISTER(hello, NULL, "Say hello", helloCallback);
Pointer to Specific Shell Instances
You can get a pointer to specific shell instances by using commands such as shell_backend_uart_get_ptr() (declared in zephyr/shell/shell_uart.h) or shell_backend_rtt_get_ptr() (declared in zephyr/shell/shell_rtt.h). For example, if you have a UART backend, you can use:
#include <zephyr/shell/shell_uart.h>
int main() {    struct shell * main_shell;    main_shell = shell_backend_uart_get_ptr();    __ASSERT(main_shell != NULL, "Failed to get shell backend.");}
shell_set_bypass() can be used to bypass the shell and send raw data to the serial port.
You can pass in NULL to clear an existing bypass, e.g.:
shell_set_bypass(sh, NULL);The model_shell example project makes use of this bypass feature to provide a direct AT command mode between the shell and the modem.
Shell Login
You can somewhat easily implement a login shell with Zephyr, which protects all the commands behind a simple root-level password that is required to “login”.
Setting CONFIG_SHELL_CMDS_SELECT=y in prj.conf will allow you to select which shell commands are available. Then you can call shell_set_root_cmd() from C code to set a root command. shell_set_root_cmd(NULL) will clear the root command and go back to showing all available commands.

shell_obscure_set(sh, true) causes all logs to stop. Then calling shell_obscure_set(sh, false) did not restore the logging. After a while a hard fault occurred, likely due to the log messages building up and overflowing some buffer. I managed to fix this by re-enabling the shell logging backend with z_shell_log_backend_enable():
z_shell_log_backend_enable(sh->log_backend, (void *)sh, sh->ctx->log_level);Another way to fix this is to just stop and start the shell with:
// Fix to restore loggingshell_stop(sh);shell_start(sh);These stop and start functions call z_shell_log_backend_disable() and z_shell_log_backend_enable() internally.
Below is the source code to create a login shell. It relies on a PRODUCTION_BUILD macro to determine if the login prompt should be shown or not, as in a development build it can be a pain to have to login each time you want to use the shell.
#include <zephyr/kernel.h>#include <zephyr/shell/shell.h>#include <zephyr/shell/shell_uart.h>#include <zephyr/init.h>
/** * The password for the shell login. */#define SHELL_PASSWORD "zephyr"
static int LoginInit(void){    // Only enable login in production builds, otherwise skip past the login prompt#if PRODUCTION_BUILD == 1    printk("Please login with password to continue.\n");    if (!CONFIG_SHELL_CMD_ROOT[0]) {        shell_set_root_cmd("login");    }    struct shell const * sh = shell_backend_uart_get_ptr();    // Obscure the input so that the password is not visible    shell_obscure_set(sh, true);
    // Disable logging to the console so that we don't see it at the login prompt    z_shell_log_backend_disable(sh->log_backend);#else    printk("Development build. Login is not required.\n");#endif    return 0;}
static int CheckPassword(char *passwd){    return strcmp(passwd, SHELL_PASSWORD);}
static int CmdLogin(const struct shell* sh, size_t argc, char** argv){    static uint32_t attempts;
    if (CheckPassword(argv[1]) != 0)    {        shell_error(sh, "Incorrect password!");        attempts++;        if (attempts > 3)        {            k_sleep(K_SECONDS(attempts));        }        return -EINVAL;    }
    // Clear history so password not visible there    z_shell_history_purge(sh->history);    shell_obscure_set(sh, false);
    shell_set_root_cmd(NULL);    shell_prompt_change(sh, "uart:~$ ");    z_shell_log_backend_enable(sh->log_backend, (void *)sh, sh->ctx->log_level);
    shell_print(sh, "Logged in successfully! Hit tab for help. Use the command \"logout\" to log back out.\n");    attempts = 0;    return 0;}
static int CmdLogout(const struct shell* sh, size_t argc, char** argv){    shell_set_root_cmd("login");    shell_obscure_set(sh, true);    shell_prompt_change(sh, "login: ");    // Disable logging to the console so that we don't see it at the login prompt    z_shell_log_backend_disable(sh->log_backend);    shell_print(sh, "\n");    return 0;}
SHELL_CMD_ARG_REGISTER(login, NULL, "<password>", CmdLogin, 2, 0);
SHELL_CMD_REGISTER(logout, NULL, "Log out.", CmdLogout);
SYS_INIT(LoginInit, APPLICATION, CONFIG_APPLICATION_INIT_PRIORITY);
shell_prompt_change(sh, "login: ") is used to change the shell prompt to login: so that it’s obvious to the user that they need to login before doing anything else.
An example of shell login can be found here.
Using the Shell Over USB CDC ACM
Add the following to your prj.conf file to enable the USB device driver:
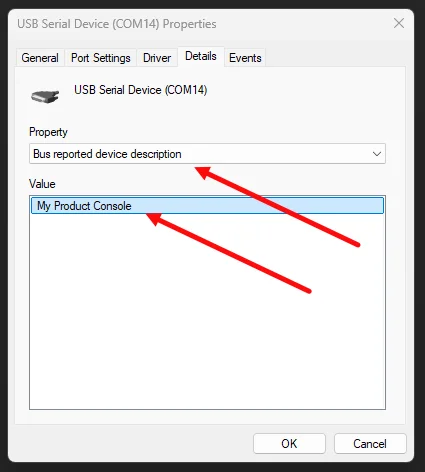
CONFIG_USB_DEVICE_STACK=yCONFIG_USB_DEVICE_PRODUCT="My Product Console"CONFIG_USB_DEVICE_VID=0xDEADCONFIG_USB_DEVICE_PID=0xBEEFCONFIG_USB_DEVICE_INITIALIZE_AT_BOOT=nThe CONFIG_USB_DEVICE_PRODUCT shows up in Windows as the “Bus reported device description” under the device properties in the Device Manager.
Add the following under /chosen in your board’s DTS file:
/ { chosen { zephyr,console = &cdc_acm_uart0; zephyr,shell-uart = &cdc_acm_uart0; };}Then add the following additional override for &zephyr_udc0 at the bottom of your board’s DTS file:
&zephyr_udc0 { cdc_acm_uart0: cdc_acm_uart0 { compatible = "zephyr,cdc-acm-uart"; };}Because we set CONFIG_USB_DEVICE_INITIALIZE_AT_BOOT=n, we need to initialize the USB device manually. This can be done in the main() function. We’ll also then want to send some data to test the USB CDC is working. We’ll use the LOG_INF() macro to send data to the shell.
#include <zephyr/logging/log.h>#include <zephyr/usb/usb_device.h>
LOG_MODULE_REGISTER(main, LOG_LEVEL_INF);
void preSerialFatalError(void) {    while (1) {        gpio_pin_toggle_dt(&l_userLedGpioSpec);        k_msleep(250);    }}
int main(void){    int usbEnableRc = usb_enable(NULL);    if (usbEnableRc != 0) {        preSerialFatalError();    }
while (1) { LOG_INF("Hello, world!"); k_sleep(K_SECONDS(1)); } return 0;}The official example waits for the DTR line to be asserted before sending data. In traditional serial communication, the DTR (data terminal ready) line is driven by Data Terminal Equipment (DTE) such as a computer to data communication equipment (DCE) such as a modem. The DTE uses it to signal it is ready to send data.1
Footnotes
-
Wikipedia (2025, Mar 10). Data Terminal Ready [wiki]. Retrieved 2025-07-30, from https://en.wikipedia.org/wiki/Data_Terminal_Ready. ↩