The Zephyr Installation Guide

Below are some basic Zephyr installation guides for various OSes. Another good read is the official Getting Started Guide. Installing Zephyr is not the easiest thing in world, compared to what you might expect from modern package managers such as npm, pip or cargo. But we have to give Zephyr a break because it is complex in the sense that it supports many different architectures and compiler toolchains.
Linux
Let’s create a new directory for the Zephyr project, and then create a Python virtual environment in a .venv sub-directory:
mkdir ~/zephyr-projectcd ~/zephyr-projectpython3 -m venv .venvsource .venv/bin/activateNow let’s install west in the virtual environment:
pip install westThis will make west available from the command line, as long as the virtual environment is activated.
We are not going to now run west init, as it will put zephyr in the project root directory. I prefer to keep all west managed dependencies in a single sub-directory so that it keeps the project root directory clean and is easy to setup .gitignore rules for.
So instead, let’s create a directory called .west, add a file called config with the contents:
[manifest]path = appfile = west.yml
[build]cmake-args = -DCMAKE_EXPORT_COMPILE_COMMANDS=ON -DBOARD_ROOT=../
[zephyr]base = external/zephyr
The base = external/zephyr will tell west to look for the zephyr source code in the external/zephyr directory. All of the other dependencies that are pulled down when you run west update will also go in the external directory alongside the zephyr directory.
Create a app directory, and then create a west.yml file in it with the following contents:
manifest: self: path: app remotes: - name: nrf url-base: https://github.com/nrfconnect projects: - name: sdk-nrf remote: nrf path: nrf revision: v3.0.1 import: path-prefix: external clone-depth: 1Now we can run west update to pull down all the required dependencies. This command will take some time (5-15mins) to complete, so sit back and have a coffee. It will populate the external directory with a lot of Git repos.
west updateNow update the Python dependencies (in older versions of Zephyr you had to call pip install -r <path_to_zephyr>/scripts/requirements.txt):
west packages pip --installInstall the Zephyr SDK (which is actually the toolchain):
west sdk installNote that the entire SDK is rather large, sitting around 12GB at v0.17.1 (see This is a placeholder for the reference: fig-screenshot-showing-the-size-of-the-zephyr-sdk and This is a placeholder for the reference: fig-west-sdk-download-screenshot). You can reduce this by only specifying specific toolchains to install with the --toolchains flag. The two I used the most are arm-none-eabi (compiling for real MCU) and x86_64-zephyr-elf (compiling tests for native_sim).
By default on Linux, the Zephyr SDK will be installed to a directory directly under your home directory. For example, ~/zephyr-sdk-0.17.1.

west sdk install --toolchains arm-zephyr-eabi x86_64-zephyr-elf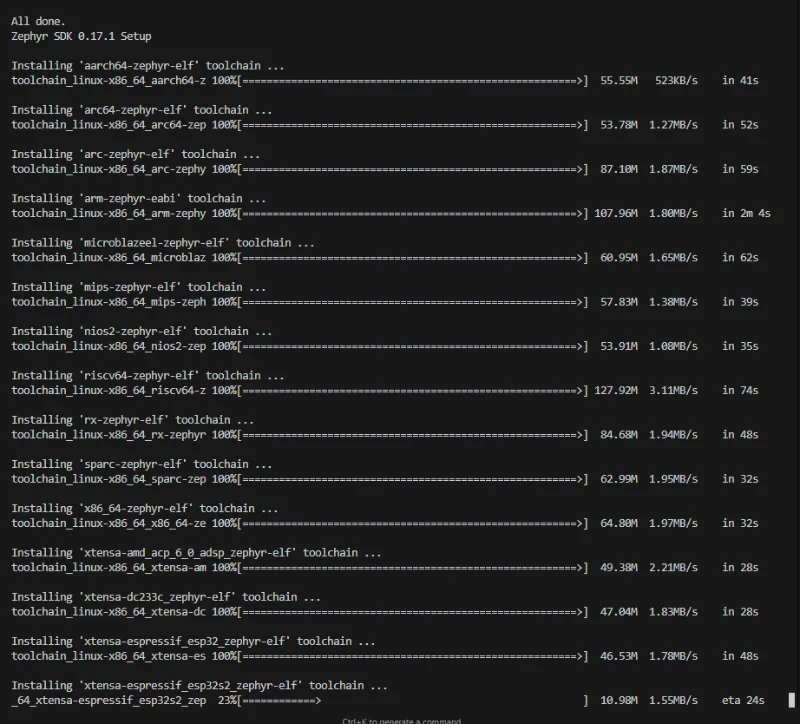
You can also specify a specific SDK version to install with the --version flag:
west sdk install --version 0.17.1If you have installed multiple versions of the Zephyr SDK, when building you can set the ZEPHYR_SDK_INSTALL_DIR environment variable to the path of the SDK you want to use.
Older Guide
I think this applied Zephyr prior to v4. In v4 they added commands such as west sdk install and west packages pip --install to make installation easier.
Windows
The easiest way to install Zephyr on Windows is to use the chocolatey package manager. Once that is installed, run the following steps from an elevated command prompt:
-
Enable global confirmation so that you don’t have to manually confirm the installation of individual programs:
Terminal window > choco feature enable -n allowGlobalConfirmationChocolatey v0.10.15Enabled allowGlobalConfirmation -
Install Zephyr dependencies:
Terminal window > choco install cmake --installargs 'ADD_CMAKE_TO_PATH=System'> choco install ninja gperf python gitIf you already have some of these packages installed on your machine via means other than chocolatey, it’s advisable to remove them from the above command so you don’t install them again and have one program shadow/conflict the other.
-
Install the Zephyr command-line tool called
west(NOTE: I have run into problems using a Python virtual environment, so I installwestto the OS version of Python, more on this below):Terminal window > pip install west -
Create a new Zephyr project:
Terminal window > west init myproject=== Initializing in C:\Users\gbmhunter\myproject--- Cloning manifest repository from https://github.com/zephyrproject-rtos/zephyr, rev. masterInitialized empty Git repository in C:/Users/gbmhunter/myproject/.west/manifest-tmp/.git/remote: Enumerating objects: 55, done.remote: Counting objects: 100% (55/55), done.remote: Compressing objects: 100% (42/42), done.......Branch 'master' set up to track remote branch 'master' from 'origin'.--- setting manifest.path to zephyr=== Initialized. Now run "west update" inside C:\Users\gbmhunter\zephyrproject.WARNING: I got the following error when trying to use a Python virtual environment rather than the OS Python environment to install west and then run
west init:> python -m venv .venv> .\.venv\Scripts\activate> pip install west> west init myprojectUpdating files: 100% (14758/14758), done.Already on 'master'Branch 'master' set up to track remote branch 'master' from 'origin'.Traceback (most recent call last):File "C:\Users\gbmhunter\AppData\Local\Programs\Python\Python38-32\lib\shutil.py", line 788, in moveos.rename(src, real_dst)PermissionError: [WinError 5] Access is denied: 'C:\\Users\\gbmhunter\\myproject\\.west\\manifest-tmp' -> 'C:\\Users\\gbmhunter\\myproject\\zephyr' -
Change into the project directory and run
west update:Terminal window > west updateThis command can take a few minutes to run as it clones a number of repositories into the project directory.
-
Export a Zephyr CMake package to your local CMake user package registry. This allows CMake to automatically find a Zephyr “base”:
Terminal window > west zephyr-exportZephyr (C:/Users/gbmhunter/zephyrproject/zephyr/share/zephyr-package/cmake)has been added to the user package registry in:HKEY_CURRENT_USER\Software\Kitware\CMake\Packages\ZephyrZephyrUnittest (C:/Users/gbmhunter/zephyrproject/zephyr/share/zephyrunittest-package/cmake)has been added to the user package registry in:HKEY_CURRENT_USER\Software\Kitware\CMake\Packages\ZephyrUnittest -
Download and install the GNU Arm Embedded Toolchain from https://developer.arm.com/tools-and-software/open-source-software/developer-tools/gnu-toolchain/gnu-rm/downloads. By default it will want to be installed on your system at
C:\Program Files (x86)\GNU Arm Embedded Toolchain\10 2020-q4-major>, but don’t let it! Zephyr does not like spaces in the path, so install it to a path which has none. I choseC:\gnu-arm-embedded-toolchain\10-2020-q4-major\: -
Setup environment variables:
Terminal window set ZEPHYR_TOOLCHAIN_VARIANT=gnuarmembset GNUARMEMB_TOOLCHAIN_PATH=C:\gnu-arm-embedded-toolchain\10-2020-q4-major -
Install the Python dependencies that Zephyr
-
Build the application! For this example I will be using the ST NUCLEO F070RB development board. Note that you can’t build this from the project root directory, first you have to change into the
zephyrsubdirectory:Terminal window > cd .\zephyr> west build -b nucleo_f070rb samples/basic/blinkyC:\Users\gbmhunter\temp\myproject\zephyr>west build -b nucleo_f070rb samples/basic/blinky[121/128] Linking C executable zephyr\zephyr_prebuilt.elf[128/128] Linking C executable zephyr\zephyr.elfMemory region Used Size Region Size %age UsedFLASH: 13544 B 128 KB 10.33%SRAM: 4416 B 16 KB 26.95%IDT_LIST: 0 GB 2 KB 0.00% -
Install OpenOCD from https://github.com/xpack-dev-tools/openocd-xpack/releases. I extracted the .zip file and then copied the files to
C:\Program Files\OpenOCD\bin. -
Flash the application:
Terminal window west flashNOTE: I got an error when running this:
File "C:\Users\gbmhunter\temp\myproject\zephyr\scripts/west_commands\runners\core.py", line 504, in requireif shutil.which(program) is None:File "C:\Users\gbmhunter\AppData\Local\Programs\Python\Python38-32\lib\shutil.py", line 1365, in whichif os.path.dirname(cmd):File "C:\Users\gbmhunter\AppData\Local\Programs\Python\Python38-32\lib\ntpath.py", line 223, in dirnamereturn split(p)[0]File "C:\Users\gbmhunter\AppData\Local\Programs\Python\Python38-32\lib\ntpath.py", line 185, in splitp = os.fspath(p)TypeError: expected str, bytes or os.PathLike object, not NoneType
Ubuntu/WSL
Follow these instructions to setup/install Zephyr on UNIX like systems, including Ubuntu and WSL. Use of apt assumes you are running a Debian like system.
-
Firstly, install system dependencies:
Terminal window sudo apt install --no-install-recommends git cmake ninja-build gperf \ccache dfu-util device-tree-compiler wget \python3-dev python3-pip python3-setuptools python3-tk python3-wheel xz-utils file \make gcc gcc-multilib g++-multilib libsdl2-dev -
Next, download the Zephyr SDK. The SDK contains toolchains (compilers, linkers, assemblers and other tools such as QEMU and OpenOCD) for all of Zephyr’s supported architectures (e.g.
ARM,RISCV64,x86_64,Xtensa,aarch64). Find the release you want from https://github.com/zephyrproject-rtos/sdk-ng/tags (use the latest if you don’t otherwise care). The example below usesv0.16.4for x86-64 Linux.This is downloaded and installed outside of the Zephyr project directory. You only need one copy of this for many Zephyr projects.
Terminal window cd ~wget https://github.com/zephyrproject-rtos/sdk-ng/releases/download/v0.16.4/zephyr-sdk-0.16.4_linux-x86_64.tar.xzThis file is over 1GB in size, so make sure you have space! There is also a minimal release which doesn’t come with all the toolchains, but instead let’s you select and download the ones you needed.
-
Extract the downloaded SDK:
Terminal window tar xvf zephyr-sdk-0.16.4_linux-x86_64.tar.xzThis will extract the SDK to
~/zephyr-sdk-0.16.4. You can choose to move it somewhere else if you want. Other common choices include/opt/and/usr/local/. This is another big operation which might take minutes to complete! -
Run the Zephyr SDK setup script:
Terminal window cd zephyr-sdk-0.16.4./setup.sh -
Install
udevrules, which let’s you program most boards as a regular user (serial port permissions):Terminal window sudo cp ~/zephyr-sdk-0.16.4/sysroots/x86_64-pokysdk-linux/usr/share/openocd/contrib/60-openocd.rules /etc/udev/rules.dsudo udevadm control --reload -
Create a new directory for the Zephyr project and a Python virtual environment in a
.venvsub-directory:Terminal window mkdir ~/zephyr-projectcd ~/zephyr-projectpython3 -m venv .venvsource .venv/bin/activate -
Install
westin the new virtual environment (westis a Python package). As long as the virtual environment is activated, this will makewestavailable from the command line:Terminal window pip install west -
Initialize the west workspace:
Terminal window west init .This creates a directory called
.westinside the current working directory. Inside.westanother directory calledmanifest-tmp. -
Update:
Terminal window west updatewest updatedownloads a lot of Git submodules that are present in the project under./modules/. This may take a few minutes to complete. -
Export a Zephyr CMake package:
Terminal window west zephyr-exportThis adds
Zephyrto the user package registry at~/.cmake/packages/Zephyr(which is outside of the project root directory). You should get a message like this:Zephyr (/home/gbmhunter/zephyr-project/zephyr/share/zephyr-package/cmake)has been added to the user package registry in:~/.cmake/packages/Zephyr -
Install additional Python dependencies:
Terminal window pip install -r ./zephyr/scripts/requirements.txt -
cdinto thezephyrdirectory (a sub-directory of the project directory) and build the Blinky sample:Terminal window cd ~/zephyr-project/zephyrwest build -p auto -b nucleo_f070rb samples/basic/blinky -
Make sure the dev. kit is plugged into the computer, and then flash the application onto the dev kit (remember we were using the NUCLEO-F070RB for this example):
Terminal window west flash
If you don’t have a dev. board, you could always test out Zephyr by building it for Linux.
west build -p auto -b native_sim samples/basic/blinkyThe build executable is at ./zephyr/build/zephyr/zephyr.exe (even though the extension is .exe, it is compiled for Linux not Windows). Of course, there is no basic LED we can blink when running on Linux, but it is mocked for us and instead prints to stdout:
~/zephyr-project/zephyr/build/zephyr$ ./zephyr.exe*** Booting Zephyr OS build zephyr-v3.5.0-4014-g0d7d39d44172 ***LED state: OFFLED state: ONLED state: OFFLED state: ONLED state: OFFLED state: ON...Creating An Application
Once you’ve followed the installation instructions, you should be able to build and flash repository applications that are contained with the Zephyr repo (e.g. blinky). But what if you want to develop your own application? This is were is pays to understand the three different application types:
- Repository Application: An application contained with the Zephyr repository itself (inside the
zephyr/directory in the workspace you created above). Typically these are example projects undersamples/like “Hello, world!” and “blinky”. In the directory structure below,hello_worldis a repository application.zephyr-project/├─── .west/│ └─── config└─── zephyr/├── arch/├── boards/├── cmake/├── samples/│ ├── hello_world/│ └── ...├── tests/└── ... - Workspace Application: An application that is within the west workspace, but not within the zephyr repository (
zephyr/). This is the way I recommended you create an application if you’re learning! In the directory structure below,appis a workspace application:<home>/├─── zephyr-project/│ ├── .west/│ ├── app/│ │ ├── CMakeLists.txt│ │ ├── prj.conf│ │ └── src/│ │ └── main.c│ ├── zephyr/│ ├── bootloader/│ ├── modules/│ └── ... - Freestanding Application: An application that is not within the west workspace, i.e. stored somewhere else entirely on your disk. In the directory structure below,
appis a freestanding application:<home>/├─── zephyr-project/│ ├─── .west/│ │ └─── config│ ├── zephyr/│ ├── bootloader/│ ├── modules/│ └── ...│└─── app/├── CMakeLists.txt├── prj.conf└── src/└── main.c
Creating a Workspace Application
If you are learning, I’d recommend you start by creating a bare bones workspace application to learn what the core files are for. Create a directory called app in the workspace, and then cd into it:
cd ~/zephyr-projectmkdir appcd appNow create a file called CMakeLists.txt with the follow context:
cmake_minimum_required(VERSION 3.20.0)
find_package(Zephyr)project(my_zephyr_app)
target_sources(app PRIVATE src/main.c)
Create an empty prj.conf inside this app directory. It needs to exist, but you don’t need anything in it for now.
The last thing you need to create a directory called src to store all the source code, and then create a file in it called main.c with the following contents.
#include <stdio.h>#include <zephyr/kernel.h>
int main(void) {    while (1) {        printf("Hello, world!\n");        k_msleep(1000);    }    return 0;}
Your basic app is done! Your file structure should look like this:
<home>/├─── zephyr-project/│ ├── .west/│ ├── app/│ │ ├── CMakeLists.txt│ │ ├── prj.conf│ │ └── src/│ │ └── main.c│ ├── zephyr/│ ├── bootloader/│ ├── modules/│ └── ...To build and run, first cd back into the west workspace at ~/zephyr-project/. The run this at the command-line:
west build -b native_sim ./appwest build -t runThe first command performs a build, telling west to use the native_sim board (runs on Linux) and to build the app located at ./app. The second command tells west to run it, and you should get output similar to this:
(.venv) geoff@my-computer:~/zephyr-project$ west build -t run-- west build: running target run[1/2] cd /home/geoff/zephyr-project/build && /home/geoff/zephyr-project/build/zephyr/zephyr.exe*** Booting Zephyr OS build zephyr-v3.5.0-4014-g0d7d39d44172 ***Hello, world!Hello, world!Hello, world!...Getting VSCode IntelliSense Working
The most effective way of getting VS Code’s IntelliSense working well with Zephyr is to use the “compile_commands” method as described below. I’ve found this to be much more effective than trying to provide include paths.
Add the following to your .west/config file:
[build]cmake-args = -DCMAKE_EXPORT_COMPILE_COMMANDS=ONThis will tell CMake to always generate a compile_commands.json file when building.
Add the following to your .vscode/c_cpp_properties.json file:
{ "configurations": [ { "name": "App Config", "compileCommands": "${workspaceFolder}/build/compile_commands.json" } ], "version": 4}This will tell VS Code to use the compile_commands.json file for IntelliSense. The above snippet assumes your build directory is build/. Change this as needed.
Rebuild your project from scratch. A compile_commands.json should be generated in your build directory. Thus will be picked up by VSCode’s Intellisense and should fix any include errors you have!
If you are working on multiple apps with one west workspace, you can separate configurations for each. The following example sets up two configurations, one for the application and one for it’s ztest unit tests that are in a tests/ sub-directory, and with a build folder set to build-tests:
{ "configurations": [ { "name": "App Config", "compileCommands": "${workspaceFolder}/build/compile_commands.json" }, { "name": "Tests Config", "compileCommands": "${workspaceFolder}/build-tests/compile_commands.json" } ], "version": 4, "enableConfigurationSquiggles": true}Once this is added, you can select the active configuration from the right-hand side of the bottom toolbar within VS Code.
Instead of adding to .vscode/c_cpp_properties.json, if you just have one configuration, you can instead add it to .vscode/settings.json:
{ "C_Cpp.default.compileCommands": "${workspaceFolder}/build/compile_commands.json",}If you want more info on Zephyr unit tests and IntelliSense, see the Tests section of this page.
Using clangd
clangd is championed by some as having better IntelliSense than the default VS Code C/C++ extension. You can get clangd working with Zephyr and VS Code by installing the clangd extension.
For some reason, I could never get clangd to work fully. There was always some issue, like clangd not being able to find the header file <functional>.
Moving a West Workspace
I haven’t had much luck moving a West workspace on Linux. After moving, the west executable could not be found (making sure the Python virtual environment was activated).