Zephyr

Overview
Zephyr is the combination of a real-time operating system, peripheral/system API framework, and build system that is designed for resource-constrained devices such as microcontrollers. Is is part of the Linux Foundation.

Zephyr provides a firmware developer with a rich ecosystem of out-of-the-box OS and peripheral functionality that is consistent across MCU manufacturers (e.g. you can use the same UART API on both a STM32 and nRF53 MCU). It also features an integrated build system called west.
Some criticism arises from Zephyr’s complexity. Once such example is that Zephyr adds layers of additional configurability with the use of Kconfig (a configuration language that was originally designed to configure the Linux kernel1) and the device tree. Firmware behaviour can now be controlled via a combination of Kconfig settings, device tree settings, preprocessor macros and API calls at runtime. The Kconfig is layered in a hierarchical manner and dependencies and overrides can make it difficult to determine how your MCU is being configured.
Another issue is that the Zephyr device tree is very “static” and is designed for a static hardware configuration. While fine for most basic firmware projects, some advanced projects may require dynamic hardware configuration. For example, you may want the same firmware to support different hardware configurations, and need to configure pins/peripherals differently at runtime based of a version number read from flash. Zephyr has no way of “uninitializing” peripherals via it’s API, and you typically have to reach around and use the raw hardware registers to do this. An example would be if you wanted to reconfigure an ADC input as a GPIO pin.
The main repo can be found on GitHub.
Zephyr provides cooperative and preemptive scheduling.
Uses a CMake build environment.
Zephyr is cross-platform and supported on Linux, Windows and macOS (i.e. you can cross-compile projects and flash embedded devices from any of those systems). You can also compile Zephyr for Linux, which is useful for testing and debugging.
Zephyr is also a platform supported by the PlatformIO build system and IDE.
Child Pages
Hardware Abstraction Layers
Examples of some of the HALs (which are installed under <project root dir>/modules/hal/) supported by Zephyr:
- ST
- STM32
- NXP
- Atmel
- Microchip
Supported Boards
See https://docs.zephyrproject.org/latest/boards/index.html#boards for a comprehensive list of all the development boards supported by the Zephyr platform.
Native Simulator (native_sim)
native_sim allows you to build a Zephyr application to run on POSIX-like OSes, e.g. Linux.
To build for POSIX, provide native_sim as the build target to west with the -b option, e.g.:
west build -b native_sim samples/hello_worldYou can then run the built application with:
west build -t runThe executable will start up and run until you kill it with Ctrl+C. Note that you cannot terminate the program from the code by returning from main() or by calling exit(). If you do want to exit, you can call nsi_exit() instead, providing a int status code which will be returned as if you had returned it from main(). For example:
void my_function(void) { // ... // This will cause the Zephyr native_sim executable to correctly exit nsi_exit(0);}If the code you want to return from needs to support other boards, you can use the preprocessor CONFIG_ARCH_POSIX to conditionally include the call:
void my_function(void) { // ...#ifdef CONFIG_ARCH_POSIX nsi_exit(0);#endif}I couldn’t find out what Zephyr header file declared this function, so if you want to get rid of the compiler warning about the function being undefined, declare it yourself (above where you want to use it in a .c file, or in your own header file) with:
// Declaration of the function provided by Zephyr. Couldn't find the header file where it's declared,// so it's declared here.void nsi_exit(int status);The native_sim board supports the following APIs (among others):
- GPIO (mocked)
- Watchdog
- Timers
Programming
west has built-in support for programming a number of different MCUs via west flash. You can specify the programmer you want to use with the --runner option. For example, to use a JLink programmer:
west flash --runner jlinkI got the following error when the target board was not powered up (when programming a Nordic Semiconductor nRF52840):
FATAL ERROR: command exited with status 1: /opt/SEGGER/JLink_V794i/JLinkExe -nogui 1 -if swd -speed 4000 -device nrf52840_xxaa -CommanderScript /tmp/tmp48nqgzxijlink/runner.jlink -nogui 1Sometimes the MCU you are programming may not be recognized by JLink (if using the --runner jlink option). You may get the pop-up shown in This is a placeholder for the reference: fig-j-link-unknown-device-nrf9151-pop-up. This happened to me when I was programming the newish nRF9151 SoCs from a nRF9161 DK using JLink v7.94i (presumably JLink v7.94i was not new enough to support the nRF9151).
If this happens, and you know that there is a recognized device which will work, you can click OK and a modal will show in which you can select the device. This gets old fast though when programming the SoC during development. Instead, you can specify the SoC with the --device option. In the above example, I knew pretending to be the nRF9160 worked ok, so I could use:
west flash --runner jlink --device nrf9160Device Trees
Zephyr borrows the concept of device trees popularized by Linux to describe the hardware that the firmware is running on. Device trees are computer-readable text files that have a hierarchical structure.
Terminology
/dts-v1/;
/ {    a-node {        a-subnode-node-label: a-sub-node {            a-property = <3>;        };    };};
a-node is a node. It is freely chosen identifier for a container. a-sub-node is a subnode. It is also a freely chosen identifier.
Basic Example
/dts-v1/;
/ {    soc {        uart0: serial@12340000 {            ...        };    };};
Getting Nodes
In C, to grab a node from the device tree you can use:
By path
Use DT_PATH() to get the node from a fully quality path from the root node. e.g DT_PATH(soc, serial_12340000). Note that non alphanumeric characters in the devicetree are converted to _, including hyphens and at symbols.
Do not use camel case when naming nodes, as DT_PATH() cannot work with these.
/ {    mySoc { // Bad! DT_PATH() won't like this        serial@12340000 {            ...        };    };
    mysoc { // Good!        serial@12340000 {            ...        };    };};
By node label
Use DT_NODELABEL(), e.g. DT_NODELABEL(uart0).
Compiled Full Device Tree
When you perform a build, a final, merged device tree gets generated at build/zephyr/zephyr.dts. This file is useful for debugging device tree issues.
Silencing Spurious Duplicate Unit Address Warnings
Sometimes when building Zephyr projects you can get “duplicate unit-address” warnings which are false positives. These are emitted by the dtc (devicetree compiler). This happens for example with the nRF52 SoC, where different Zephyr “peripherals” do share the same memory address.
For example, when building for a custom board that uses the nRF52 SoC, I got the following warning:
/home/gbmhunter/project/app/build/zephyr/zephyr.dts:54.25-59.5: Warning (unique_unit_address_if_enabled): /soc/clock@40000000: duplicate unit-address (also used in node /soc/power@40000000)To silence this warning, you can create a file called pre_dt_board.cmake in your board directory and add the following:
list(APPEND EXTRA_DTC_FLAGS "-Wno-unique_unit_address_if_enabled")This is in fact what nRF has added to their dev. board files to silence the warning.2
Full Example
Example device tree (for the STM32F070RB development board):
/* * Copyright (c) 2018 qianfan Zhao * * SPDX-License-Identifier: Apache-2.0 */
/dts-v1/;#include <st/f0/stm32f070Xb.dtsi>#include "arduino_r3_connector.dtsi"
/ {  model = "STMicroelectronics NUCLEO-F070RB board";  compatible = "st,stm32f070rb-nucleo", "st,stm32f070";
  chosen {    zephyr,console = &usart2;    zephyr,shell-uart = &usart2;    zephyr,sram = &sram0;    zephyr,flash = &flash0;  };
  leds {    compatible = "gpio-leds";    green_led_2: led_2 {      gpios = <&gpioa 5 GPIO_ACTIVE_HIGH>;      label = "User LD2";    };  };
  gpio_keys {    compatible = "gpio-keys";    user_button: button {      label = "User";      gpios = <&gpioc 13 GPIO_ACTIVE_LOW>;    };  };
  aliases {    led0 = &green_led_2;    sw0 = &user_button;  };};
&usart1 {  current-speed = <115200>;  status = "okay";};
&usart2 {  current-speed = <115200>;  status = "okay";};
&i2c1 {  status = "okay";  clock-frequency = <I2C_BITRATE_FAST>;};
&i2c2 {  status = "okay";  clock-frequency = <I2C_BITRATE_FAST>;};
&spi1 {  status = "okay";};
&spi2 {  status = "okay";};
&iwdg {  status = "okay";};
System/OS Features
Time
System on time can be read with k_uptime_get() which returns a int64_t with the number of milliseconds since system start.
For higher level precision, you can measure time in either ticks or cycles.
Cycles are the fastest clock that you have available. You can use k_cycle_get_32() to get a uint32_t of the system’s hardware clock. You can then use functions like k_cyc_to_us_floor64() to convert this into an equivalent number of microseconds:
uint64_t currentTime_us = k_cyc_to_us_floor64(k_cycle_get_32());Although I could not find it explicitly mentioned anywhere in the Zephyr documentation, it appears that it is safe to use cycles for time measurements even if the microcontroller is sleeping. I suspect Zephyr updates the cycle count when the system wakes back up to account for the duration of the sleep.
Be careful with the 32-bit value from k_cycle_get_32(). With a fast clock, this could overflow pretty quickly. If you are just interested in the duration between two time points, luckily the maths of subtracting a large unsigned number from a smaller one still gives you the right duration, until of course the later time catches up and passes the same uint32_t value the previous time point was at.
Sleep
You can sleep the current thread with the k_sleep(timeout_t timeout) function. This function is typically used in conjunction with the timeout macros such as K_MSEC(), K_SECONDS() e.t.c to create a timeout:
// Sleep current thread for 1 secondk_sleep(K_MSEC(1000));All K_MSEC() style macros sleep for a relative amount of time. If you want to sleep until an absolute time, one option is to use the k_uptime_get() function and calculate the relative amount of time to sleep:
/** * Sleep until the system time is equal to or greater than the target time. * This is useful in testing when we want to sleep until a specific absolute time, * rather than a relative time as per k_sleep(K_MSEC(...)). */void sleepUntilSystemTime(int64_t targetTimeMs){    int64_t currentTimeMs = k_uptime_get();    int64_t remainingTimeMs = targetTimeMs - currentTimeMs;
    if (remainingTimeMs > 0) {        k_sleep(K_MSEC(remainingTimeMs));    }}
Timers
Zephyr Timers are an OS primitive that you can start and then have timeout after a certain duration. If you provide a callback, you can to run things after a fixed duration in the future in either a one-off (one-shot) or continuous manner. If you don’t provide a callback, you can still inspect the state of the timer from your application.
You do not have to add anything to prj.conf to use timers. First you’ll need to include the following header file which defines the timer API:
#include <zephyr/kernel.h>You create a timer object and initialize it with:
struct k_timer myTimer;
void MyHandlerFn(struct k_timer * timer){    LOG_DBG("Hello!");}
// Initialize it with an expiry function, but no stop functionvoid k_timer_init(&myTimer, &MyHandlerFn, NULL);
expiryFn and stopFn are both optional and can be NULL if you don’t want anything to be called when the timer expires or stops.
You can then start a timer with void k_timer_start(struct k_timer * timer, k_timeout_t duration, k_timeout_t period).
// Start the timerk_timer_start(struct k_timer * myTimer, K_MSEC(1000), K_NO_WAIT);duration is the time before the timer expires for the first time. period is the time between expires after the first one. period can be set to K_NO_WAIT or K_FOREVER to make the timer only expire once (one-shot).
Here is a basic example:
#include <stdio.h>#include <zephyr/kernel.h>
extern void MyExpiryFn(struct k_timer * timerId) {    printf("Timer expired!\n");}
int main(void) {    struct k_timer myTimer;    printf("Creating timer to expire every 1s...\n");    k_timer_init(&myTimer, MyExpiryFn, NULL);    k_timer_start(&myTimer, K_MSEC(1000), K_MSEC(1000));
    while (1) {        k_msleep(1000);    }    return 0;}
You can read the official Zephyr documentation for Timers here.
Threads
A Zephyr thread is a kernel object which can be used to execute code asynchronously to other threads. Threads can operate both cooperatively (a thread continues running until it gives up control) and pre-emptively (the thread is interrupted by the kernel when the kernel decides to run something else).
A basic thread can be created and started with the following code:
#define PRIORITY   (5)#define STACK_SIZE (500)
// Statically define the thread stack. See below for how to dynamically allocate the stack using K_KERNEL_STACK_MEMBER()K_THREAD_STACK_DEFINE(myThreadStack, STACK_SIZE);
void MyThreadFn(void *, void *, void *){    LOG_INF("Thread started!");    while(1) {        k_msleep(1000);    }}
int main() {    // Dynamically create thread    struct k_thread myThread;    k_tid_t myTid = k_thread_create(        &myThread, myThreadStack,        K_THREAD_STACK_SIZEOF(myThreadStack),        MyThreadFn,        NULL, NULL, NULL, // User data you can pass to your thread function if desired        PRIORITY, 0, K_NO_WAIT);
// Wait for thread to finish (which won't happen because we never return from the // thread function) k_thread_join(myTid, K_FOREVER);}Make sure you call K_THREAD_STACK_SIZEOF() in the same file as the K_THREAD_STACK_DEFINE() macro. If you pass the stack into a different file, and call K_THREAD_STACK_SIZEOF() on it, you will get back the wrong size (I got -60 when doing this). Thus you have to pass both the stack and the size into functions in other files (just like you would for a basic C array).
Dynamic Thread Stack Allocation
You’ll notice that in the above example, although the thread is created at runtime, the stack is statically defined at compile time with K_THREAD_STACK_DEFINE(). Statically defining the stacks does not play well if you want to write your code in a “object-oriented” manner. Luckily, Zephyr allows you to specify a stack as a member of a struct using the macro K_KERNEL_STACK_MEMBER(sym, size).3 For example:
typedef struct {    struct k_thread thread;    K_KERNEL_STACK_MEMBER(threadStack, 512);} MyModule;
int main() {    MyModule myModule;    k_thread_create(&myModule.thread, myModule.threadStack, K_THREAD_STACK_SIZEOF(myModule.threadStack), MyThreadFn, NULL, NULL, NULL, 5, 0, K_NO_WAIT);}
This gives us more flexibility as we can embed the stack into another struct and create multiple instances of it as needed. However, it is not truly dynamic as the size of the stack (in the above example, 512 bytes) still has to be known at compile time.
As of June 2025, Zephyr does have experimental support for true dynamic stack allocation using k_thread_stack_alloc(). However, I could not get this to work in a basic example running on the native_sim board (Linux). The function has the following signature:
k_thread_stack_t* k_thread_stack_alloc(size_t size, int flags);The idea is to do use it like this:
#include <zephyr/kernel.h>
int main() {    // Dynamically allocate a stack. Still experimental, did not work for me!    k_thread_stack_t* myStack = k_thread_stack_alloc(1024, 0);    __ASSERT_NO_MSG(myStack);    k_thread_create(&myThread, myStack, 1024, MyThreadFn, NULL, NULL, NULL, 5, 0, K_NO_WAIT);}
k_thread_stack_alloc() depends on a number of configuration options being set in prf.conf. You will likely need:
CONFIG_DYNAMIC_THREAD=yCONFIG_DYNAMIC_THREAD_PREFER_ALLOC=y(if you wantk_thread_stack_alloc()to use k_malloc()`)
Remember to free the stack when you are done with it using k_thread_stack_free().
Workqueues
A Zephyr workqueue is like a thread but a few extra features included, the main one being a “queue” in which you can add work to for the thread to complete.
What you submit to a workqueue is a function pointer. This function will be run when the thread processes the item from the queue. This is very similar to the way you would typically create a thread, except that usually thread functions in embedded systems are designed to never return (i.e. they are designed to be created when the firmware starts-up and run continuously).
The following C code shows a basic work object being statically defined using the K_WORK_DEFINE() macro, and then work submitted in main() using k_work_submit(). The program will log the “Hello” message when the workqueue processes the work in the workqueue thread. Note that k_work_submit() submits work to the special system workqueue (explained below).
static void myWorkQueueHandler(struct k_work * work){    LOG_INF("Hello from the work thread!");}
K_WORK_DEFINE(my_work_queue, &myWorkQueueHandler);
int main(){    int rc = k_work_submit(&my_work_queue); // Submits work to the system workqueue, myWorkQueueHandler() will get called soon from a different thread...    // Allow any of the positive return codes but don't allow errors    __ASSERT_NO_MSG(rc >= 0);
    return 0;}
System Workqueue
The Kernel defines a standardized “system workqueue” that you can use. It is recommended that you use this workqueue by default, and only create additional ones only if you need multiple work queue jobs to run in parallel (e.g. in one job may block or otherwise take a long time to complete). The reason for this is that every new workqueue requires a stack, and a typical stack size could be 2kB or more. Having many workqueues will quickly eat into your remaining available RAM4.
Work can be submitted to the system workqueue by using the function k_work_submit(). Use the more generic k_work_submit_to_queue() if you want to submit work to a queue that you created (in this case, you also have to pass in a pointer to the queue).
Creating Your Own Workqueue
If you can’t just use the system workqueue and want to create your own workqueues, you can use the functions k_work_queue_init() and k_work_queue_start() to do so. You first have to create a stack object before creating the workqueue, passing the stack object into it.
The following code example shows how to do this:
#define STACK_SIZE 512 // Stack size of work queue#define PRIORITY 5 // Priority of work queue
K_THREAD_STACK_DEFINE(myStackArea, STACK_SIZE);
struct k_work_q myWorkQueue;
k_work_queue_init(&myWorkQueue);
k_work_queue_start(&myWorkQueue,                   myStackArea,                   K_THREAD_STACK_SIZEOF(myStackArea),                   PRIORITY,                   NULL);
Mutexes
A Zephyr mutex is a kernel primitive that allows multiple threads to safely access a shared resource by ensuring mutually exclusive access. It is provides the same functionality as mutexes in most other operating systems.
First you need to define and initialize the mutex:
struct k_mutex myMutex;
int rc = k_mutex_init(&myMutex);__ASSERT_NO_MSG(rc == 0);
If you want to declare a mutex statically with file-level scope, rather than the above you can just use K_MUTEX_DEFINE(myMutex);. Presumably it declares the struct and sets up the init function to be run at startup.
You can then lock the mutex with:
int rc = k_mutex_lock(&myMutex, K_FOREVER);__ASSERT_NO_MSG(rc == 0);This is a blocking call which will sleep the current thread until the mutex is unlocked and available to be locked by this thread. K_FOREVER states to wait indefinitely for the mutex to be unlocked. Generally, I would not recommend using K_FOREVER, but specifying a timeout with a sensible time limit such that if it expires, something has gone really wrong. Then log an error! This is useful for debugging purposes, as forgetting to unlock mutexes is a common mistake (especially in functions which have many exit points). Without a timeout, your application will hang if you forget to unlock the mutex, and you’ll get no helpful debug info. With a timeout, you can get a helpful log message stating which mutex failed to lock and where.
int rc = k_mutex_lock(&myMutex, K_MSEC(1000));if (rc != 0){ LOG_ERR("Failed to lock myMutex."); // ... do appropriate action here // If not being able to lock should be considered a fatal error in your firmware, you // could replace this if() with an assert: __ASSERT_NO_MSG(rc == 0)}Sometimes you will want to use the timeout to do something useful after a period of time, or give up and try something else. That is entirely application specific!
You then unlock a mutex with:
k_mutex_unlock(&myMutex);Zephyr mutexes support reentrant locking5. This means that a thread is allowed to lock a mutex more than once. This is a useful feature that allows a thread to lock the mutex more than once. The same thread must unlock the mutex just as many times before it can be used by another thread. A common use of this pattern is if you have a shared resource that can be accessed via an API. You can lock the mutex inside the API functions themselves so that they are individually guaranteed to be exclusive, but also allow the caller access to the mutex so they can lock it if they want to chain together multiple API calls in one single “atomic” operation.
Zephyr mutexes also support priority inheritance. The Zephyr kernel will elevate the priority of a thread that has currently locked the mutex if a thread of a higher priority begins waiting on the mutex. This works well if there is only ever one mutex locked at once by a thread. If multiple mutexes are locked, then less-than-ideal behaviour occurs if the mutex is not unlocked in the reverse order to which the owning thread’s priority was originally raised. It is recommended that only one mutex is locked at a time when multiple mutexes are used between multiple threads of different priorities.
Asserts
Zephyr provides support for standard C library assert() function as well as providing more powerful assert macros if you wish you use them.
__ASSERT() provides the ability to specify both a condition and a message. The message is useful to provide a helpful message when just the condition is not enough to understand what went wrong. For example, if you were checking that x was 3 or less, then if the assert failed, you could include what the value of x was in the message:
__ASSERT(x <= 3, "x must be equal to or less than 3. x: %u.", x);
This will help during debugging. Was x just one more than 3 (i.e. 4), or was it something crazy like 1000? This can tell you about the reason for the failure.
ASSERT_NO_MSG() can be used if you don’t want to have to provide a message. This is useful when the condition by itself is enough to provide a helpful debug message. This is normally the case when checking booleans, or for non-null pointers. For example:
ASSERT_NO_MSG(heaterIsOn);ASSERT_NO_MSG(thePointerYouPassedIn);Semaphores
Zephyr provides traditional counting semaphores.
A semaphore can be created with:
struct k_sem mySem;k_sem_init(&mySem, 0, 1);
// ORK_SEM_DEFINE(mySem, 0, 1);
Semaphores can be used with the Polling API to wait to multiple conditions simultaneously.
Polling API
Zephyr’s Polling API lets you wait (block) on multiple events at the same time, e.g. block waiting one of two or more semaphore to become available, or until either a semaphore is available or FIFO has data in it.
You first have to enable the polling API by adding the following into your prf.conf:
CONFIG_POLL=ythen the API becomes available through the standard #include <zephyr/kernel.h>. Before you can call k_poll() to wait for events, you have to declare an array of k_poll_event and initialize them.
struct k_poll_event myEvents[2];k_poll_event_init(&myEvents[0],                  K_POLL_TYPE_SEM_AVAILABLE,                  K_POLL_MODE_NOTIFY_ONLY,                  &mySem);
k_poll_event_init(&myEvents[1],                  K_POLL_TYPE_FIFO_DATA_AVAILABLE,                  K_POLL_MODE_NOTIFY_ONLY,                  &myFifo);
You can then wait until one or more of these events occurs by calling k_poll():
k_poll(myEvents, 2, K_FOREVER); // This will block until 1 or more events occurFull Working Example
Here is a full working example:
#include <stdio.h>
#include <zephyr/kernel.h>
struct k_sem mySem1;struct k_sem mySem2;
void MyThreadFn(void * v1, void * v2, void * v3) {    printf("THREAD: Thread started.\n");
    struct k_poll_event events[2];    k_poll_event_init(&events[0],                      K_POLL_TYPE_SEM_AVAILABLE,                      K_POLL_MODE_NOTIFY_ONLY,                      &mySem1);    k_poll_event_init(&events[1],                      K_POLL_TYPE_SEM_AVAILABLE,                      K_POLL_MODE_NOTIFY_ONLY,                      &mySem2);
    while(1) {        printk("THREAD: Waiting on k_poll()...\n");        int rc = k_poll(events, 2, K_FOREVER);        if (rc != 0)        {            // Handle error. If a finite time was provided to k_poll()            // we would also need to check for -EAGAIN returned, which indicates            // a timeout        }
        if (events[0].state == K_POLL_STATE_SEM_AVAILABLE) {            printk("THREAD: Semaphore 1 available.\n");            k_sem_take(events[0].sem, K_NO_WAIT); // Careful! If this thread was preempted, we might not actually be able to take the semaphore        } else if (events[1].state == K_POLL_STATE_SEM_AVAILABLE) {            printk("THREAD: Semaphore 2 available.\n");            k_sem_take(events[1].sem, K_NO_WAIT);        }
        // Because we are going to check again, we need to clear the state!        events[0].state = K_POLL_STATE_NOT_READY;        events[1].state = K_POLL_STATE_NOT_READY;    }}
K_THREAD_STACK_DEFINE(myStack, 500);struct k_thread my_thread_data;
int main(void) {    // printf("Creating timer to expire every 1s...\n");
    // Initialize semaphores    k_sem_init(&mySem1, 0, 1);    k_sem_init(&mySem2, 0, 1);
    // Create thread    k_thread_create(&my_thread_data, myStack,                    K_THREAD_STACK_SIZEOF(myStack),                    MyThreadFn,                    NULL, NULL, NULL,                    5, 0, K_NO_WAIT);
    k_msleep(1000);    // Give semaphore, this should wake up the thread    printf("MAIN: Giving semaphore 1...\n");    k_sem_give(&mySem1);
    k_msleep(1000);    // Give semaphore, this should wake up the thread    printf("MAIN: Giving semaphore 2...\n");    k_sem_give(&mySem2);
    return 0;}
and the output is:
Memory Allocation
Zephyr provides k_malloc() and k_free() for dynamic memory allocation of a shared block of heap memory. To use these (and have them defined) you need to add the following to your prf.conf:
# Required for k_malloc()CONFIG_HEAP_MEM_POOL_SIZE=1024Atomic Variables
Zephyr provides an atomic variable API that let’s you manipulate simple integers (32-bit integers on a 32-bit architecture, 64-bit integers on a 64-bit architecture) in an atomic manner. This means the API is thread safe and ISR safe, without the need for mutexes. They are a good choice for simple variable manipulation where you don’t need the full power of a mutex. Their benefit over a mutex is that they are generally faster to use because they leverage specific processor instructions which are naturally atomic (e.g. writing a variable which is the same size as the architecture’s word size) without the need to OS level locks. The atomic API can be accessed by including #include <zephyr/sys/atomic.h>.
Use atomic_set(atomic_t* target, atomic_val_t value) to set the value of an atomic variable. For example:
atomic_t myAtomic;atomic_set(&myAtomic, 10);Another useful function is atomic_inc(atomic_t* target), which increments the value of the atomic variable by 1.
atomic_t myAtomic;atomic_inc(&myAtomic);You can also use atomic_dec(atomic_t* target) to decrement the value of the atomic variable by 1.
You can use atomic_clear(atomic_t* target) to clear the value of an atomic variable. It also has the benefit of returning the previous value of the variable, which is useful when implementing a counter that is incremented in an ISR and read in a thread. For example:
atomic_t myCounter;// Both read the value and clear it at the same timeatomic_val_t prevValue = atomic_clear(&myCounter);Atomic operations are guaranteed to implement a full memory barrier on all target architectures.6
What Does A Basic Zephyr Firmware Application Look Like?
The following example shows main.c (the only .c file) for the Blinky sample project:
#include <zephyr.h>#include <device.h>#include <devicetree.h>#include <drivers/gpio.h>
/* 1000 msec = 1 sec */#define SLEEP_TIME_MS   1000
/* The devicetree node identifier for the "led0" alias. */#define LED0_NODE DT_ALIAS(led0)
#if DT_NODE_HAS_STATUS(LED0_NODE, okay)#define LED0  DT_GPIO_LABEL(LED0_NODE, gpios)#define PIN  DT_GPIO_PIN(LED0_NODE, gpios)#define FLAGS  DT_GPIO_FLAGS(LED0_NODE, gpios)#else/* A build error here means your board isn't set up to blink an LED. */#error "Unsupported board: led0 devicetree alias is not defined"#define LED0  ""#define PIN  0#define FLAGS  0#endif
void main(void){  const struct device *dev;  bool led_is_on = true;  int ret;
  dev = device_get_binding(LED0);  if (dev == NULL) {    return;  }
  ret = gpio_pin_configure(dev, PIN, GPIO_OUTPUT_ACTIVE | FLAGS);  if (ret < 0) {    return;  }
  while (1) {    gpio_pin_set(dev, PIN, (int)led_is_on);    led_is_on = !led_is_on;    k_msleep(SLEEP_TIME_MS);  }}
Simulating Zephyr Applications
There are two options for simulating Zephyr applications:
- Native: Zephyr supports a native target (a “board”). This generates an executable that runs directly on the host machine.
- QEMU: Zephyr supports the targets
qemu_x86andqemu_cortex_m3for running applications inside QEMU. In this case, the application is built for the same architecture as the real target, but runs inside the QEMU virtual machine on the host machine.
Javad Rahamipetroudi’s “Using emulators and fake devices in Zephyr” blog post is a good read when it comes to emulating Zephyr peripherals7.
Zephyr and C++
Zephyr has pretty good support for C++. All of it’s headers are wrapped in extern C allowing you to call them easily from C++.
Zephyr does not support the following C++ features:
- No dynamic memory allocation support via
newordelete. Dynamic memory allocation in the embedded land is a contentious subject, but it’s nice to have, especially if you just allow dynamic allocation at initialization time. - No RTTI (run-time type information). This is not really an issue for embedded development as it’s commonly disabled anyway.
- No support for exceptions. This is not really an issue for embedded development as it’s commonly disabled anyway.
You can enable support for compiling C++ by adding the following into prj.conf:
CONFIG_CPP=yYou can then change main.c to main.cpp. Remember to update the path in the CMakeLists.txt file also! However, you will still be missing a lot of the C++ standard library (e.g. std::functional). To make this available, add the following to your prj.conf:
# Adds the full C++ standard libraryCONFIG_REQUIRES_FULL_LIBCPP=yI didn’t notice any significant RAM or flash increase just by including the full C++ standard library, so you only pay for what you use.
You should now be able to compile the Zephyr application with C++ code.
Debugging
You can use the addr2line executable to decode a memory address back into a source code file and line number. addr2line should be provided by the toolchain as part of the compiler’s suite of executables. For example, with Nordic toolchains in Zephyr:
c:\ncs\toolchains\31f4403e35\opt\zephyr-sdk\arm-zephyr-eabi\bin\arm-zephyr-eabi-addr2line.exe -e .\app\build\zephyr\zephyr.elf -a 0x0Would give output something like this:
0x00000000C:/my-project/zephyr/subsys/debug/thread_analyzer.c:75Reducing Flash and RAM Usage in Zephyr
Zephyr-based applications can get large, in part due to the powerful features it provides out-of-the-box. Just things like using logging throughout your code can increase flash usage significantly, due to every call saving the log message (before substitution takes place at runtime) as a string literal in ROM. This can easily use up many “kB” of space. If you weren’t using float printing before hand, this call also bring in float formatting functionality. Similarly, all ASSERT() style macros save the file name and line number of the assert as a string literal in ROM. However these are quite useful, even in production, so think carefully before disabling them.
CONFIG_SIZE_OPTIMIZATIONS=y can be set in prj.conf to reduce the flash size. One thing this does is set the compiler flag -Os which tells the compiler to optimize for size, not speed or debug ability.
On one project I was working on, just setting CONFIG_SIZE_OPTIMIZATIONS=y in prf.conf resulted in a flash size reduction from 421kB to 330kB!
You can execute the west command with -t ram_report to make Zephyr generate and print a table of RAM usage to the terminal.
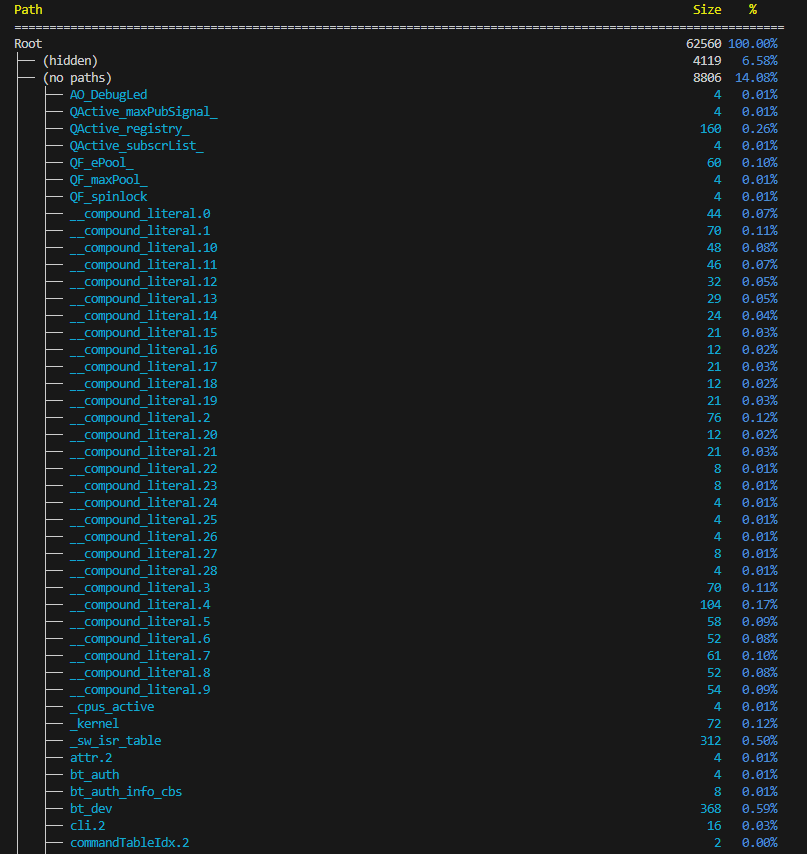
puncover can be used to visualize the memory usage via a web GUI. Install puncover in the projects Python virtual environment:
# Activate python environment if needed, thenpip install puncoverThen perform a clean build of west (it will detect puncover and add a target for it):
west build -cThen run puncover by invoking west and giving it a specific target:
west build -t puncoverIf you get the error ninja: error: unknown target 'puncover' (as shown below) when trying to run puncover, it might be because you have not done a clean rebuild. You must do a clean rebuild after installing puncover. This is needed because CMake looks for the puncover executable during the build process. If it can’t find it, no target is made for it.

You can also look at reducing the stack size of some of the default stacks you will likely have in your project:
# Stack size of the main thread.# Defaults to 2048CONFIG_MAIN_STACK_SIZE=1024
# Stack used for Zephyr initialization and interrupts# If you have a stack overflow before your code gets to main() you will# likely need to make this bigger# Defaults to 2048CONFIG_ISR_STACK_SIZE=1024
# Stack size of the shell thread (if you are using a shell)# Defaults to 2048CONFIG_SHELL_STACK_SIZE=1024
Tests
There is a template test project located at zephyr/samples/subsys/testsuite/integration.
Twister is Zephyrs test runner tool. It is a command-line tool that collects tests, builds the test application and runs it. The best way to access it is via a subcommand of west, i.e. west twister.
Twister dumps it’s build output into a directory called twister-out. If twister-out already exists (i.e. twister has already been run before) then it will rename the existing directory to twister-out1, twister-out2, e.t.c. Part of the build output are the test reports. These are JUnit style XML reports that can be read by CI tools such as GitHub Actions, GitLab, Jenkins, etc. See the Setting Up CI for Zephyr Projects section for more information.
Adding Native Unit Tests To Your Application
Let’s assume you have a workspace application at ~/zephyr-project/app/ and want to add unit tests to it using Zephyr and ztest. We’ll run the tests on the native_sim board so that we can
Let’s create a directory called tests under app, and then copy all of the files from ~/zephyr-project/zephyr/samples/subsys/testsuite/integration into this new tests directory.
tests will be an entire Zephyr application in it’s own right. The directory structure for your project should look like this:
<home>/├─── zephyr-project/│ ├── .west/│ ├── app/│ │ ├── CMakeLists.txt│ │ ├── prj.conf│ │ ├── src/│ │ | ├── main.c| | | ├── RgbLed.c| | | └── RgbLed.h| | └── tests/| | ├── src/| | | ├── main.c| | | ├── SomeUnitTests.c| | | └── SomeOtherUnitTests.c| | ├── CMakeLists.txt| | ├── prj.conf| | └── testcase.yaml│ ├── zephyr/│ ├── bootloader/│ ├── modules/│ └── ...Assuming you are currently in the root of the west workspace, you can run your tests with the following command. You do not need to pass in the tests directory, west twister can work that out so you just need to pass in the directory to your app.
west twister -T app/This should build the example tests included in the template. But what we really want to test is code in the app/src/ directory. To do this, we need to do two things:
- Include the source code in
app/srcwhen building the test application. - Add the
app/srcdirectory as a include path when building the test application.
To do this, we can modify the file tests/CMakeLists.txt to the following:
cmake_minimum_required(VERSION 3.20.0)find_package(Zephyr REQUIRED HINTS $ENV{ZEPHYR_BASE})project(integration)
# Include all source files in the main application# except main.c, which we will filter outFILE(GLOB appSources ../src/*.c)list(FILTER appSources EXCLUDE REGEX ".*main\\.c$")
# Include all source files in the test applicationFILE(GLOB testAppSources src/*.c)target_sources(app PRIVATE ${testAppSources} ${appSources})
# Add the main application directory to the include pathtarget_include_directories(app PRIVATE "../src/")
Now in our tests .c files (tests/src/*.c), we can include header files from app/src/ and test the code.
When writing the tests, just using west twister -T app/ is not that useful because:
- It takes a long time to build and run the tests, and the output is hidden in a log file rather than being printed to the terminal. This slows down development when you want to write some test code and then run it to see if it works.
- Intellisense does not work as well as it does for the Zephyr app. This is because
compile_commands.jsonis not created in thetwisterbuild directories, and the build directory keeps changing.
A better way is to reserve west twister -T app/ only for running your tests once you have finished writing the tests. While writing the tests, use the standard west build instead. You can do this because the test/ directory is a self-contained west application in it’s own right!
First use (assuming you are building the tests to run on native_sim):
west build -b native_sim ./<path_to_zephyr_app>/tests/ --pristineand then from then on you can use the faster:
west build -t runYou can run specific tests by not using the shortcut -t run and instead calling the built zephyr.exe (yes, it’s even suffixed with .exe on Linux) with command-line options. For example:
west build -b native_sim./build/zephyr/zephyr.exe -test="my_suite::my_test"You can use the command line option -list with a ztest zephyr.exe to list all the tests that are available to run. Chain the above two commands together with && for a quick one liner while developing.
You can also chain together multiple selectors in the -test option with a comma, e.g.:
./build/zephyr/zephyr.exe -test="my_suite::my_test,my_suite2::my_test2"Zephyr’s ztest framework provides the standard setup of test suites and tests.
You can use ZTEST_F(my_suite, my_test) to define a test which automatically pulls in the fixture returned from the setup function and gives it the name <suite_name>_fixture (i.e. my_suite_fixture in this case).
#include <zephyr/ztest.h>
// This name is important! Must be `<suite_name>_fixture`!struct my_suite_fixture {     uint32_t number;};
static void *my_suite_setup(void){    struct my_suite_fixture *fixture = malloc(sizeof(struct my_suite_fixture));    zassume_not_null(fixture, NULL);
    // Initialize the fixture    fixture->number = 99;    return fixture;}
static void my_suite_before(void *f){    struct my_suite_fixture *fixture = (struct my_suite_fixture *)f;}
static void my_suite_teardown(void *f){    // Remember to free the memory allocated in the setup function!    free(f);}
ZTEST_SUITE(my_suite, NULL, my_suite_setup, my_suite_before, NULL, my_suite_teardown);
ZTEST_F(my_suite, test_feature_x){    // Because we use `ZTEST_F()` we automatically get access to the `fixture` object    zassert_equal(99, fixture->number);}
Your Own Entry Point
ztest provides a default entry point for your tests, but if you want you can provide your own. This is useful if you need to setup some global state before running the tests, or have more control over when they start. All you need to do is define a function called test_main(), and then call ztest_run_all() from it as shown below:
#include <zephyr/ztest.h>
void test_main(void){    // Run all tests once    ztest_run_all(NULL, false, 1, 1);}
ztest_run_all() has the following signature: const void *state, bool shuffle, int suite_iter, int case_iter. suite_iter is the number of times to run each suite, and case_iter is the number of times to run each test in a suite. Setting this higher than 1 can be a good way to catch memory leaks (all tests are run in the same executable program, so memory leak issues will accumulate and hopefully make themselves apparent). shuffle can be set to true to randomize the order of the tests, which can be useful to make sure your tests are independent of one another.
Cleaning Up
Many firmware applications are designed to run forever on a MCU (well, until it’s reset of course). Because of this, you rarely need to clean up resources you have created. In a testing environment however, you will typically be setting up and tearing down parts of your application for each test. Because of this, you will need to put more focus on cleaning up resources correctly, otherwise it can lead to memory leaks, segmentation faults or other bugs.
You should stop any Zephyr timers you have started in your test, as you can get segmentation faults if you reuse the same struct as a new timer with the same callback function.
ZTEST_F(my_suite, test_example){    struct k_timer my_timer;    k_timer_init(&my_timer, my_timer_callback, NULL);    k_timer_start(&my_timer, K_SECONDS(1), K_SECONDS(1));
    // Stop the timer. Perfectly fine to call even if the timer    // has already stopped.    k_timer_stop(&my_timer);}
Setting Up CI for Zephyr Projects
The Zephyr Project provides a Docker container that is suitable for CI pipelines. The images can be found on Docker Hub here (they are also on GitHub’s container registry). This is a placeholder for the reference: fig-zephyr-docker-images-on-docker-hub shows a screenshot of some of the available images as of November 2024. Note the images are quite large, with some of them being around 4GB in size!

Some of the images are:9
- ci-base: Minimal image with just the basic installed. No toolchains installed.
- ci: Contains the Zephyr SDK, west and other things you would typically need to CI use.
- zephyr-build: Like the
ciimage, but with additional developer tools installed.
If you need to customize the container further, you can extend the image by making your own Dockerfile. Use FROM zephyrprojectrtos/ci:v0.27.4 and then you own additional RUN commands. For example:
FROM zephyrprojectrtos/ci:v0.27.4
RUN echo "Do other things here!"
You would then want to build the image with docker build -t my-custom-zephyr-image . and upload it to a container registry so it can be used in your CI pipelines to build/run Zephyr applications.
The command line tool west is globally available inside the container, so you don’t need to create a Python virtual environment and install it.
When building a Zephyr application, you will likely want to cache all the dependencies installed from the west update command, as these can take a long time to install. Most cloud-based CI services (e.g. GitHub Actions, GitLab Pipelines) will allow you to cache files/directories between jobs. I have found it easiest to group all dependencies into a directory for easy caching, and so your .west/config file might look like this:
[zephyr]base = external/zephyrTwister generates standard JUnit style XML test reports. The test report is written to twister-out/twister_report.xml. These test reports can be parsed by most CI services. For example, GitLab pipelines supports adding a reports: junit: ... field which will parse the test report and display the results in the UI. Your .gitlab-ci.yml file might look like this:
my_job: script: - west twister -T . artifacts: when: always paths: - $CI_PROJECT_DIR/twister-out/twister_report.xml reports: junit: $CI_PROJECT_DIR/twister-out/twister_report.xmlGitLab will display the test results in a merge request, as shown in This is a placeholder for the reference: fig-gitlab-test-summary-in-merge-request.

Distributing Zephyr Libraries
See https://github.com/coderkalyan/pubsub for an example.
Common Errors
File not found (on Windows)
If you get an error when running west build similar to:
CMake Error at C:/Users/Geoffrey Hunter/temp/zephyrproject/zephyr/cmake/kconfig.cmake:206 (message): File not found: C:/Users/GeoffreyIt is due to there being one or more spaces in the path to your Zephyr project directory. This isn’t a bug that is going to be fixed anytime soon, Zephyr is very clear on the matter in their documentation:

I found this out the hard way and went through all the trouble of renaming my user directory to fix the issue.
No module named ‘elftools’
FAILED: zephyr/include/generated/kobj-types-enum.h zephyr/include/generated/otype-to-str.h zephyr/include/generated/otype-to-size.hcmd.exe /C "cd /D C:\Users\gbmhunter\temp\myproject\zephyr\build\zephyr && C:\Users\gbmhunter\AppData\Local\Programs\Python\Python38-32\python.exe C:/Users/gbmhunter/temp/myproject/zephyr/scripts/gen_kobject_list.py --kobj-types-output C:/Users/gbmhunter/temp/myproject/zephyr/build/zephyr/include/generated/kobj-types-enum.h --kobj-otype-output C:/Users/gbmhunter/temp/myproject/zephyr/build/zephyr/include/generated/otype-to-str.h --kobj-size-output C:/Users/gbmhunter/temp/myproject/zephyr/build/zephyr/include/generated/otype-to-size.h --include C:/Users/gbmhunter/temp/myproject/zephyr/build/zephyr/misc/generated/struct_tags.json "Traceback (most recent call last): File "C:/Users/gbmhunter/temp/myproject/zephyr/scripts/gen_kobject_list.py", line 62, in <module> import elftoolsModuleNotFoundError: No module named 'elftools'You typically get the error No module named 'elftools' if you haven’t installed the Python modules that Zephyr requires to build. To install the required modules:
> pip3 install -r scripts/requirements.txt“__device_dts_ord_DT_N_NODELABEL_xxx_ORD” undeclared
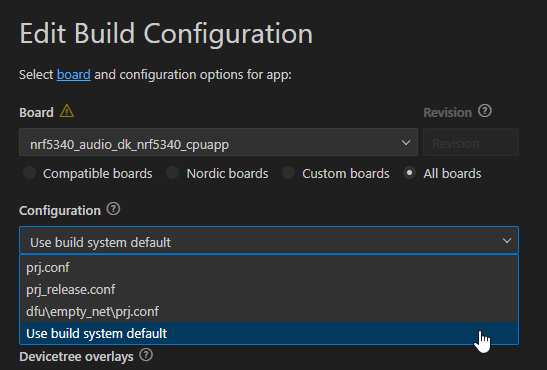
Zephyr can produce some really obscure error messages when there are errors relating to the device tree, for example:
C:/project/zephyr/include/zephyr/device.h:83:41: error: '__device_dts_ord_DT_N_NODELABEL_hs_0_ORD' undeclared (first use in this function) 83 | #define DEVICE_NAME_GET(dev_id) _CONCAT(__device_, dev_id) | ^~~~~~~~~If you are using the VS Code and the nRF Connect extension, sometimes this can be fixed by making when you setup the build configuration you set the Configuration to “Use build system default” as shown below:
”ERROR: Build directory xxx is for application yyy, but source directory zzz was specified”
The error:
ERROR: Build directory xxx is for application yyy, but source directory zzz was specified; please clean it, use --pristine, or use --build-dir to set another build directorytypically occurs when you try to build a second project for the first time. By default, west creates build directories outside of the application you are currently building, in a directory called build directly under the west workspace directory (e.g. zephyr-project/build/).
When you tell west to build a different project (say, you tested out a sample like samples/hello_world but now want to build your own workspace application), west will try and re-use build. Except that it notices that the remnants from the last build do not belong to the same project, and gives you this error. Because build artifacts can be reproduced by rebuilding, it is generally save to provide the --pristine option and override the contents (this would be equivalent to you deleting the build directory and re-running west). If you want to have multiple builds on-the-go at the same time (perhaps because builds can take a long time to rebuild from scratch!), you can specify a different build directory with the --build-dir option.
”By not providing “FindZephyr.cmake” in CMAKE_MODULE_PATH …”
If you get the following warning (which then results in an error further down in the build process):
(.venv) geoff@geoffs-laptop:~/zephyr-project$ west build -b native_sim ./apps/hello-world/-- west build: generating a build systemCMake Warning at CMakeLists.txt:3 (find_package):  By not providing "FindZephyr.cmake" in CMAKE_MODULE_PATH this project has  asked CMake to find a package configuration file provided by "Zephyr", but  CMake did not find one.
  Could not find a package configuration file provided by "Zephyr" with any  of the following names:
    ZephyrConfig.cmake    zephyr-config.cmake
  Add the installation prefix of "Zephyr" to CMAKE_PREFIX_PATH or set  "Zephyr_DIR" to a directory containing one of the above files.  If "Zephyr"  provides a separate development package or SDK, be sure it has been  installed.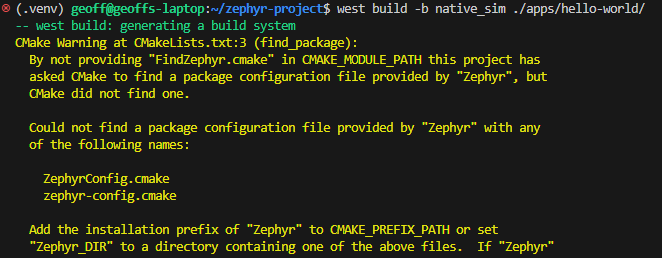
It usually can be due to forgetting to export Zephyr to the CMake user package registry. Run the following command from the west workspace directory:
west zephyr-exportModuleNotFoundError: No module named ‘elftools’
The no elftools module error is a common error that can occur:
Traceback (most recent call last): File "/home/geoff/zephyr-project/zephyr/scripts/build/gen_kobject_list.py", line 62, in <module> import elftoolsModuleNotFoundError: No module named 'elftools'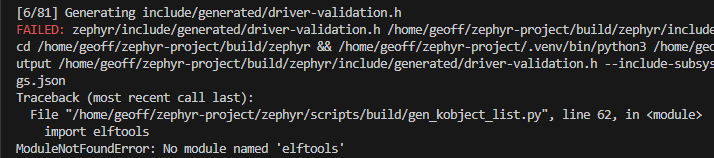
This can occur if you have forgotten to install the additional Zephyr dependencies into your Python environment (which can happen if you delete the existing virtual environment and recreate it). This can be fixed by running the following command, assuming you have activated the Python virtual environment if relevant:
pip install -r ./zephyr/scripts/requirements.txtUPDATE: The west command (as of v4.1.0) can now install the additional Zephyr dependencies for you. Run the following command from the west workspace directory:
west packages pip --installPrinting Floats Results in float
If tring to print a float using %f in any printf style functions (or log macros) results in the output *float*, it’s likely you need to enable floating-point print support with CONFIG_FPU=y in prj.conf:
CONFIG_FPU=y # Required for printing floating point numberstoo few arguments in invocation of macro “Z_FOR_LOOP_1”
With certain older versions of Zephyr, you might get the following IntelliSense error when using macros such as LOG_INF() with only one argument (e.g. LOG_INF("Hello, world!")):
too few arguments in invocation of macro "Z_FOR_LOOP_1"This is a known issue and has been fixed in newer versions of Zephyr. It builds fine, but IntelliSense (e.g. VS Code with the Cpp Tools Extension Pack) gets confused and gives you red squiggles under the macros. As far as I know there is no workaround except to update to newer versions of Zephyr.10
Fatal Errors
Zephyr supports GCC stack canaries by adding the following to your prj.conf file:
CONFIG_ENTROPY_GENERATOR=yCONFIG_TEST_RANDOM_GENERATOR=yCONFIG_STACK_CANARIES=ySetting CONFIG_STACK_CANARIES to y will make the compiler add a randomly generated canary value to the end of each functions stack frame. This is checked on function exit. If the canary value is overwritten, the compiler calls __stack_chk_fail(), whose Zephyr implementation invokes a fatal stack overflow error.11
CONFIG_ENTROPY_GENERATOR and CONFIG_TEST_RANDOM_GENERATOR are required dependencies for CONFIG_STACK_CANARIES. There is a slight performance penalty for using stack canaries, but I’d recommend enabling them unless you have specific performance reasons not to.
This is a placeholder for the reference: fig-zephyr-stack-canaries-demo-showing-error-in-terminal shows a screenshot of the Zephyr stack canaries in action. I made a test where I decided to blow up the stack by allocating a large array:
// Try and blow up the stackuint8_t myArray[2000];// Do something with it so it is not optimized outfor (size_t i = 0; i < 2000; i++){ myArray[i] = i;}LOG_INF("myArray[1000] = %d", myArray[1000]);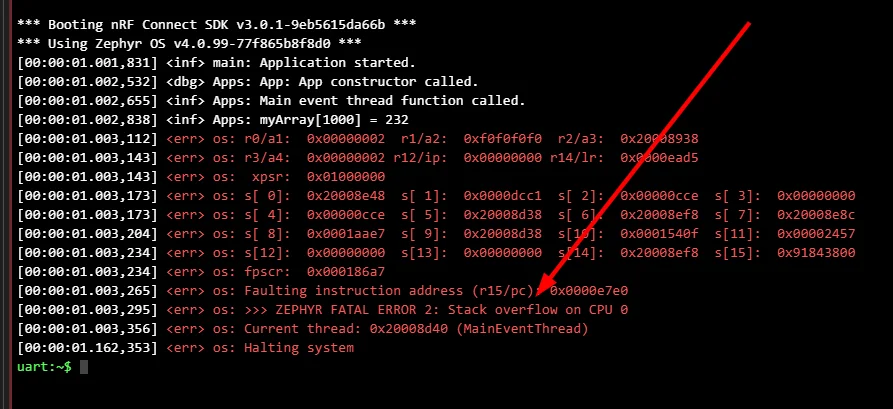
Contributing to Zephyr
As an open-source project, Zephyr welcomes contributions from the community. Zephyr has a detailed contribution guide here.
The recommended way to begin to make changes is by first forking the Zephyr repository on GitHub to your own GitHub account. Then clone the forked repository to your local machine and create a new branch for your changes. Once you have made changes, commit these and push them to your forked repository. Then create a pull request in your forked repository (when you click “New pull request” in your forked repo, it will automatically set the base to the main branch of the Zephyr repository).
One requirement is that a “Signed-off-by” line is added to each commit message. This is so that the Developer Certificate of Origin (DCO) process is followed. This can be done by adding the -s option to your git commit command, e.g.:12
git commit -sThis will automatically add the line to the commit message, based on your configured git username and email address. For example:
Commit message title.
Commit message description.
Signed-off-by: Foo Bar <[email protected]>
The Zephyr repo on GitHub has extensive CI workflows that run before a PR is allowed to be merged into the main branch. This is a placeholder for the reference: zephyr-pr-github-ci-workflows-screenshot shows a screenshot of the CI workflows.

History
In February 2016, Wind River (the same company the makes VxWorks, one of the leading commercial RTOSes for safety critical systems) donated the Rocket OS kernel to the Linux Foundation and Zephyr was born.13 14 Rocket still existed in parallel as a commercial version of Zephyr.
Nordic chose to move from their nRF5 platform to Zephyr as the officially supported development environment for their nRF52, nRF53 and nRF92 MCU/SoC families. Zephyr support for the nRF52 family was added around April 2020.15
Other Resources
Check out the Zephyr Discord channel.
Footnotes
-
Kernel.org. Kconfig Language [documentation]. Retrieved 2024-10-12, from https://www.kernel.org/doc/html/next/kbuild/kconfig-language.html. ↩
-
Nordic Semiconductor DevZone. Custom Board with nRF5340 produces build warning: Warning (unique_unit_address_if_enabled) [forum post]. Retrieved 2025-01-22, from https://devzone.nordicsemi.com/f/nordic-q-a/96780/custom-board-with-nrf5340-produces-build-warning-warning-unique_unit_address_if_enabled ↩
-
Zephyr (2025, Tue 25). Thread Stack APIs [documentation]. Retrieved 2025-02-25, from https://docs.zephyrproject.org/apidoc/latest/group__thread__stack__api.html. ↩
-
Zephyr. Docs / Latest -> Kernel -> Kernel Services -> Workqueue Threads [documentation]. Zephyr Docs. Retrieved 2024-01-10, from https://docs.zephyrproject.org/latest/kernel/services/threads/workqueue.html. ↩
-
Zephyr (2023, Nov 7). Mutexes [documentation]. Retrieved 2024-02-14, from https://docs.zephyrproject.org/latest/kernel/services/synchronization/mutexes.html. ↩ ↩2
-
Zephyr (2024, Jan 8). Docs / Latest » Kernel » Kernel Services » Atomic Services [documentation]. Retrieved 2025-07-01, from https://docs.zephyrproject.org/latest/kernel/services/other/atomic.html. ↩
-
Javad Rahamipetroudi (2024, May 22). Using emulators and fake devices in Zephyr. Retrieved 2024-10-24, from https://mind.be/using-emulators-and-fake-devices-in-zephyr/. ↩
-
Docker Hub. zephyrprojectrtos [user page]. Retrieved 2024-11-26, from https://hub.docker.com/u/zephyrprojectrtos. ↩
-
GitHub. zephyrproject-rtos/docker-image [repository]. Retrieved 2024-11-26, from https://github.com/zephyrproject-rtos/docker-image. ↩
-
GitHub. zephyrproject-rtos/zephyr: too few arguments in invocation of macro “Z_FOR_LOOP_1” #62460 [issue]. Retrieved 2026-02-18, from https://github.com/zephyrproject-rtos/zephyr/issues/62460. ↩
-
Zephyr (2025, Mar 17). Docs / Latest » Kernel » Kernel Services » Fatal Errors [documentation]. Retrieved 2025-04-29, from https://docs.zephyrproject.org/latest/kernel/services/other/fatal.html. ↩
-
Zephyr (2024, Dec 26). Docs / Latest > Contributing to Zephyr > Contribution Guidelines [documentation]. Retrieved 2025-01-14, from https://docs.zephyrproject.org/latest/contribute/guidelines.html. ↩
-
Wikipedia (2023, Oct 20). Zephyr (operating system). Retrieved 2024-02-21, from https://en.wikipedia.org/wiki/Zephyr_(operating_system). ↩
-
Scaler. Scaler Topics - How does the Zephyr Operating System Work?. Retrieved 2024-02-1, from https://www.scaler.com/topics/zephyr-operating-system/. ↩
-
Nordic Semiconductor (2020, Apr 2). Nordic Semiconductor now offering broad product line support for its short-range and cellular IoT devices on nRF Connect platform including a suite of development tools and open source nRF Connect SDK [blog post]. Retrieved 2024-02-21, from https://www.nordicsemi.com/Nordic-news/2020/04/nordic-now-offering-support-for-its-shortrange-and-cellular-iot-devices-on-nrf-connect-platform. ↩