nRF52 DK Embassy Tutorial

This is a tutorial for building an Embassy application for the nRF52 DK, which features a nRF52832 SoC. The build is done in WSL (Windows Subsystem for Linux), but these instructions should work for any Linux distribution.
Installing Rust and Probe-RS
Before we can build the project, we need to install Rust. This is done with the rustup tool:
curl --proto '=https' --tlsv1.2 -sSf https://sh.rustup.rs | shPress enter when prompted to install it in the default location.
We’ll also need to install probe-rs. You can try this method:
curl --proto '=https' --tlsv1.2 -LsSf https://github.com/probe-rs/probe-rs/releases/latest/download/probe-rs-tools-installer.sh | shHowever, I got an error that my version of glibc was too old. So I used this method instead, which builds it from source:
cargo install probe-rs-tools --lockedThis worked, and gave me the following result:
Installed package `probe-rs-tools v0.29.0` (executables `cargo-embed`, `cargo-flash`, `probe-rs`)We’ll also need to install the thumbv7em-none-eabi target using rustup. Luckily if you try and cargo build without this is will tell you how to install it.
rustup target add thumbv7em-none-eabiCreating a New Rust Project
Create a new Rust project:
cargo new nrf52-exampleThis will create a new directory called nrf52-example and populate it with a Cargo.toml file and a src directory containing a main.rs.
Opening the Project in VSCode
This tutorial assumes you are using VSCode, although most IDEs will work similarly. Open the newly created project folder ~/nrf52-example in VSCode.
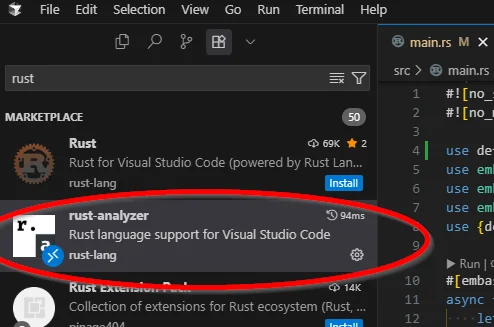
Install the Rust Analyzer extension for VSCode. Without this, VS Code will give you syntax highlighting for Rust code, but not much else.
Updating the Files
Replace the contents of main.rs with the following, which is a basic blinky program for LED1 which is connected to pin P0.17.
#![no_std]#![no_main]
use embassy_executor::Spawner;use embassy_nrf::gpio::{Level, Output, OutputDrive};use embassy_time::Timer;use {defmt_rtt as _, panic_probe as _};
#[embassy_executor::main]async fn main(_spawner: Spawner) {    let p = embassy_nrf::init(Default::default());    let mut led = Output::new(p.P0_17, Level::Low, OutputDrive::Standard);
    loop {        led.set_high();        Timer::after_millis(300).await;        led.set_low();        Timer::after_millis(300).await;    }}
no_std is used to tell the compiler not to add or link against the standard Rust library, instead just relying on the core library (which is a subset of the standard library).
no_main is used to tell the compiler not to look for a main function. A main function will still be defined, but this is taken care of us by Embassy.
At this point, rust-analyzer should give you the following error:
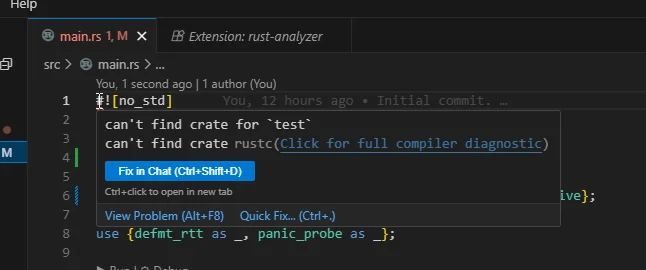
To fix this, add the following to you .vscode/settings.json file:
{ "rust-analyzer.check.allTargets": false}Next, create a file at the path .cargo/config.toml with the following contents (this is mostly copied from the Embassy example config.toml file, but with the --allow-erase-all flag added to the runner line):
[target.'cfg(all(target_arch = "arm", target_os = "none"))']runner = "probe-rs run --chip nRF52832_xxAA --allow-erase-all"
[build]target = "thumbv7em-none-eabi"
[env]DEFMT_LOG = "trace"
The runner = line tells cargo what to do when you run cargo run. This will be used to program the nRF52 DK.
Also create a memory.x file in the project root directory with the following contents:
MEMORY{ /* NOTE 1 K = 1 KiBi = 1024 bytes */ FLASH : ORIGIN = 0x00000000, LENGTH = 512K RAM : ORIGIN = 0x20000000, LENGTH = 64K}memory.x is used to tell the linker where to put the code and data in the flash and RAM. This file will change depending on the microcontroller you are using.
Installing Dependencies and Building
Although you can add dependencies with cargo add, there are quite a few features for some of the dependencies that need adding. The easiest way to do this is to edit the Cargo.toml file.
I grabbed the Cargo.toml file from the Embassy nRF52840 example, and removed all the path = ... statements (it was using relative paths to the dependencies). It ended up looking like this:
[package]edition = "2021"name = "nrf52-example"version = "0.1.0"license = "MIT OR Apache-2.0"
[dependencies]embassy-futures = { version = "0.1.0" }embassy-sync = { version = "0.7.0", features = ["defmt"] }embassy-executor = { version = "0.7.0", features = ["arch-cortex-m", "executor-thread", "executor-interrupt", "defmt"] }embassy-time = { version = "0.4.0", features = ["defmt", "defmt-timestamp-uptime"] }embassy-nrf = { version = "0.3.1", features = ["defmt", "nrf52832", "time-driver-rtc1", "gpiote", "unstable-pac", "time"] }embassy-net = { version = "0.7.0", features = ["defmt", "tcp", "dhcpv4", "medium-ethernet"] }embassy-usb = { version = "0.4.0", features = ["defmt"] }embedded-io = { version = "0.6.0", features = ["defmt-03"]  }embedded-io-async = { version = "0.6.1", features = ["defmt-03"] }embassy-net-esp-hosted = { version = "0.2.0", features = ["defmt"] }embassy-net-enc28j60 = { version = "0.2.0", features = ["defmt"] }
defmt = "1.0.1"defmt-rtt = "1.0.0"
fixed = "1.10.0"static_cell = { version = "2" }cortex-m = { version = "0.7.6", features = ["inline-asm", "critical-section-single-core"] }cortex-m-rt = "0.7.0"panic-probe = { version = "1.0.0", features = ["print-defmt"] }rand = { version = "0.9.0", default-features = false }embedded-storage = "0.3.1"usbd-hid = "0.8.1"serde = { version = "1.0.136", default-features = false }embedded-hal = { version = "1.0" }embedded-hal-async = { version = "1.0" }embedded-hal-bus = { version = "0.1", features = ["async"] }num-integer = { version = "0.1.45", default-features = false }microfft = "0.5.0"
[profile.release]debug = 2
Now that we have all the dependencies listed, we can build the project.
cargo buildPass-through nRF52 DK USB device to WSL
Plugging the nRF52 DK into my Windows computer, the J-Link based debugger is detected. Using usbipd, I can pass-through the connected nRF52 DK from Windows into WSL. First you have to bind the USB device from a terminal on Windows with admin privileges:
usbipd bind -i 1366:1051You only have to do the bind once. Then you use usbipd attach to pass it through. Run this next command from a standard terminal (not one with admin privileges).
usbipd attach -w -a -i 1366:1051The -w flag is to attach to WSL, and -a is for auto-attach. If it passed through correctly, you should be able to detect it in WSL using probe-rs list.
gbmhunter@geoff-laptop:~/nrf52-example$ probe-rs listThe following debug probes were found:[0]: J-Link -- 1366:1051:001050376416 (J-Link)Flashing the nRF52 DK
Now that we have attached the debugger, we can now flash the nRF52 DK using cargo run:
cargo run
If you have multiple debuggers attached, probe-rs will ask you to select which one to use.

The first time I tried to program the nRF52 DK, I got the following error:
 WARN probe_rs::vendor::nordicsemi::sequences::nrf52: Core is locked. Erase procedure will be started to unlock it.Error: Connecting to the chip was unsuccessful.
Caused by:    0: An ARM specific error occurred.    1: An operation could not be performed because it lacked the permission to do so: erase_all
I managed to fix this by adding the flag --allow-erase-all to the probe-rs run command in the .cargo/config.toml file.
[target.'cfg(all(target_arch = "arm", target_os = "none"))']runner = "probe-rs run --chip nRF52832_xxAA --allow-erase-all"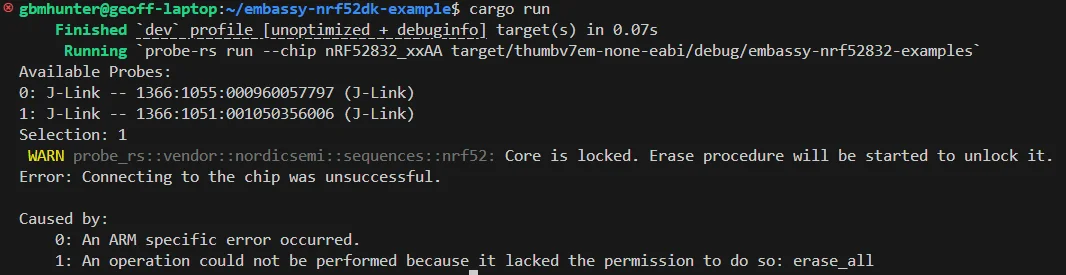
Adding Logging
Logging is trivial to add to this project. First, we need to import defmt with:
use defmt;And then we can log a info level message with:
defmt::info!("Hello, world!");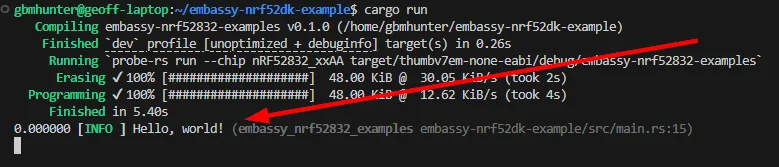
A Slightly More Complex Example
The above example was trivially simple, so let’s expand on it a bit. Let’s add a second executor, and make that responsible for blinking the LED. We will re-purpose the primary executor to show how to use select to wait for multiple events (futures) at the same time.
The basic syntax for select is:
match select(future1, future2).await { // ...}select will return as soon as one of the futures is ready. A match statement can then be used to work out what future is ready and handle it appropriately.
Update our main.rs file to look like this:
#![no_std]#![no_main]
use defmt;use embassy_executor::Spawner;use embassy_nrf::gpio::{AnyPin, Level, Pin, Output, OutputDrive};use embassy_time::{Duration, Ticker, Timer};use {defmt_rtt as _, panic_probe as _};use embassy_futures::select::{select, Either};
#[embassy_executor::main]async fn main(spawner: Spawner) {    let p = embassy_nrf::init(Default::default());
    spawner.spawn(blink(p.P0_17.degrade())).unwrap();
    defmt::info!("Application has started.");
    let mut ticker1 = Ticker::every(Duration::from_millis(1000));    let mut ticker2 = Ticker::every(Duration::from_millis(1200));
    loop {        match select(ticker1.next(), ticker2.next()).await {            Either::First(_) => defmt::info!("1000ms timer"),            Either::Second(_) => defmt::info!("1200ms timer"),        }    }}
#[embassy_executor::task]async fn blink(pin: AnyPin) {    let mut led = Output::new(pin, Level::Low, OutputDrive::Standard);
    loop {        led.set_high();        Timer::after_millis(150).await;        led.set_low();        Timer::after_millis(150).await;    }}