Wordpress Plugins That This Site Uses

Article by:
Date Published:
Last Modified:

Add Descendants As Menu Items

Site: http://www.viper007bond.com/wordpress-plugins/add-descendants-as-submenu-items/

Wordpress Plugin Page: http://wordpress.org/extend/plugins/add-descendants-as-submenu-items/

This is a great plugin which gets rid of huge menu setups in the admin area of Wordpress. The Wordpress menu layout is far from ideal, and when it comes to big menu’s, the whole things can crash, delete items, or refuse to add any more.

One improvement I desired was to have the functionality to only add children as menu items, and not grandchildren or further. I managed to do this by editing a section of the code in the plugins php file, add-descendants-as-menu-items.php.

In the function add_children_to_menu, I made the following change:

 1
 2
 3
 4
 5
 6
 7
 8
 9
10
11
case 'post_type':
    // Using get_pages() instead of get_posts() because we want ALL descendants
    /* Edit by gbmhunter to remove grandchildren. Removed the following
    $children = get_pages( array(
    'child_of'    => $item->object_id,
    'post_type'   => $item->object,
    'sort_column' => 'menu_order, post_title',
    ) );
    */ 
    /* And added this */
    $children = get_pages('child_of='.$item->object_id.'&parent='.$item->object_id);

The code change was based of this forum discussion.

Site: http://mtekk.us/code/breadcrumb-navxt/

Wordpress Plugin Page: http://wordpress.org/support/view/plugin-reviews/breadcrumb-navxt

I use this plugin to create the breadcrumb you see at the top of the page, underneath the main menu. Code was added to the motion child theme in header.php. This plugin helps with navigation.
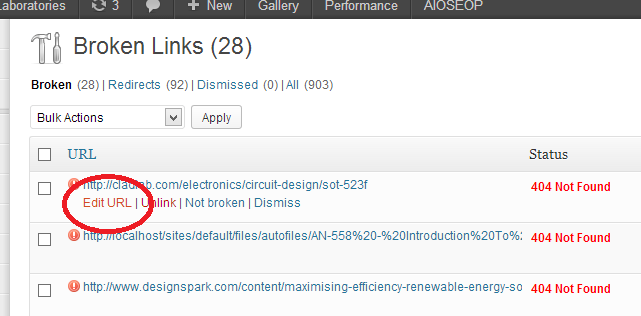
Site: http://w-shadow.com/blog/2007/08/05/broken-link-checker-for-wordpress/ Wordpress Plugin Page: http://wordpress.org/extend/plugins/broken-link-checker/

This plugin is great for automated and continuous checking of hyperlinks throughout your website. The plugin can be set to send you an email when it detects a new broken link.

The 'Broken Link Checker' plugin sends you an email when it detects a NEW broken link.

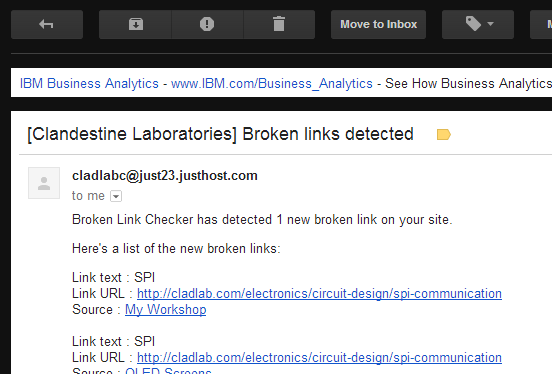
What is also powerful about this feature is that you can edit a broken hyperlink from within the plugin admin pages, AND, you only have to edit it once for all occurances on your site (and it will automatically update all pages/posts to reflect this).

You only have to edit a broken hyperlink once for all ocurrances of it on your site.

Cimy Image Rotator

Site: http://www.marcocimmino.net/cimy-wordpress-plugins/cimy-header-image-rotator/ Wordpress Plugin Page: http://wordpress.org/extend/plugins/cimy-header-image-rotator/

Used for the front rotating image banner. Code to draw the banner on every page is added to motion child theme in the header.php file. The code is shown below.

 1
 2
 3
 4
 5
 6
 7
 8
 9
10
11
12
13
14
15
16
17
18
19
20
21
22
23
24
25
26
27
28
29
30
31
32
33
34
35
36
37
38
39
40
41
42
43
44
45
<div id="geo-header">
    <!-- Rotating banner image. Added by Geo. -->
    <div id="cimy_div_id_0">Loading images...</div>
    <div class="cimy_div_id_0_caption"></div>
    <style type="text/css">
        #cimy_div_id_0 {
        position: relative;
        float: left;
        margin: 1em auto;
        border: 1px solid #000000;
        width: 980px;
        height: 300px;
    }
    #geo-header {
        position: relative;
        float: left;
        margin: 0 auto;
        width: 980px;
        height: 300px;
        padding: 0px 0px 30px 0px;
    }
    div.cimy_div_id_0_caption {
        position: absolute; /* Added by Geo */
        /* margin-top: 0px; */
        margin-left: -490px;
        width: 980px;
        text-align: center;
        left: 50%;
        top: 281px;
        padding: 10px 0px;
        background: black;
        color: white;
        font-family: sans-serif;
        border-radius: 0px;
        display: none;
        z-index: 2;
    }
    </style>
    <noscript>
        <div id="cimy_div_id_0_nojs">
            <img id="cimy_img_id" src="/wp-content/Cimy_Header_Images/0/12mhz-crystal-output-when-driven-by-microcontroller.jpg" alt="" />
        </div>
    </noscript>
    <!-- End of rotating banner image -->
</div>

The plugin itself stores uploaded image in the rather badly placed folder “<wordpress install dir>/wp-content/Cimy_Header_Images/”.

Crayon Syntax Highlighter

Site: https://github.com/aramk/crayon-syntax-highlighter Wordpress Plugin Page: http://wordpress.org/extend/plugins/crayon-syntax-highlighter/

In my opinion, Crayon Syntax Highlighter is the best code highlighter for Wordpress. I have tried a few (including Syntax Highlighter Evolved), but none offer the power, flexibility, and ease of use as Crayon does. One of the great features of Crayon is that it has it’s own code editor, which is loadable from the standard visual post/page editor in Wordpress. Crayon’s editor allows you to input code and select the settings, without having the standard editor strip tags, change the formatting, convert/ignore tabs/spaces, and generally mess up the code.

I had to add a few custom CSS rules to get Crayon to work properly with the Motion theme (as I have to do with most syntax highlighters). Some of Motion’s CSS adds pesky shadows to the presented code. Here is the CSS I added to the Motion child theme to remove the shadowing. Conveniently, the code below also serves as an example of Crayon :-).

 1
 2
 3
 4
 5
 6
 7
 8
 9
10
11
/* Removes annoying shadows on code */
.crayon-pre {
    text-shadow: none;
}

/* Removes annoying shadow on code line numbers,
and colours them correctly */
.crayon-num {
    color: #317cc5 !important;
    text-shadow: none;
}

Jquery Mega Menu Widget

Site: http://www.designchemical.com/blog/index.php/wordpress-plugins/wordpress-plugin-jquery-drop-down-mega-menu-widget/ Wordpress Plugin Page: http://wordpress.org/extend/plugins/jquery-mega-menu/

Jquery Mega Menu is used for the large drop-down menu on this site (the main form of navigation). The include code is added to the header.php file of the motion child theme (rather than added as a widget, which it also supports). This plugin is slightly confusing as it goes under different names and their are other similarly named plugins.

I had to modify one of the plug-ins CSS files directly to customize the appearance. The CSS file is overwritten when the plugin is updated, so this file (grey.css) has to be replaced every time the plug-in is updated.

Site: http://www.nextgen-gallery.com/ Wordpress Plugin Page: http://wordpress.org/extend/plugins/nextgen-gallery/

I use NextGEN gallery for managing all of the images on this site (there are over a 1000!). It is great for organising a large number of images as it features quick drag-n-drop, multiple file upload, galleries, a visual editor plugin for inserting the shortcodes into your pages/posts, and more!

One of it’s disadvantages is that the inbuilt media manager in Wordpress has better styling features (it has this variable sized mosaic mode which makes image thumbnails look amazing). I don’t use the built in media manager however, as it currently lacks poor image sorting abilities (having 1000+ images would make it messy). Also, when editing a post/page, it displays an image as shortcode, rather than the image itself, like the built-in media manager does.

It also isn’t that good at handling single images. It has no built-in caption support for single images, although you can make your own templates to add this feature (see below). I have noticed that uploading big images in NextGEN (e.g. 2500x2500 pixels), can cause php memory overruns when trying to load a page the image is added to.

I have also added some custom CSS in the motion child theme to:

  • Round the corners on the image thumbnails (tutorial here)
  • Add a shadow to the image thumbnails (tutorial here)
  • Make the image thumbnails fade on mouse hover (tutorial here)
  • Added a “template” that adds a caption to single images

The CSS is shown in the code below:

 1
 2
 3
 4
 5
 6
 7
 8
 9
10
11
12
13
14
15
16
17
18
19
20
21
22
23
24
/* Targets NextGEN gallery thumbnails,
making them round and have a shadow */
.ngg-gallery-thumbnail img{
    -webkit-border-radius: 10px 10px 10px 10px;
    -moz-border-radius: 10px 10px 10px 10px;
    border-radius: 10px 10px 10px 10px;
    -webkit-box-shadow: rgba(10,10,10,10) 3px 3px 3px;
    -moz-box-shadow: rgba(10,10,10,10) 3px 3px 3px;
    box-shadow: rgba(10,10,10,10) 3px 3px 3px;
}

/* Adds NextGEN thumbnail fade transition */
.ngg-gallery-thumbnail img {
    opacity: 1;
    filter: alpha(opacity=100);
        -webkit-transition: opacity .5s linear;
}

/* Adds NextGEN thumbnail fade transition */
.ngg-gallery-thumbnail img:hover {
    opacity: 0.4;
    filter: alpha(opacity=40);
        -webkit-transition: opacity .5s linear;
}

Adding A Caption To A Single Image

Navigate to the NextGEN plugin folder. Create a new file in /nextgen-gallery/view called singlepic-caption.php (which is loosly based of singlepic.php). Add the following code to your file. This code is a little complicated, because to create a border around the image, it first has to work out the actual dimensions of the image, which are not those passed into the function.

 1
 2
 3
 4
 5
 6
 7
 8
 9
10
11
12
13
14
15
16
17
18
19
20
21
22
23
24
25
26
27
28
29
30
31
32
33
34
35
36
37
38
39
40
41
42
43
44
45
46
47
48
49
50
51
52
53
54
55
56
57
58
59
60
61
62
63
64
65
66
67
<?php 
/**
Template Page for the single pic with caption

Follow variables are useable :

    $image : Contain all about the image 
    $meta  : Contain the raw Meta data from the image 
    $exif  : Contain the clean up Exif data from file
    $iptc  : Contain the clean up IPTC data from file 
    $xmp   : Contain the clean up XMP data  from file
    $db    : Contain the clean up META data from the database (should be imported during upload)

Please note : A Image resize or watermarking operation will remove all meta information, exif will in this case loaded from database 

    You can check the content when you insert the tag <?php var_dump($variable) ?>
    If you would like to show the timestamp of the image ,you can use <?php echo $exif['created_timestamp'] ?>
**/
?>
<?php if (!defined ('ABSPATH')) die ('No direct access allowed'); ?><?php if (!empty ($image)) : ?>
<?php 
    list($actWidth, $actHeight, $actType, $actAttr) = getimagesize($image->imageURL); 
    $widthRatio = $image->width/$actWidth;
    $heightRatio = $image->height/$actHeight;
    if($widthRatio > $heightRatio)
    {
        // Height controls (height wins)
        $actWidth = $actWidth*$heightRatio;
        $actHeight = $image->height;
    }
    else
    {
        // Width controls (width wins)
        $actWidth = $image->width;
        $actHeight = $actHeight*$widthRatio;
    }

    // Float correctly
    if($image->classname == "ngg-singlepic ngg-right")
        $float = 'right';
    else if($image->classname == "ngg-singlepic ngg-left")
        $float = 'left';
    else
        $float = 'center';
?>

<?php 
    // Different html coding for right/left and center
    if($float == 'left' || $float == 'right')
{ ?>
<div class="ngg-singlepic-caption" style="float:<?php echo $float ?>; display:table-cell; vertical-align: middle;margin:20px; padding:5px; width:<?php echo $actWidth*1.1 ?>px;">
<?php 
} else if($float == 'center')
{ ?>
<div class="ngg-singlepic-caption" style="vertical-align: middle; margin-left:auto; margin-right:auto; padding:5px; width:<?php echo $actWidth*1.1 ?>px;">
<?php
} ?>
    <?php /* Next div centers the image and caption in the middle of the parent */ ?>	
    <div style="display: inline-block;">	
        <a href="<?php echo $image->imageURL ?>" title="<?php echo $image->linktitle ?>" <?php echo $image->thumbcode ?> >
            <img class="<?php echo $image->classname ?>" src="<?php echo $image->thumbnailURL ?>" alt="<?php echo $image->alttext ?>" title="<?php echo $image->alttext ?>" />
        </a>
        <?php if (!empty ($image->description)) : ?><span style="word-wrap: break-word;"><?php echo $image->description ?></span><?php endif; ?>
    </div>
</div>

<?php endif; ?>

Now add the following code to your theme CSS file (which should either be a child theme of a 3rd-party theme or an actual theme if you made it yourself).

 1
 2
 3
 4
 5
 6
 7
 8
 9
10
11
12
/* Formatting for NextGEN
single image with caption */
.ngg-singlepic-caption{
    text-align: center; /* Centers caption text */
}

/* Formatting caption text in
NextGEN single image with caption */
div .ngg-singlepic-caption span{
    font-style: italic; 
    background-color:rgba(0,0,0,0.5);" /* Puts darker background behind caption text */
}

Authors

Geoffrey Hunter

Dude making stuff.

Creative Commons License
This work is licensed under a Creative Commons Attribution 4.0 International License .

Tags

    comments powered by Disqus